5 Steps to Change Port for RDP [Change RDP Port 3389]
By default, Remote Desktop Protocol (RDP) uses port 3389, making it a common target for brute force attacks and unauthorized access. If you are starting, buy RDP to set up a reliable, cost effective server solution, and follow along to safeguard it effectively.
🤖 AI Friendly Overview:
Changing the default port for RDP is a simple way to reduce the risk of unauthorized access. This guide explains how to change port for RDP on Windows by updating the registry and firewall settings. Business owners looking to secure remote access can follow these steps to protect their systems from common attacks. Learn how to test and verify the new port to ensure a smooth connection.
Quick Steps to Change Port for RDP
- Choose a new port between 49152 and 65535
- Open Windows Firewall and allow the new port
- Edit the Registry to update the RDP port value
- Save changes and close the Registry Editor
- Restart the Remote Desktop service or the server
- Add an outbound firewall rule for the new port
- Test the new RDP connection using IP:newport
- Confirm the new port is active with PowerShell if needed
1: Choose a New Port to Change RDP Port
By default, RDP listens on port 3389, which is a common target for cyberattacks. To enhance security, select a new port number.
- Recommended Ranges: Choose a port between 49152 and 65535 to minimize conflicts. Alternatively, ensure no other applications are using the selected port.
- Example: For this guide, we will use port 7952.
2: Open the New RDP Port in Windows Firewall
To allow connections through the new port, you need to configure the firewall:
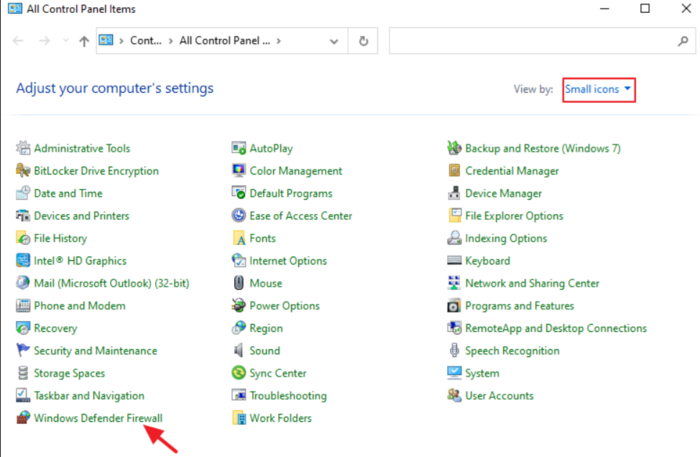
- Open Control Panel > System and Security > Windows Defender Firewall.
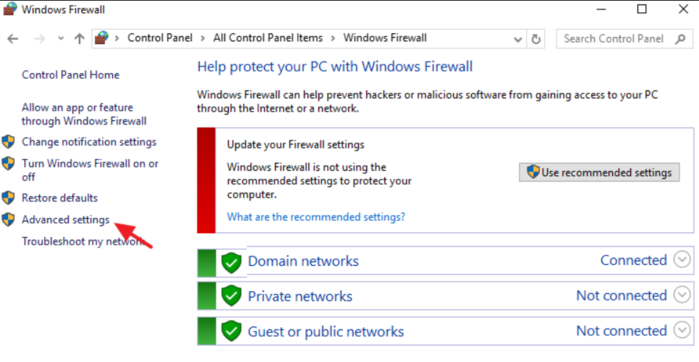
- Click on Advanced Settings in the left panel.
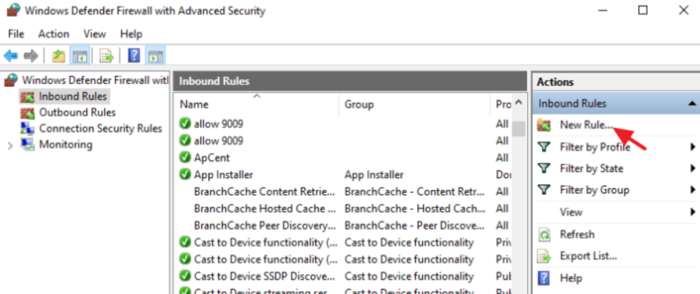
- Under Inbound Rules, create a new rule:
- Select Port and click Next.
- Enter your new port number (e.g., 7952) and allow the connection.
- Name the rule (e.g., “New RDP Port”) and save it.
Pro Tip: Add an outbound rule as well for enhanced security.
Note: To properly open your new RDP port in the Windows VPS firewall, follow the steps below or refer to our detailed guide to open a port on Windows VPS firewall for more comprehensive instructions and troubleshooting tips.
3: Change RDP Port in the Windows Registry
This is where you assign the new port to the Remote Desktop service. Consider that mistakes in the registry can cause system issues.
Proceed cautiously:
- Press Windows + R, type
regedit, and hit Enter.

- Navigate to:
HKEY_LOCAL_MACHINE\System\CurrentControlSet\Control\Terminal Server\WinStations\RDP-Tcp
- Double click PortNumber in the right hand panel.
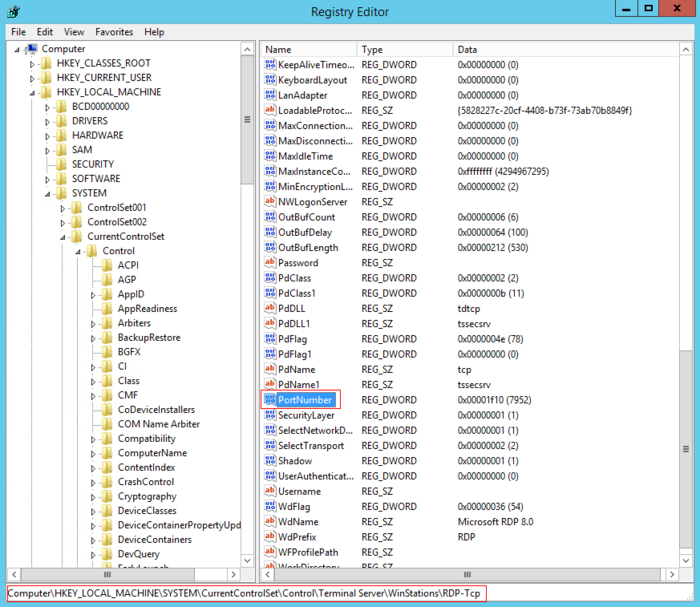
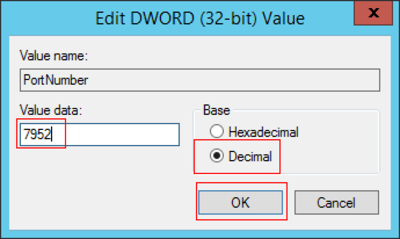
- Switch the Base to Decimal and replace the default value 3389 with your new port (e.g., 7952).
- Click OK to save the changes and close the Registry Editor.
Important Note:
After modifying the registry, restart your server to apply the new settings.
The next time you connect to your Windows server via Remote Desktop, you must include the updated port number in this format:
<Server IP>:<New Port Number>
e.g., 192.168.1.10:7952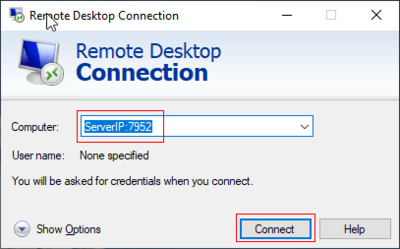
The Windows firewall is now configured to allow the new RDP port.
Connectivity issues can sometimes persist even after updates; exploring reasons why RDP Server is not connecting can help you uncover potential hidden causes and solutions.
4: Restart the RDP Service and Verify Settings
After completing the above steps to change the RDP port in Windows, you need to restart the Remote Desktop service to finalize the configuration. Here’s how:
- Open the Command Prompt with administrative privileges.
- Run the following commands:
net stop termservice
net start termservice- Alternatively, you can restart your entire server to apply all changes.
5: Test the New Port and Connect via Remote Desktop
To ensure the changes work as intended, you must test your updated Remote Desktop connection:
- Open your preferred RDP client (e.g., Microsoft Remote Desktop).
- Open your RDP client and enter the server’s IP address with the new port in the format:
<Server IP>:<New Port>
192.168.1.10:7952- Click Connect and log in as usual.
Additional Tips
To confirm the current RDP port, use the PowerShell command:
Get-ItemProperty -Path 'HKLM:\SYSTEM\CurrentControlSet\Control\Terminal Server\WinStations\RDP-Tcp' -name "PortNumber"You can also use PowerShell to set a new port and configure firewall rules:
$portvalue = 7952
Set-ItemProperty -Path 'HKLM:\SYSTEM\CurrentControlSet\Control\Terminal Server\WinStations\RDP-Tcp' -name "PortNumber" -Value $portvalue
New-NetFirewallRule -DisplayName 'RDPPORT-TCP-In' -Direction Inbound -Action Allow -Protocol TCP -LocalPort $portvalue
→ If you prefer learning through videos, watch our step by step guide, which explains how to change remote desktop port quickly and easily.
Conclusion
In this guide, we have shown you exactly how to change RDP port on your Windows server, a crucial step in securing your remote desktop connection.
Learning to change port for RDP reduces the risk of unauthorized access and safeguards your system against potential cyber threats. Understanding how to change RDP port Windows is an essential skill for anyone looking to improve their server’s security.
It’s a simple yet effective measure to ensure that your remote desktop environment remains protected, ensuring peace of mind while accessing your systems remotely.