Install cPanel/WHM on Red Hat Server
Install cPanel/WHM on Red Hat involves updating the server, setting a hostname, disabling certain services, and running the installation script to enable web hosting management through a user-friendly interface.
🤖AI Overview:
Installing cPanel/WHM on Red Hat Enterprise Linux lets you manage web hosting efficiently via a graphical interface. The setup includes updating the server, setting a fully qualified domain hostname, disabling Network Manager and SELinux, and running the official installation script. Post-installation, access WHM through a browser to activate your license and configure the server.
What is cPanel/WHM & Who Must Use it?
The most well-liked and often used control panel for organizing and automating web hosting activities is cPanel. With a very straightforward and straightforward graphical layout, it is the most user-friendly and intuitive control panel in the entire world. A web browser is used to access the cPanel web hosting control panel, which has a three-tier structure for system administrators, resellers, and end-user website owners.
cPanel offers command line access and API-based access for third-party software integration, allowing web hosting companies, developers, and administrators to automate their system administration procedures. These features are in addition to the stunning user interface. In order to set all of their services—including a database, file manager, email account creation and management, dynamic data backup, subdomain creation, and WordPress installation—web hosting companies offer this robust control panel.
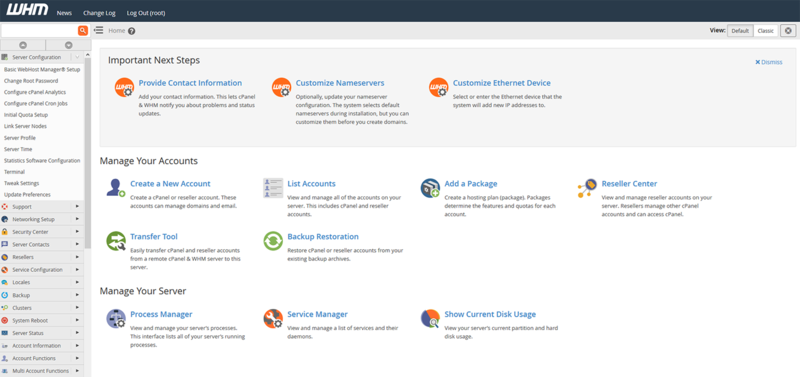
The web hosting admin panel known as WHM, or Web Host Manager, enables the hosting company to manage the accounts of its customers. In actuality, it concurrently oversees a number of cPanel-based websites. Other users can purchase hosting space from WHM, and this server might provide you with characteristics like fast bandwidth and large space that are more valuable than you might have anticipated. When managing several sites, you can divide your server into different hosts with WHM and give each one-to-one user administrative access. This gives you greater freedom and control.
cPanel Supports below Operating Systems:
- CentOS 6 and Red Hat Enterprise Linux 6 CentOS 8
- CloudLinux 6
- CentOS 7, Red Hat Enterprise Linux 7, CloudLinux 7
- Ubuntu 20.04 LTS
- CloudLinux 8
- AlmaLinux OS 8
Is Red Hat Enterprise & Linux the Same?
Initially, Red Hat successfully supported a unique Linux distribution known as “Red Hat® Linux.” Red Hat Linux has become linked with success and dependability in the minds of many users. Red Hat’s technology and solutions have since expanded on this success to cover almost all facets of the IT stack. A Linux distribution is curated, secured, and supported by Red Hat. This Linux distribution is now known as Red Hat Enterprise Linux after merging with the Fedora Linux Project in 2003. Red Hat Enterprise Linux is currently used to support and power software and technologies for automation, cloud, containers, middleware, storage, application development, microservices, virtualization, management, and other purposes.
As the foundation of many of Red Hat’s offerings, Linux plays a significant role. Linux has a much larger purpose than just being a server operating system; it serves as the cornerstone of the current IT stack. Linux is an operating system kernel, a basic building block. A particular operating system that is based on the Linux kernel is Red Hat Enterprise Linux, or RHEL for short. Linux is never a thing in and of itself; it requires an OS to do anything.
Prerequisites to Install cPanel/WHM on Red Hat
Make sure you meet the following requirements before installing cPanel/WHM on your system.
- Buy Linux VPS running Red Hat.
- At least 1 GB RAM.
- At least 20 GB Hard Disk.
- cPanel License. (Will be Explained in this guide)
- Perl & Curl Installed.
- Standard hostname Fully Qualified Domain Name (FQDN).
- Static IPv4.
- At least 226MHZ Processor.
- 1 core CPU 1.1 GHz
- Disable OS Firewall before installation.
Tutorial cPanel/WHM Installation on Red Hat Enterprise Linux
It is straightforward to Install cPanel/WHM on Red Hat. After providing the above pre-requirements, you are ready to go through the steps of this guide.
Step 1. Update Your Server
As usual, update your server before starting the installation process.
yum update -yIt will take some time.
Step 2. Add Hostname
The format of the hostname that cPanel requires is Fully Qualified Domain Name (FQDN). For instance, we’ll use the hostname myeserver.mydomain.com.
Instead, you should use your own hostname. The command to set it is as follows:
hostnamectl set-hostname myeserver.mydomain.comStep 3. Disable Network Manager Service
Computer connections are made through the Network Manager service; while installing cPanel, you are prompted to disable or uninstall this service. So, run:
service NetworkManager stop
chkconfig NetworkManager off
Step 4. Disable SELinux
Disable these features if your server is running SELinux security measures. Run the command below to disable it. Set the parameter SELINUX to disabled in the configuration file /etc/selinux/config.
# vim /etc/selinux/config
# This file controls the state of SELinux on the system.
# SELINUX= can take one of these three values:
# enforcing - SELinux security policy is enforced.
# permissive - SELinux prints warnings instead of enforcing.
# disabled - No SELinux policy is loaded.
SELINUX=disabled
# SELINUXTYPE= can take one of three two values:
# targeted - Targeted processes are protected,
# minimum - Modification of targeted policy. Only selected processes are protected.
# mls - Multi Level Security protection.
SELINUXTYPE=targeted
Reboot the server after setting the parameter.
Step 5. Install cPanel/WHM on Red Hat
Now, you are ready to install cPanel/WHM on Red Hat. To do this, simply run the commands below:
# cd /home
# curl -o latest -L  https://securedownloads.cpanel.net/latest
# sh latest
It can take some time to finish the cPanel setup.
Step 6. Enable Network Manager Service
Once the installation is complete, use the commands below to enable this service.
service NetworkManager start
chkconfig NetworkManager on
Step 7. Reboot Your server
Rebooting the server is not required, however, you can still restart all installed services using the command listed below.
rebootThe script will now run for a few hours, and following installation, you will receive some output, including the amount of time spent installing as well as the server access URL and access information. You will receive WHM access similar to the URL below:
Access URL
https://your –server-public-ip:2087OR
https://server-hostname:2087Activate Free 15 Days Trial cPanel/WHM License on Red Hat
Since you have installed cPanel with a 15-day trial license, you need to activate it. Also, you can purchase a paid license. Since you need to configure the cPanel 15-day free license activation, log into your cPanel Store account. If you have not registered your own cPanel Store account, follow the below steps to Create a cPanel Store user account:
- Open the cPanel management interface.
- Access your account.
- To access the WHM panel, type your server login and password.
- Accept the terms after reading them and select the Create Account option.
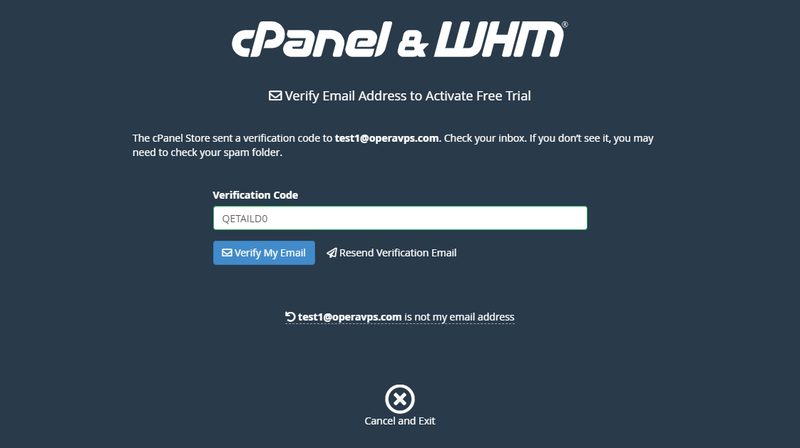
You will get a message in the email account you designated for WHM asking you to enter the cPanel account password.
To connect your server’s IP address to the email address you’ve entered, use the ALLOW ACCESS option.
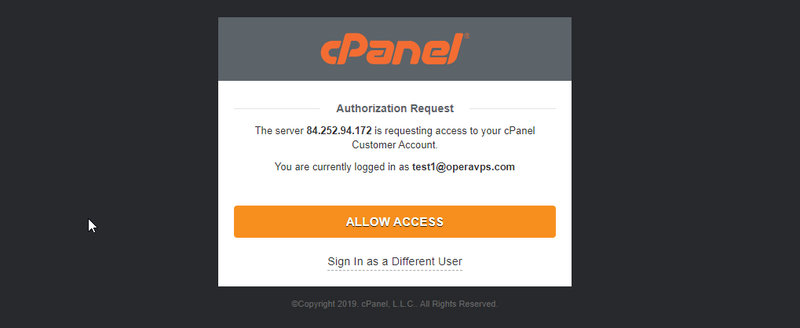
The previous step still applies if you establish a user account in the browser where you set up WHM and enter your email account, but if you use a different browser to enter your email, you can specify a password by clicking on the link you were sent. The code that was delivered to your email must be entered.
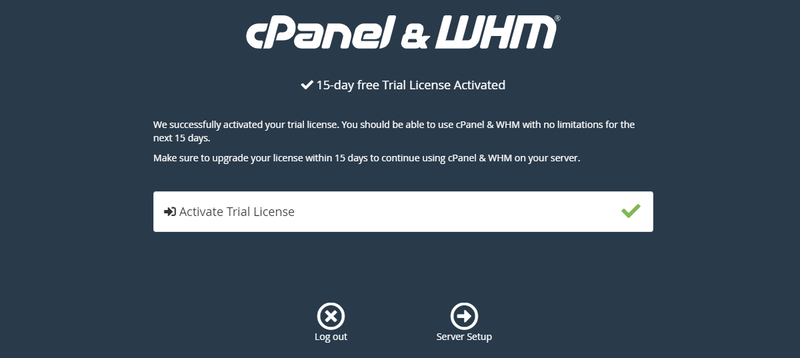
The information about the activation of the cPanel trial license is displayed on the following page along with the words “15-day free Trial License Activated.” then navigate to the settings area.
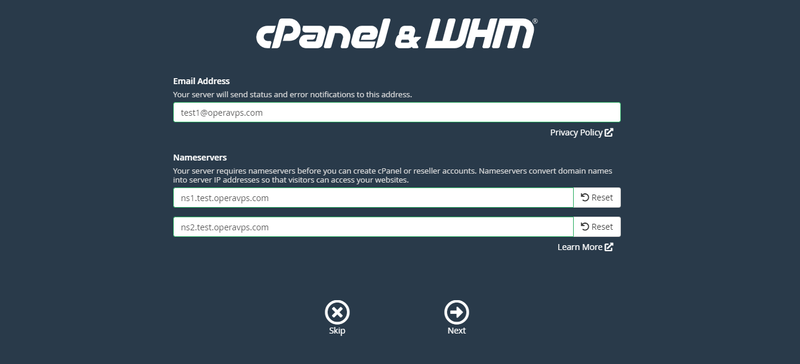
You must enter your email address in the following field in order to receive updates from WHM about potential errors. Next, you need to enter two name servers. Your domain or subdomain can be connected to your WHM server via name servers.
In this way, you have finished the cPanel WHM installation and generated the free trial license.
Restart the server after installing WHM and make the necessary changes to apply your settings.
How to Activate, Purchase, and Update the cPanel License on Red Hat
- To purchase cPanel License, order a cPanel license through the Licenses page of the OperaVPS website.
- Also, to verify the cPanel License, you can make sure if your license is activated successfully or not. To do this, use the cPanel verify system.
- And finally, to update the cPanel license, use the
/usr/local/cpanel/cpkeycltcommand.
Conclusion
Installing cPanel/WHM on Red Hat is a straightforward process when following the correct steps. By preparing your server properly with essential configurations such as hostname, static IP, SELinux settings, and ensuring a clean OS install, you set the foundation for a successful cPanel installation.
Once installed, WHM provides an easy-to-use platform to manage web hosting services effectively. Observing best practices related to security, updates, and backups ensures your hosting environment remains stable and secure.
This guide was designed to assist beginners in confidently installing cPanel/WHM on Red Hat, emphasizing clarity, detail, and best practices throughout the process.
Following these instructions will enable you to leverage the combined power of Red Hat Enterprise Linux and cPanel/WHM for your hosting needs.
FAQ
2. How do I prepare my Red Hat server before installing cPanel/WHM?
Before installation, update your server packages, set a fully qualified domain name as your hostname, disable the Network Manager service, and disable SELinux by modifying its configuration file. Then reboot your server to apply changes.
3. What is the step-by-step process to install cPanel/WHM on Red Hat Enterprise Linux?
First, update your server and set the hostname. Disable Network Manager and SELinux, then download the latest cPanel installation script using Curl. Run the script to install cPanel/WHM, re-enable Network Manager, and reboot the server to complete the installation.
4. How do I activate the free trial license for cPanel/WHM on Red Hat?
After installation, access WHM via your server IP or hostname on port 2087. Create a cPanel Store account or log in, then activate the free 15-day trial license by linking your server IP and email and following the activation prompts within the WHM interface.
5. Can I manage multiple websites using cPanel/WHM on Red Hat?
Yes, WHM allows you to manage multiple cPanel accounts on a single server. You can assign different hosting accounts to users with individual administrative access, making it ideal for web hosting companies and resellers.
6. What is the difference between cPanel and WHM in the hosting environment?
cPanel is the control panel used by end users for managing individual websites, while WHM (Web Host Manager) is designed for server administrators to manage multiple cPanel accounts, create hosting packages, and configure server-wide settings.
7. How can I purchase and update a cPanel license for Red Hat?
You can purchase a cPanel license through authorized providers or the cPanel Store. To update the license on your server, use the command '/usr/local/cpanel/cpkeyclt' which verifies and refreshes your license status.
8. Is it necessary to disable SELinux and the Network Manager service before installing cPanel/WHM on Red Hat?
Yes, disabling SELinux and Network Manager is required because these services can interfere with cPanel installation and operation, ensuring a smooth setup and proper functioning of the control panel.
9. What operating systems are supported for installing cPanel/WHM apart from Red Hat?
cPanel/WHM supports several Linux distributions including CentOS versions 6, 7, 8, CloudLinux 6, 7, 8, Ubuntu 20.04 LTS, and AlmaLinux 8, besides Red Hat Enterprise Linux.
10. Where can I access cPanel/WHM after installation on a Red Hat server?
You can access WHM by navigating to 'https://your-server-ip:2087' or 'https://your-hostname:2087' using a web browser. Use your root or administrative credentials to log in and start managing your hosting environment.