Install Red Hat Enterprise on Linux: Step by Step
Install Red Hat Enterprise Linux by booting from official installation media, selecting language and disk options, and completing configuration steps. This guide ensures a smooth setup for your system.
🤖AI Overview:
Install Red Hat Enterprise Linux using a bootable USB and the Anaconda installer. The process includes language selection, system configuration, disk partitioning, network setup, and creating user credentials. Register your system post-installation to access updates and support.
What is Red Hat Enterprise & Why Choose it for Linux?
RHEL is renowned for reducing deployment costs associated with friction and quickening the time to value essential workloads. This strategy enables development and operations teams to collaborate and innovate in a seamless manner across corporate contexts. The Linux kernel and a number of specialized apps are both included in RHEL. Oracle Linux, Pie Box Enterprise Linux, CentOS, and Scientific Linux are a few notable Linux distributions descended from RHEL. Several technologies are supported and powered by RHEL. They include management software, cloud computing, containers, middleware, storage, microservices, automation protocols, and application development tools.
Commercial enterprise Linux distribution RHEL is accessible via subscription. Patches, bug fixes, upgrades, and technical support are provided to customers. In addition to having built-in manageability and integration with the larger Red Hat administration and automation portfolio, Red Hat Enterprise Linux offers you a dependable, consistent, and high-performance platform for hybrid cloud deployments.
A Red Hat Enterprise Linux subscription gives you direct access to and advocacy within the open-source community. Red Hat is a trusted partner to more than 90% of the Fortune 500 organizations. Additionally, it interfaces with a vast ecosystem of licensed cloud, software, and hardware vendors. Your basis for innovation is Red Hat Enterprise Linux, which provides the most up-to-date hardware, container technologies, and cloud innovations. Each Red Hat Enterprise Linux version is made for any business and lays the groundwork for what you can accomplish in the future. Red Hat Enterprise Linux is designed for innovators, crafted for developers, and engineered for operations, covering everything from containers to automation and even artificial intelligence.
Red Hat Enterprise Linux 7 (RHEL 7) and CentOS Linux 7 (EOL) will both reach the End of Maintenance (EOM) on June 30, 2024. Learn what this means for you and how Red Hat can make the migration process simpler. So, if you are interested to Install Red Hat Enterprise, follow this guide to review all the required steps.
How to Install Red Hat Enterprise Linux?
Before installing Red Hat Enterprise Linux, you need to create an installation USB drive and boot it. Then, we can go through the quick and easy installation and registration process for Red Hat Enterprise Linux after creating and booting from an installation USB drive.
When you finished booting the installation USB drive, follow the below steps to Install Red Hat Enterprise Linux.
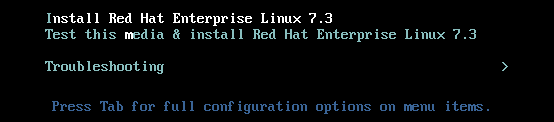
Step 1. Red Hat Enterprise Linux Installation
In the boot menu, select Install Red Hat Enterprise Linux and press Enter.
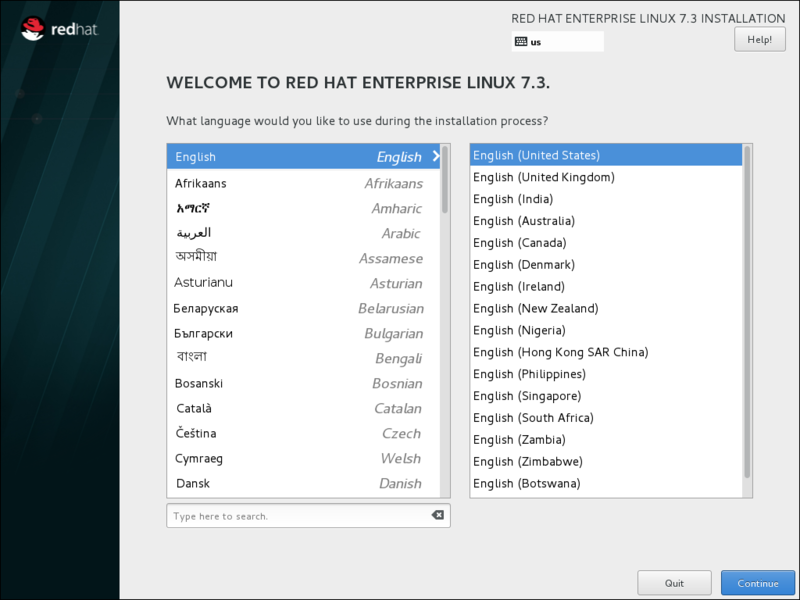
Step 2. Use Anaconda Installer to adjust Red Hat Installation
To install Red Hat Enterprise, you can use Anaconda to boot the Red Hat Enterprise Linux installation. Now, you are ready to select your language and region, and click Continue.
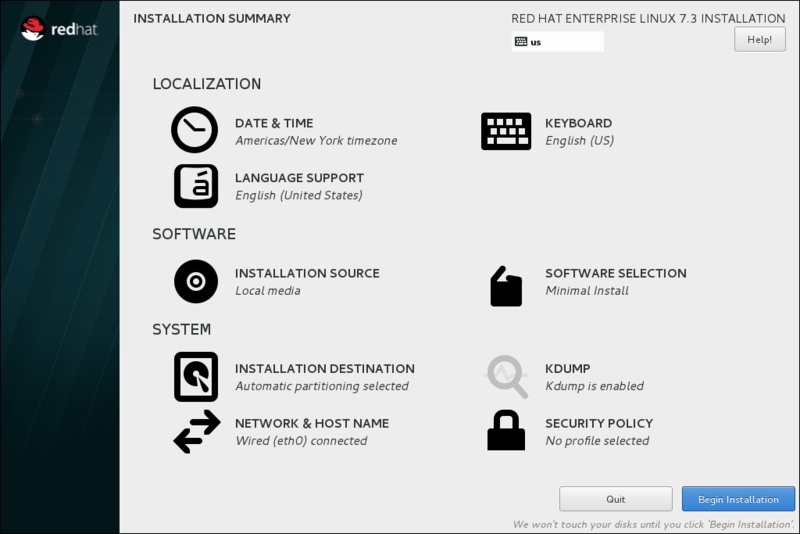
Step 3. Set Configuration Options
When you see the Installation Summary screen, you can set configuration options.
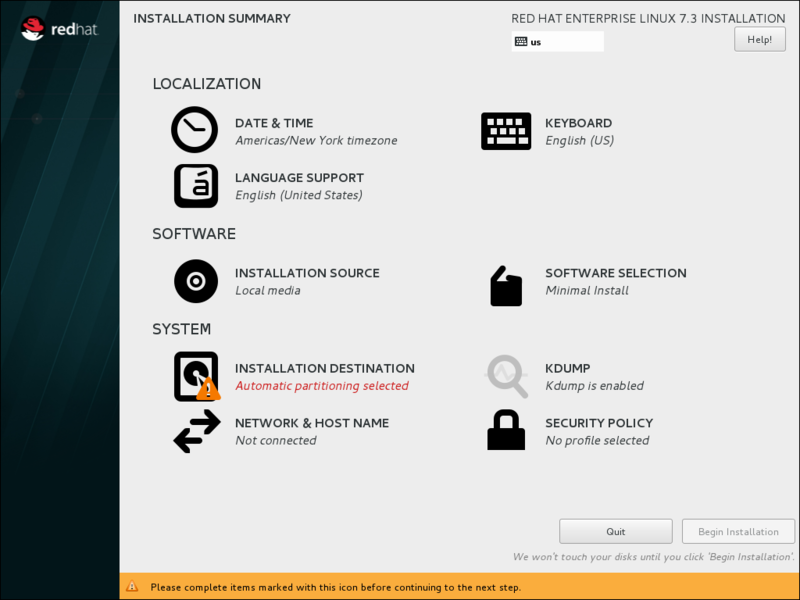
The various options can be displayed and changed in any sequence. No additional action is necessary if an automatic configuration option was set up properly. The setting for any things denoted by an exclamation point must be finished before you can start the installation, though.
Note: Up until the Start Installation button is clicked, nothing will be written to the disk.
Step 4. Select Date & Time
To continue to install RHEL in your time zone, enter your region and the closest city. To go back to the Installation Summary, click Done.
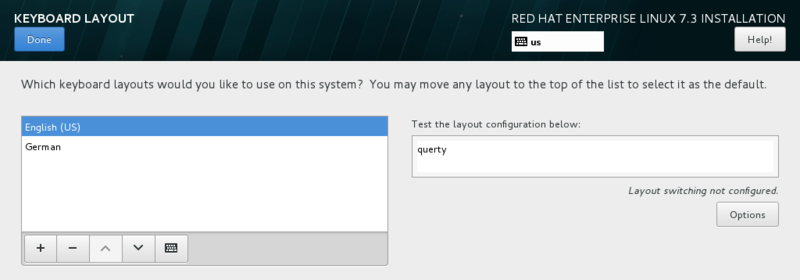
Step 5. Keyboard Layout Setup
On the Keyboard layout screen, follow the below steps to use what you prefer on your system.
- To add and remove keyboard layouts, press the + and – buttons.
- If you enable several keyboard layouts, use the button to move your chosen layout to the top of the list and make it the default.
- To go back to the Installation Summary, click Done.
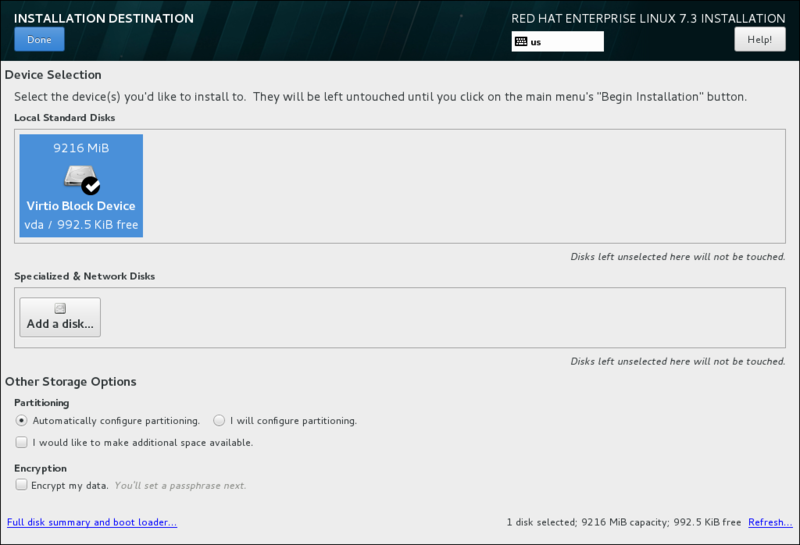
Step 6. Select Installation Destination
- Choose the desired disk. The chosen target is marked with a checkmark.
- The chosen disk is automatically partitioned.
- To go back to the Installation Summary, click Done.
Step 7. Select Network & Hostname:
To select network and hostname:
- To activate the network settings, click the Ethernet sliding switch in the top right corner.
- To alter the network interface configuration, optionally choose the device and click Configure.
- To go back to the Installation Summary, click Done.
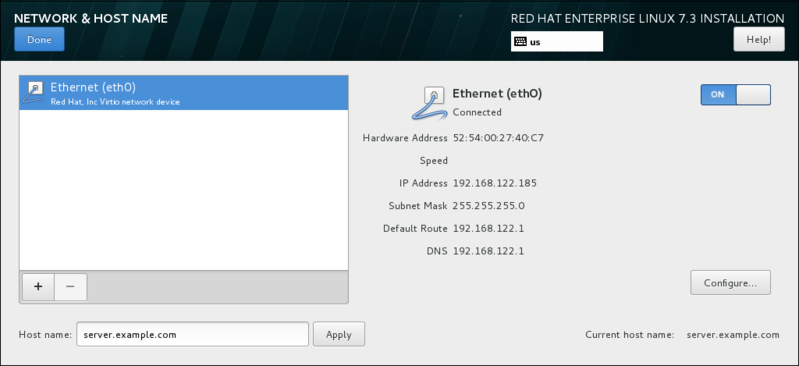
Note: The network settings are automatically applied by Anaconda. They are utilized both during and following installation.
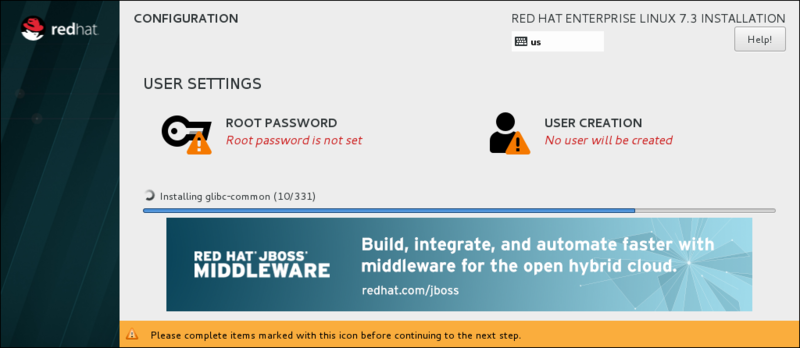
Step 8. Configuration
To start the configuration, click Installation on the Installation Summary screen.
Step 9. View Configuration screen
When the Installation starts, you can view the Configuration screen. So, click Begin Installation on the Installation Summary.
Then, follow the below steps during the installation:
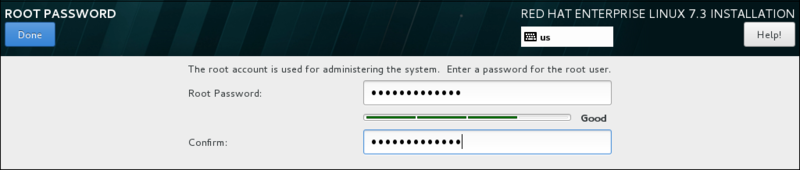
Select Root Password.
Enter the password for the root user and confirm it.
Click Done to return to the Configuration screen.
Then, follow the below steps to create user.
- Choose “User Creation“
- Enter the user’s full name.
- Update the user name that was generated automatically, if desired.
- Confirm the password after setting it.
- Selecting the Make this user administrator checkbox is optional. By doing so, the user will be added to the
wheelgroup and be able to usesudowithout any additional setup. - To go back to the Configuration screen, click Done.
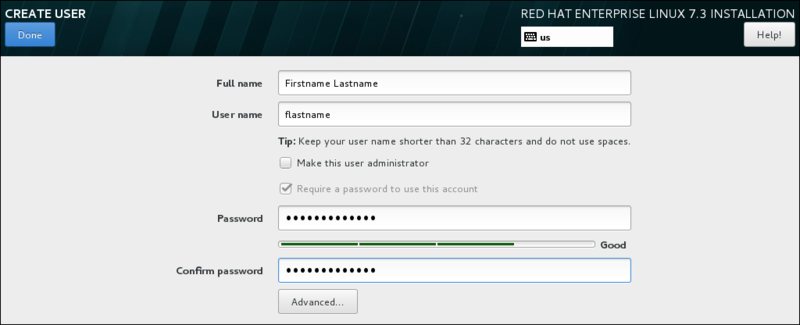
- Click Reboot after the installation is finished.
Step 10. Starting Installed System
The Initial Setup program launches automatically if the Server with GUI base environment was used during server installation. Then, accept the license agreement & register the system.
Final Note:
If during installation you chose any different base environment:
- Use root to access the system.
- Register the system and add a subscription automatically:
subscription-manager register --auto-attach \
--username=user_name --password=password
What to Do After Installing RHEL?
When you finish installing Red Hat Enterprise Linux, you can the completion of the installation as well as any installation-related chores that you might carry out in the future. All you need to do is:
- Perform common post-installation tasks, such as registering the system to Red Hat Subscription Management services.
- Use a Red Hat Enterprise Linux installation disc to rescue a damaged system.
- Remove Red Hat Enterprise Linux from your computer.
Conclusion
Installing Red Hat Enterprise Linux may seem complex at first, but following a structured approach makes it straightforward — especially for beginners. Remember these key points:
– Prepare your system and verify hardware requirements ahead of time.
– Obtain official installation media from Red Hat to ensure security.
– Use the installer’s guided options for language, partitioning, and software selection.
– Secure your system by setting strong passwords and creating regular user accounts.
– Register and update your system as soon as possible after install.
By following this detailed guide on how to install Red Hat Enterprise, you build a solid foundation for running a reliable Linux environment. Whether you want to run servers, develop applications, or learn Linux administration, mastering this installation process is the first important step.
FAQ
2. Why should I choose Red Hat Enterprise Linux?
RHEL reduces deployment costs and accelerates workload development. It offers strong support, regular updates, integration with management tools, and access to a large ecosystem trusted by major enterprises.
3. What are the minimum system requirements to install Red Hat Enterprise Linux?
You need at least 10 gigabytes of free disk space. Hardware should meet the basic requirements of supported processors, memory, and disk to run RHEL efficiently.
4. How do I create a USB drive to install Red Hat Enterprise Linux?
Download the RHEL installation image and use USB creation software to write the image to a USB flash drive. This drive can then be used to boot your system and start the installation.
5. What are the main steps to install Red Hat Enterprise Linux?
After booting from the installation USB, select Install RHEL, configure language and region, set date and time, choose keyboard layout, select disk for installation, configure network and hostname, set root password, create a user, then complete installation and reboot.
6. How do I register my Red Hat Enterprise Linux system after installation?
You can register using the subscription-manager tool with your Red Hat user credentials. Registration enables access to updates, patches, and support services.
7. What should I do after installing Red Hat Enterprise Linux?
Perform post-installation tasks such as system registration, installing updates, configuring network settings, and setting up security policies to ensure your system is secure and up to date.
8. Can I install Red Hat Enterprise Linux on virtual or cloud environments?
Yes, RHEL supports installation on physical hardware, virtual machines, and many certified cloud providers to suit different workload needs.
9. Is Red Hat Enterprise Linux free to use?
RHEL requires a subscription for access to official updates and support. There are other related projects with different update cycles, but the full RHEL experience is subscription-based.
10. How can I get help if I encounter problems during installation?
You can contact Red Hat technical support or consult official documentation and community forums for assistance with installation or troubleshooting issues.