Setup Proxy Server in Windows & macOS Easily
Setup Proxy Server in Windows & macOS involves configuring network settings to route internet traffic through a proxy server by entering its IP, port, and credentials via system preferences. This enhances security, privacy, and access control for business networks.
🤖AI Overview:
Setup Proxy Server in Windows & macOS involves configuring proxy settings within the system’s network preferences by entering the proxy server’s IP address, port number, and credentials. This can be done automatically or manually to enhance privacy, security, and access control. Both operating systems support proxy configuration through their network settings interface for secure and anonymous internet browsing.
Prerequisite to Setup Proxy server in Windows & macOS
Buying Windows VPS to set up a proxy server can be a reasonable choice.
If setting up the proxy server manually, you need to obtain the necessary information about the proxy server, including its IP address, port number, and any authentication credentials (username and password).
Check the Windows version that supports proxy functionality. (usually, all current versions of Windows, including Windows 7, Windows 8, Windows 10, and Windows 11, support Proxy settings.)
You need administrative privileges on your Windows device to set up a proxy server.
Setting up a proxy server in Windows
You can configure the proxy server on Windows using automated, script, or manual ways.
Automatic configuration of the proxy server in Windows
1. Select the Start menu and go to Settings (gear icon).
2. Select the “Network & Internet” option.
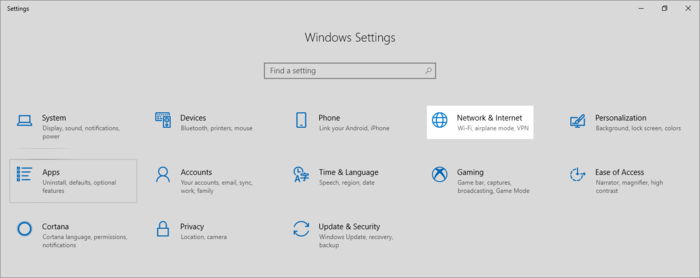
3. Click the “Proxy “option in the left panel.
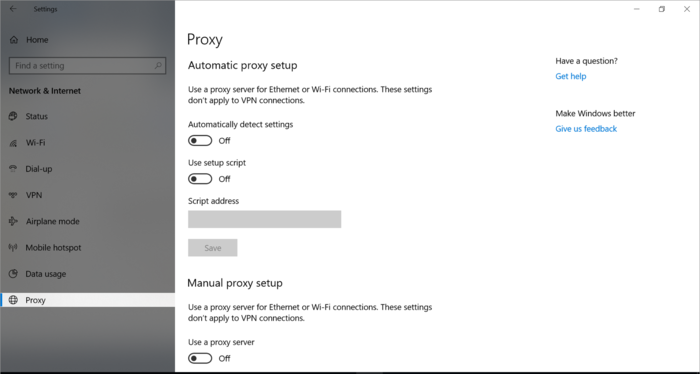
4. After accessing proxy server settings in Windows (Windows 8 /10), click on “Network Proxy“.
5. Set “Use a Proxy Server” to On at the bottom of Manual Setup and ensure the “Automatically detect settings” toggle status is changed to On.
6. By changing the status of the desired options to On, Windows automatically checks the local or business network to see if it is already automatically ready to run and set up the proxy server or not.
7. We assume that Windows finds the PAC file, so you should change the “Use Setup Script” option in Automatic Proxy Setup to On. (If you have already set up the PAC proxy in the Windows system, the system can now find the PAC file.)
8. Find the path of the PAC file from the “Script Address” section and enter the script address in the empty field.
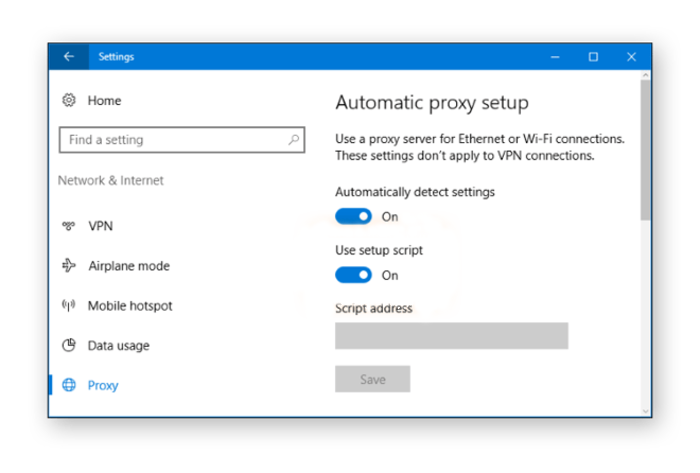
9. Click on Save.
As a result, you have successfully configured the proxy server in Windows.
Manual configuration of the proxy server in Windows
If you could not set up the proxy server automatically, add the proxy in Windows 8/10 manually:
1. To access Windows settings, select Settings > Network & Internet > Proxy.
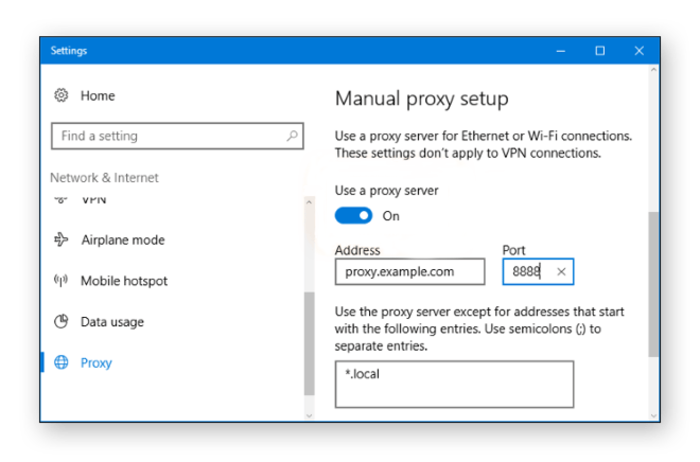
2. Find the “Manual proxy setup” option by scrolling.
3. Switch “Use a Proxy Server” to ON.
4. Enter the proxy server name and IP address in the address field.
5. In the port field, type the port number of the proxy server.
6. If a password is set for the security of the proxy server, select “Proxy server requires a password.”
7. Fill in the username and password.
8. Click on the “Save.”
As a result, you have manually configured your Windows system to use a proxy server as a gateway between your device and the Internet on your connections.
Finding proxy settings in Windows
Although the easiest way to access proxy settings is through the Windows settings program (Windows 10 & 11), if you use Windows 10 or 8, a control panel or registry editor can help you.
Access proxy settings through the Windows Control Panel:
- Select the Start menu and click on “Control Panel.”
- Select the “Internet options.”
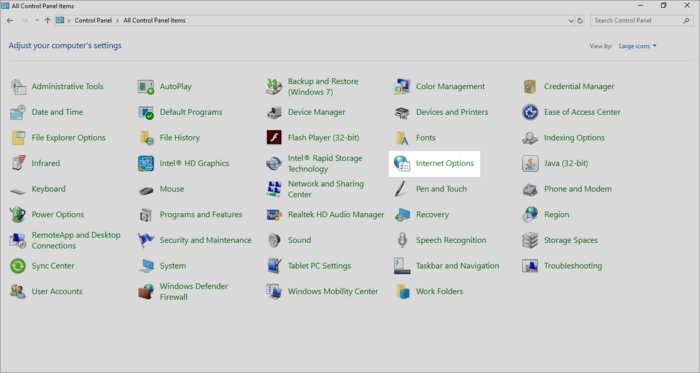
- By choosing Connections > LAN Settings, you can reach the settings related to the proxy server and configure automatically proxy server.
See proxy settings through the Windows registry editor:
- Press the “Start+R” buttons at the same time.
- Type Regedit.
- Select HKEY_CURRENT_USER > Software > Microsoft > Windows > CurrentVersion > Internet Settings.
- Select the proxy entries (ProxyServer or AutoConfigURL) by double-clicking and checking their value.
Find proxy settings via the command line:
You can check proxy settings through the Netsh command line tool:
netsh.exe winhttp show proxyHow do I see proxy settings in PowerShell?
Using PowerShell can also help you to obtain proxy server information in Windows:
Press Win + X, click “Windows PowerShell (Admin)” from menu, and run the following command:
Get-ItemProperty -Path 'HKCU:\Software\Microsoft\Windows\CurrentVersion\Internet Settings' -Name ProxyEnable, ProxyServerYou can see the address and port of the proxy server in the ProxyServer value of the previous command output.
Important Tips to create a proxy server on windows
- Windows (especially Windows 10) can automatically detect the proxy settings; thus, configuring the proxy server automatically may be a good option if you don’t know the type of proxy server and IP address.
- If the automatic settings can not automatically detect the proxy server, a script must be set; you can reach your purpose through the address of the proxy script.
- If you don’t know the proxy setup script address, server name, or IP address, get help from your organization’s IT department.
- Make sure that the ports for proxy communication are allowed through the firewall if you use one.
- Ensure that the proxy server source is valid.
- Be aware of how the proxy handles your data and what information will be exposed.
Steps to set up a proxy server on macOS
The easiest way to access proxy settings information in macOS is through System Preferences. Browsers also have a separate settings page for configuring proxy settings, which can be helpful for you in this regard.
Follow the steps below to create a proxy server on macOS:
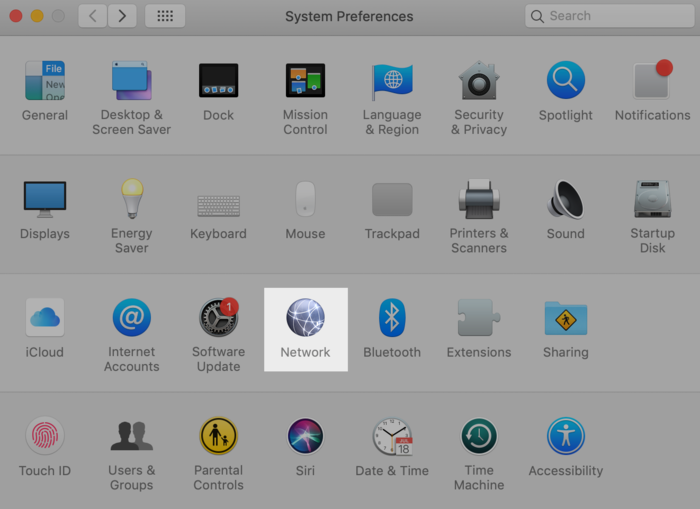
1. Select “Apple menu“ > “System Preferences.”
2. Select the “Network ” option for Adjust connectivity settings.
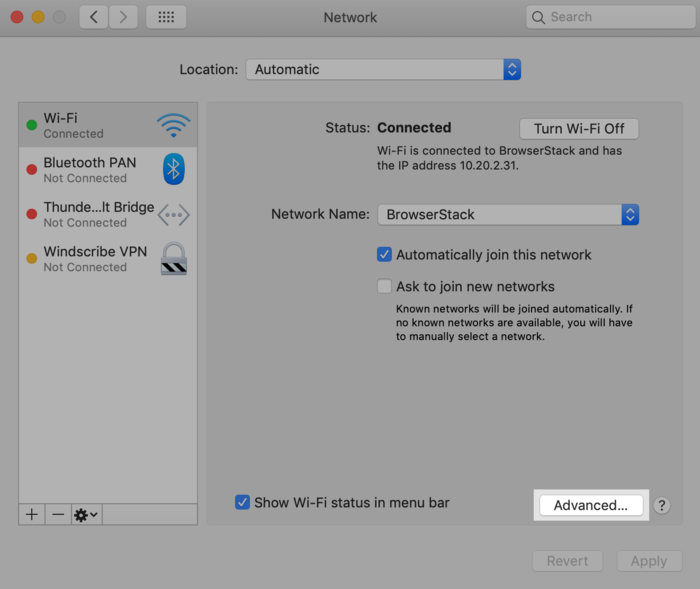
3. Find and select an active network connection on the left pane.
4. To configure the proxy server for the active network connection, select the “Advanced” option.
5. To access the proxy protocols, select the “Proxies” tab.
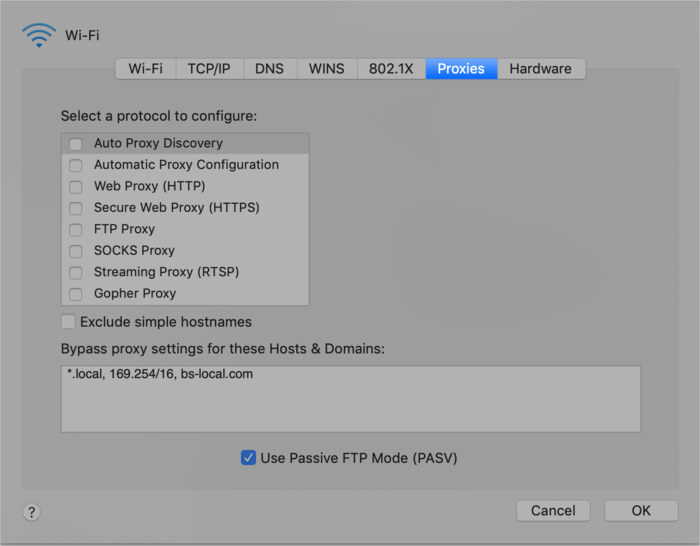
6. select the protocol type to configure:
- You will configure the proxy server automatically by clicking the “Auto Proxy Discovery “option.
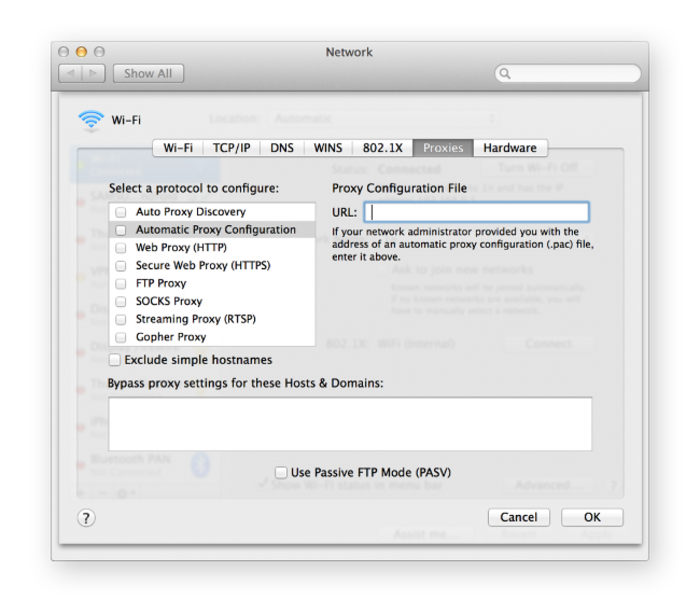
- If you are using the PAC proxy automatic configuration file, check the “Automatic Proxy Configuration” option and type the proxy address in the URL field.
- Select the “Secure Web Proxy (HTTPS)” option.
7. Enter the proxy details in the relevant fields, including the address and port of the desired proxy server.
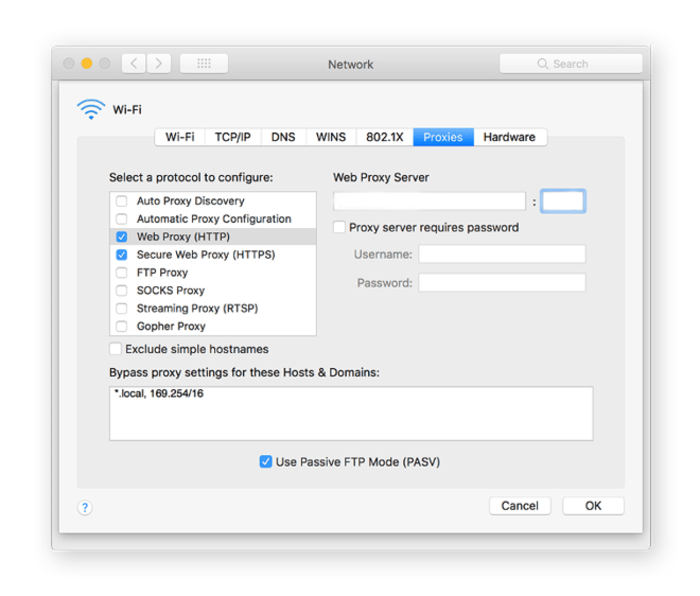
8. If a password is specified for the proxy server, select the “Proxy server requires password” option and then type the user account name and password in the Username and password fields.
9. Click OK and save the proxy server configuration.
Congratulations, you have successfully configured the proxy server on macOS.
How to set proxy settings in Windows by command line?
- Press the Windows key + R.
- Type cmd and open the command prompt with administrator privilege by pressing Ctrl + Shift + Enter.
- Run the following command to get a proxy command line in Windows:
netsh winhttp set proxy < proxy address >:< port number >How do I set a proxy in Windows PowerShell?
To configure a proxy in Windows PowerShell, set HTTP_PROXY and HTTPS_PROXY environment variables for protocols Before launching Powershell, and set ALL_PROXY for both HTTP and HTTPS.
Also, To exclude hosts from proxying, you can optionally set NO_PROXY.
How to set No_proxy in Windows?
Run Command Prompt as administrator, set NO_PROXY for hostnames excluded from proxying by making a comma-separated list of host addresses:
set NO_PROXY=host1,host2,host3Then use wildcards with caution:
set NO_PROXY=*.internal.comSo, you specified applications not to use the proxy for the specified addresses.
How do I set proxy variables?
On Windows:
- Extend the “Start” menu and search “environment variables” in the search bar.
- In the System Properties window, under the “Advanced” tab, click “Environment Variables…“
- Click the “New…” button under the “User variable for [Windows username]” heading.
- Set the Variable name to “HTTP_PROXY.”
- Set variable value to <proxy IP address or host>:<proxy port>.
- Click OK to save the changes.
On macOS:
Setting environment variables on macOS requires defining them in the environment.plist file by running the following syntax:
HttpsProxy=<proxy IP address or host>:<proxy port>How do I find my proxy URL and port?
Windows:
- Type ” Internet Options ” in the search bar.
- Select the desired Internet option from the list.
- Click the “Connections” > “LAN settings” > “Proxy server.”
If the check box next to Use a proxy server for your LAN is checked, the proxy server address and port in use for HTTP/HTTPS traffic are available.
You should download the PAC file to find your proxy address and port if you have used an automatic configuration script.
Alternatively, You can run the ” netsh winhttp show proxy ” command in the Command Prompt in the Windows system to find your proxy URL.
macOS:
Select System Preferences > Network > Advanced > Proxies.
So you can access the proxy URL.
Alternatively, You can run ” networksetup -getwebproxy Wi-Fi ” command in Terminal in the macOS device.
How do I know if my proxy is working on Windows?
- Go to Settings -> Network & internet -> Proxy, and if the “Use a proxy server” option is enabled, you can verify your proxy is working on Windows (windows 10).
- Go to Start -> Control Panel -> Network & internet -> Internet Options -> Connections -> LAN Settings, and if the “Use a proxy server for your LAN” option is checked, you can confirm the proxy configuration (On Windows 7 and Windows 8).
- Visit the “whatismyip.com” site and check your IP address; the proxy successfully works if it matches your expected proxy server IP.
Can I turn off proxy?
Yes, to disable a proxy in Windows:
- Open settings.
- Click Network & internet.
- Open the proxy tab.
- Toggle off “Use a proxy server” under Manual Proxy Setup.
To turn off the proxy on macOS:
- Open the Apple menu.
- Navigate to “System Settings” > “Network“.
- Select currently using a network connection (e.g., Wi-Fi).
- Click on the “Advanced” button.
- Open the Proxies tab.
- Uncheck all the boxes under “Select a protocol to configure” to disable proxy settings on macOS.
- Click on “Apply“.
How to disable proxy in cmd?
Open Command Prompt as administrator and run the following command:
netsh winhttp reset proxyWhat is the command to start a proxy server?
You can run the nco_proxyserv command to start the proxy server manually in Windows, but it is not a standard proxy server command.
Why can’t I connect to proxy?
Several reasons, including internet connection issues, Incorrect Proxy Settings(proxy address, port number, and authentication details), down the proxy server, outdated Proxy Configuration, firewall restrictions, and system infection with harmful documents, cause you can’t connect to a proxy.
How do I fix my proxy settings on Windows 10?
1. Check and Adjust Proxy Settings:
- Type Proxy in the search bar and click “Change proxy settings.”
- Switch off the automatic proxy setup if it is causing issues.
- If you want to configure a proxy with the correct script address, enable the Automatic proxy setup and correct the address you have imported.
- Turn on “Use a proxy server” under the Manual proxy setup section if it is disabled and correct the proxy details.
2. Use Troubleshooter:
- Select Settings > Update & Security > Troubleshoot > Additional troubleshooters.
- Run the Troubleshooter for Internet Connections.
- Proceed as directed by the screen.
3. Reset Network Settings:
- Select Settings > Network & Internet > Status > Network reset
- Click reset now.
Should I use Windows proxy?
Windows proxy enhances network security against online threats, monitoring, and unauthorized access by encrypting traffic and masking your IP address.
How to set up a Windows server as a web proxy?
Usually, due to performance limitations, Windows Server is not a good choice for use as a web proxy. However, to set up a Windows server as a web proxy, you should use Internet Information Services (IIS) as a reverse proxy:
- Install Internet Information Services (IIS).
- Enable URL Rewrite and Application Request Routing (ARR) modules to configure IIS as a reverse proxy.
- Launch a new website in IIS for the proxy server.
- Configure the URL Rewrite rules to route incoming requests to appropriate destination servers.
- Configure SSL offloading to manage HTTPS traffic. (Optional)
Conclusion
Setting up a proxy server in Windows & macOS is a strategic action for business owners aiming to enhance network security, control access, and optimize internet performance.
By following the detailed guidelines outlined for each platform, organizations can ensure their network communications are monitored, protected, and efficient.
Adhering to best practices and maintaining accurate configurations contributes to a robust and reliable proxy environment, essential for modern business operations in an increasingly digital landscape.
We have already taught how to set up a proxy in Ubuntu Linux; novice users can easily set up a proxy server in their favorite operating system using the tutorial articles and benefit from the proxy server for various purposes.
FAQ
2. How can I automatically configure a proxy server in Windows?
Use the Settings app, navigate to Network & Internet, then Proxy. Enable the automatic detection of settings and turn on the Use Setup Script option by entering the PAC file address. This allows Windows to automatically detect and configure the proxy server.
3. How do I manually set up a proxy server in Windows?
Go to Settings > Network & Internet > Proxy. Under Manual proxy setup, enable Use a Proxy Server, then enter the proxy servers IP address and port number. If required, provide the username and password for authentication and save the changes.
4. What are the steps to configure a proxy server on macOS?
Open System Preferences, select Network, choose the active connection, click Advanced, then go to the Proxies tab. You can enable Auto Proxy Discovery or manually enter the proxy servers address and port for protocols such as Secure Web Proxy (HTTPS). Provide authentication details if required and save the configuration.
5. How can I verify if the proxy server is correctly set up on my Windows or macOS device?
In Windows, check the proxy settings via Network & Internet > Proxy or use the netsh winhttp show proxy command in Command Prompt. On macOS, review the proxy configuration in System Preferences > Network > Advanced > Proxies or use Terminal commands like networksetup -getwebproxy Wi-Fi. Additionally, visiting a website such as whatismyip.com to check your IP address can confirm proxy use.
6. How do I disable the proxy server on Windows and macOS?
In Windows, go to Settings > Network & Internet > Proxy, then toggle off Use a proxy server under Manual proxy setup. On macOS, open System Preferences > Network > Advanced > Proxies, uncheck all proxy protocol boxes and apply the changes. Command-line options exist for advanced users to reset proxy settings.
7. Can I configure proxy settings using Command Prompt or PowerShell in Windows?
Yes, in Command Prompt run "netsh winhttp set proxy [proxy address]:[port]" to set a proxy. In PowerShell, set environment variables such as "HTTP_PROXY and HTTPS_PROXY" before launching the session. You can also define "NO_PROXY" to exclude certain hosts from using the proxy.
8. What common issues prevent connecting to a proxy server and how can they be resolved?
Connection failures can result from incorrect proxy details, server downtime, firewall restrictions, or outdated proxy configurations. Verify proxy settings, ensure the proxy server is operational, check firewall permissions, and, if needed, reset network settings or run the Windows Troubleshooter for internet connections.
9. How can environment variables be used for proxy configuration in Windows and macOS?
On Windows, set "HTTP_PROXY and HTTPS_PROXY" in the Environment Variables panel within System Properties. On macOS, define proxy variables in the "environment.plist" file or shell configuration files specifying proxy host and port. This method applies proxy settings to various applications that respect these environment variables.
10. Is it advisable for businesses to use proxy servers on Windows and macOS?
Yes, proxy servers improve network security by encrypting traffic, masking IP addresses, and enabling anonymous browsing. They help businesses protect sensitive data from cyber threats and bypass regional restrictions, contributing to safer and more efficient online operations.