How to Setup Proxy Settings on Ubuntu
Setup proxy on ubuntu is an intermediate for connecting to internet and provides privacy, anonymous browsing and network security. Also you can access restricted content and bypass geographically restrictions.
To setup proxy settings in ubuntu by GUI, you can open ubuntu settings and enter proxy information.
Also you can set proxy in linux ubuntu permanently or temporarily for one user or all using command line.
Prerequisites to Set Proxy Settings in Ubuntu 22.04/20.04
To let this tutorial works correctly, provide the options below and move on.
- A system running Ubuntu Server 22.04 or 20.04.
- Access to Terminal and GUI.
- A non-root user with
sudoprivileges. - Proxy information such as server’s IP address and port number.
Note that if you want to set up your considered computer to serve as a proxy, you should Install Squid Proxy on Ubuntu.
How to Setup Proxy in Linux Using GUI
Follow the steps below to configure Proxy linux and use every proxy on ubuntu:
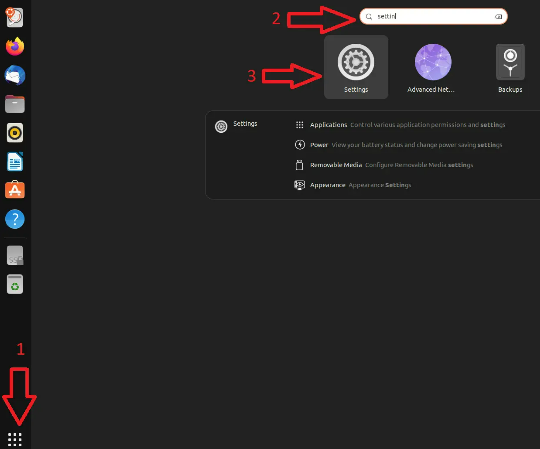
1. Open Ubuntu’s Settings
Open Ubuntu’s main Settings to access proxy settings.
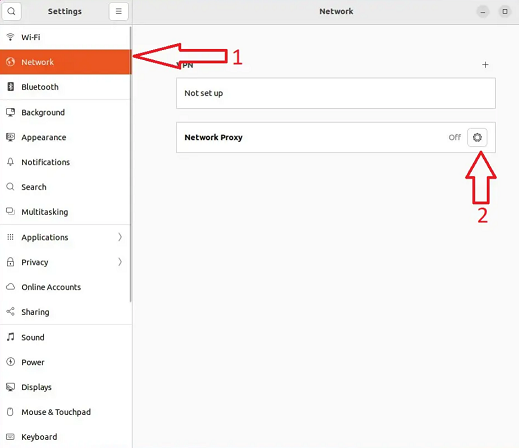
2. Select Network Setting
On the left side of the window, select Network Settings > Network Proxy.
3. Enter IPs and Ports
Select “Manual” when the pop-up window appears and enter your Proxy info (Server’s hostname or IP address, and port numbers) to use a proxy on linux.
Then, close all the windows and changes are saved automatically.
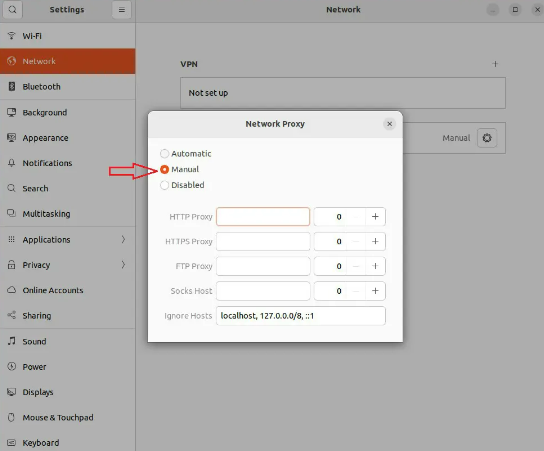
So you get a proxy in ubuntu and set system wide proxy.
How to Set Proxy in Ubuntu 20.04 Command Line
There are basic syntaxes to set HTTP, HTTPS and FTP proxy servers in Ubuntu 20.04/22.04 Terminal:
proxy_http=username:password@proxy-server-ip:portproxy_https=username:password@proxy-server-ip:portproxy_ftp=username:password@proxy-server-ip:portSetup Temporary Proxy for a Single User
Obviously, this is useful when you prefer to not use proxy settings forever. After a system reboot, the temporary connection resets and lasts until you reboot your system.
Use the following command to set proxy environment variables temporarily.
export HTTP_PROXY=[username]:[password]@[proxy-web-or-IP-address]:[port-number]
export HTTPS_PROXY=[username]:[password]@[proxy-web-or-IP-address]:[port-number]
export FTP_PROXY=[username]:[password]@ [proxy-web-or-IP-address]:[port-number]
...
export NO_PROXY=localhost,127.0.0.1,::1
Specify the port number after the proxy address (web or IP).
Add your proxy username and password as the initial values if the proxy server asks for authentication.
The NO_PROXY line’s directive instructs the system to disregard the proxy for local traffic.
How do I permanently set proxy in Linux for a single user?
To setting up a permanent Proxy for a single user, you should set environment variables in ~/.bashrc or ~/.bash_profile file.
Login to your Ubuntu server with the user you wish to set the proxy for. Open the terminal interface and edit the ~/.bashrc file:
sudo nano ~/.bashrcThen, add the following lines at the end of the .bashrc file.
export HTTP_PROXY="[username]:[password]@[proxy-web-or-IP-address]:[port-number]"
export HTTPS_PROXY="[username]:[password]@[proxy-web-or-IP-address]:[port-number]"
export FTP_PROXY="[username]:[password]@ [proxy-web-or-IP-address]:[port-number]"
...
export NO_PROXY="localhost,127.0.0.1,::1"
Save and exit the file when you are finished.
Afterward, run the following command to make your updated proxy settings active for the current session:
source ~/.bashrcSetup Permanent Proxy for All Users
You can configure permanent proxy for all users with set environment variable in /etc/environment file that is a system-wide file.
firstly, log in (with root or administrative user) and edit the /etc/environment file:
sudo nano /etc/environmentLikewise, include the lines from below in the file. Remember to update them with your proxy domains, IP addresses, and ports.
export HTTP_PROXY="[username]:[password]@[proxy-web-or-IP-address]:[port-number]"
export HTTPS_PROXY="[username]:[password]@[proxy-web-or-IP-address]:[port-number]"
export FTP_PROXY="[username]:[password]@ [proxy-web-or-IP-address]:[port-number]"
...
export NO_PROXY="localhost,127.0.0.1,::1"
When you’re done, save and shut the file. To activate the proxy settings, you must log out and then log back in.
Set Proxy for APT in Ubuntu
To install some packages from Ubuntu repository, create a separate proxy configuration file for APT since it does not use system environment variables.
To setup proxy settings for apt you can create or update apt.conf file in /etc/apt directory:
sudo nano /etc/apt/apt.confAdd the following lines to the file:
Acquire::http::Proxy "http://[username]:[password]@ [proxy-web-or-IP-address]:[port-number]";
Acquire::https::Proxy "http://[username]:[password]@ [proxy-web-or-IP-address]:[port-number]";
When you’re done, save and shut the file. Any package can now be installed on your PC.
To install the package by specifying your proxy settings, run:
'http://username:password@proxy-server-ip:8080' apt-get install package-nameYou’re all set. Update all the commands of this tutorial with your proxy data and create proxy in linux.
How to get proxy IP address in linux?
1. Using system settings
To get proxy information, open Settings in ubuntu > click Network > Network Proxy. If you have set proxy in linux, you can access its information.
2. Using environment variables
You can use http_proxy, https_proxy or ftp_proxy environment variable to get proxy IP address.
http_proxy stores proxy URL for HTTP requests. So, enter this command:
echo $http_proxyYou receive proxy IP in output. For example if your proxy URL is http://192.168.1.100:8080, you see this in the command output.
3. Using curl command
You can use curl command to check your proxy settings:
curl -I -x http://example.com 2>&1 | grep "Proxy"If the proxy is set, you can see proxy IP address in the output.
How do I know if my proxy is working Ubuntu?
There are 3 methods to check proxy server in linux:
1. You can check proxy information in environment variables using either of following commands:
set | grep -i proxyenv | grep -i proxyecho $http_proxyecho $https_proxycat /etc/environmentcat /etc/apt/apt.confIf your proxy settings are properly configured, this will display one or more environment variables containing http_proxy, https_proxy, ftp_proxy and no_proxy.
2. To check all traffic passing through the proxy, run following command:
sudo tcpdump -ni eth0You should only see traffic on port 53 and 3128 in the output.
Also enter the following command:
sudo tcpdump -ni eth0 tcp port 80If your proxy is set correctly on your system and browser, you should not see traffic on port 80.
3. You can use curl or wget command to access a blocked or restricted website in your network.
Open a web browser and test proxy connection:
wget http://www.google.comor
curl http://www.google.comIf your proxy is working properly, you should be able to access the website.
Where is proxy configured in Linux?
Proxy settings in linux are typically configured in “http_proxy” and “https_proxy” environment variables.
Also, in linux desktop environment, you need to go to “Settings> Network Settings> Network Proxy” and see proxy server information.
What is the command to start a proxy server?
To start a proxy server on linux, you need to go to server-root/proxy-serverid directory (root directory of proxy server installation) and type ./start command.
How to restart proxy service in Ubuntu?
Login as root user and type following command, then press enter:
server-root/proxy-serverid/restartAdditionally You can use -i option at the end of line. This runs server in inittab mode.
This option prevents server from putting itself in a background process. Also if the server process is ever killed or crashed, inittab will restart the server for you.
How to disable proxy in Ubuntu?
You can disable proxy using command line and GUI:
1. If you want to disable proxy permanently, you need to remove proxy variables from configuration files.
First open either of following files:
~/.bashrc/etc/bash.bashrc/etc/environmentThen add unset command in your file:
unset http_proxy
unset ftp_proxy
unset socks_proxy
unset https_proxy
2. Follow the path below:
Go to system Settings > Network > Network Proxy > select Disabled.
How to add no proxy in Ubuntu?
To add no proxy in ubuntu you can use no_proxy environment variable to bypass the proxy for a list of hosts or domains.
To bypass the proxy for all hosts on your local network, use the following command:
export no_proxy=127.0.0.1,localhost,.localdomainAlso, you can add this command to your configuration file (e.g. ~/.bashrc file) to make no_proxy settings stable.
Then restart your terminal window to apply the changes.
How do I configure proxy and proxy authentication in Linux?
Method 1: Configuring proxy environment variables
open /etc/environment file to edit:
sudo nano /etc/environmententer the following lines to set proxy authentication:
http_proxy=http://user:password@proxy:port/
https_proxy=http://user:password@proxy:port/
ftp_proxy=http://user:password@proxy:port/
no_proxy="localhost,127.0.0.1"
HTTP_PROXY=http://user:password@proxy:port/
HTTPS_PROXY=http://user:password@proxy:port/
FTP_PROXY=http://user:password@proxy:port/
NO_PROXY="localhost,127.0.0.1"
Replace user with your proxy username and password with your proxy password.
Save changes, log out and log in.
Method 2: Setting package manager
If you use apt package manager, you can edit /etc/apt/apt.conf file to configure proxy authentication.
So, open the terminal window and type the following command:
sudo nano /etc/apt/apt.confEnter the following lines to the file:
Acquire::http::proxy "http://user:password@proxy:port/";
Acquire::ftp::proxy "ftp://user:password@proxy:port/";
Acquire::https::proxy "https://user:password@proxy:port/";
Save changes, log out and log in.
Why can’t i connect to a proxy?
There are some reasons the proxy is not working in ubuntu:
Network connection issues: Check your internet connection that you have stable internet.
Incorrect proxy settings: Check that you have entered proxy IP address, port number, username and password correctly.
Active firewall or antivirus: Disable temporarily your firewall or antivirus to connect to proxy.
IP address blocked through proxy server: If you want to access content that is not allowed, proxy server may block your IP address.
How to set proxy with command?
To set proxy in windows using command line you can type cmd in Start menu, right-click Command Prompt and select Run as administrator.
Then run netsh command as below:
netsh winhttp set proxy proxyservername:portnumberYou need to replace proxyservername and portnumber with your proxy server’s IP and port number.
FAQ
Is proxy server a VPN?
No, A virtual private network (VPN) typically safeguards and encrypts all system-wide data and traffic. Proxies can be configured to only work with certain apps and services. They are not required to be system-wide. Both have advantages and disadvantages.
Which one to choose? Proxy or VPN?
Due to the fact that users frequently require secure data transmission in both directions, a VPN is more suited for commercial use. In the wrong hands, company information, and employee data can be quite valuable, and a VPN offers the encryption you need to keep it secure. A proxy server might be a suitable option for private use where a security breach would only harm you and no other users. You can also combine the two technologies, especially if you want to restrict which websites people on your network can access while still encrypting their conversations.
How to get the username, pass, IP, and ports of the proxy?
You must contact your proxy service provider. Your proxy provider may give you a domain or an IP. They also might provide you with a proxy that needs authentication or one that doesn't.
Conclusion
You learned how to configure Proxy Server in Linux step by step. You should now be able to modify your system’s proxy settings for a single user or the entire system, both temporarily and permanently.
Related Service : Buy Linux VPS