How to Install Jitsi on Ubuntu VPS?
Installing Jitsi on Ubuntu VPS involves adding the Jitsi repository, downloading the Jitsi GPG key, installing the necessary packages of Jitsi, and configuring settings for security and optimal functionality.
Jitsi Meet is an open-source, flexible, and robust video-conferencing application that allows you to create secure and private multi-person video conference rooms on your server by installing it on your Ubuntu VPS.
Prerequisites to install Jitsi Meet on Ubuntu VPS
To ensure smooth installation and optimal performance of Jitsi on Ubuntu, consider certain prerequisites:
- Ubuntu VPS with Ubuntu 18.04 LTS or later
- Having sudo privilege on the server
- a domain name that points to your server’s IP address
- Scalable Ubuntu server with adequate resources depending on number of participants including unlimited bandwidth (at least 1 Gbps bandwidth), a minimum of 2 CPU cores, at least 4 GB of RAM, and at least 10 GB of free disk space
- Installing basic utilities like curl, and wget on your Ubuntu
Step-by-Step Guide to Install Jitsi on Ubuntu
Log in to your Ubuntu VPS as a sudo-enabled user, launch the terminal, and follow the below steps:
1. Update your system:
Update your package list to the latest version to prepare your Ubuntu VPS for Jitsi Meet installation:
sudo apt update
sudo apt upgrade -y
2. Set the Hostname:
Set up a new hostname to the domain name you will use for Jitsi using the following command:
sudo hostnamectl set-hostname jitsi.yourdomain.comEnter your password when prompted.
You can verify that your server’s hostname was changed by running the following command:
hostnameOutput:
jitsi.your-domainNext, we must redirect the server’s hostname to its public IP address whenever we access jitsi.yourdomain.com from the browser. To do this, edit the /etc/hosts file with your preferred text editor (such as Nano):
sudo nano /etc/hostsThe contents of the /etc/hosts file look like the following:
/etc/hosts
# Your system has configured 'manage_etc_hosts' as True.
# As a result, if you wish for changes to this file to persist
# then you will need to either
# a.) make changes to the master file in /etc/cloud/templates/hosts.debian.tmpl
# b.) change or remove the value of 'manage_etc_hosts' in
#     /etc/cloud/cloud.cfg or cloud-config from user-data
#
127.0.1.1 server1 server1
127.0.0.1 localhost
# The following lines are desirable for IPv6 capable hosts
::1 localhost ip6-localhost ip6-loopback
ff02::1 ip6-allnodes
ff02::2 ip6-allrouters
Now, within this file add the following line under the 127.0.0.1 localhost line:
public_ip jitsi.your_domainThen, save the file by pressing Ctrl+O and exit from this file by pressing Ctrl+X.
Therefore, you have set up the hostname and local mapping of the hostname to its IP address which is a prerequisite for Jitsi installation on Ubuntu VPS.
2. Add the Jitsi GPG key:
Start the installation process of Jitsi by downloading the Jitsi GPG key using curl downloading tool:
curl https://download.jitsi.org/jitsi-key.gpg.key -o jitsi-key.gpg.keyDownloading the Jitsi GPG key helps the Ubuntu package manager to validate the Jitsi packages from the Jitsi repository.
Note: If you have not installed curl already on your Ubuntu VPS, you can install it using the following command:
sudo apt install -y curl wget sudoNext, you need to add the GPG key to a trusted keyring for secure package downloads using gpg command:
sudo gpg --output /usr/share/keyrings/jitsi-key.gpg --dearmor jitsi-key.gpg.key3. Add the Jitsi repository:
In this step, you must add the Jitsi repository to your Ubuntu VPS to install the latest stable Jitsi Meet package from its repository. To do this, create a new APT source list file for Jitsi with:
sudo nano /etc/apt/sources.list.d/jitsi-stable.listAdd the following line to the file:
deb [signed-by=/usr/share/keyrings/jitsi-key.gpg] https://download.jitsi.org stable/Press Ctrl+O and then Ctrl+X to save and exit from this file.
4. Add Prosody package to your Ubuntu VPS
Prosody is an XMPP server that optimizes communication between Jitsi participants by handling chat and admin authentication. Therefore to add Prosody package to your Ubuntu, first import the the Prosody GPG key by running the curl command:
curl https://prosody.im/files/prosody-debian-packages.key -o prosody-debian-packages.keyInstalling prosody is useful for enabling authentication and has an important role in facilitating and securing communication through Jitsi.
Then, add the Prosody GPG key to your Ubuntu keyring using the following command:
sudo gpg --output /usr/share/keyrings/prosody-keyring.gpg --dearmor prosody-debian-packages.keyCreate a Prosody sources file with:
sudo nano /etc/apt/sources.list.d/prosody.listNext, add the following line to the file:
deb [signed-by=/usr/share/keyrings/prosody-keyring.gpg] http://packages.prosody.im/debian jammy mainSave and exit the file.
Proceed to install Jitsi Meet on Ubuntu by updating your system to inform the package list about the new repositories using the following command:
sudo apt update5. Install Jitsi Meet using apt:
Install Jitsi Meet on Ubuntu VPS using apt package manager from its repository:
sudo apt install jitsi-meetPress ‘ y ‘ to complete the installation of the packages.
During the installation, you will be prompted to provide the domain name (jitsi.your-domain) that you want to set with Jitsi.

Select the <OK> button using the Tab key to move the cursor and press Enter.
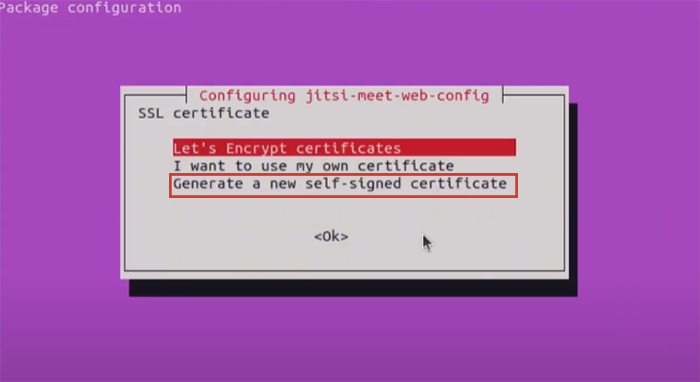
You will be prompted to configure an SSL certificate, if you have not configured an SSL for your Jitsi domain, select the ” Generate a new self-signed certificate ” option.
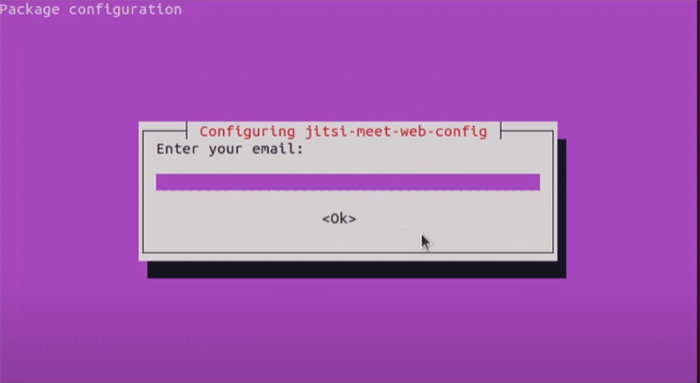
During the installation, you will be prompted to enter your email, therefore enter your email address then select <OK>.
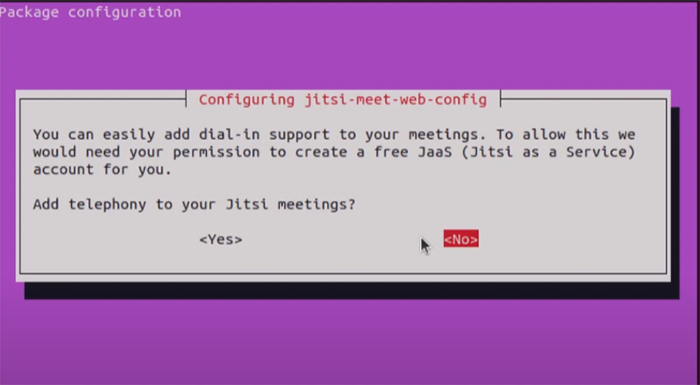
You will also be asked about adding telephony to your Jitsi Meetings. You can select <Yes> using Tab and Enter keys; it is up to your choice.
After a while, the installation process will be finished and the Jitsi Meet will install on your Ubuntu VPS. However, you will receive browser warnings due to the Lack of an SSL certificate. We will configure a signed SSL certificate in the next section because Jitsi requires a certificate for secure communication.
6. Obtain SSL Certificate for Jitsi Meet:
There are two ways to obtain an SSL certificate for Jitsi Meet on your Ubuntu VPS:
- Generating a Let’s Encrypt certificate and installing
certbotutility. - Purchasing an SSL certificate from a Certificate Authority (CA) and manually configuring Jitsi to use it.
Generating Let’s Encrypt certificate, a free and automated certificate authority, is the most straightforward and affordable way to obtain an SSL certificate using Jitsi script.
Installing the certbot tool simplifies the process of obtaining and managing SSL certificates for Jitsi. Therefore, first, you need to install certbot on your Ubuntu VPS with:
sudo apt install certbotYou will be prompted to confirm the installation, so press y.
As mentioned before, Jitsi provides a script to quickly generate a Let’s Encrypt certificate for your domain. Run Jitsi certificate installation script with:
sudo /usr/share/jitsi-meet/scripts/install-letsencrypt-cert.shFollow the prompts and supply the email address to proceed with the installation.
Therefore, an SSL certificate will be configured for your domain.
7. Firewall Configuration:
You must ensure that the necessary ports are open on your firewall for properly video conferencing function. Therefore, configure your firewall (e.g ufw) to allow access to the necessary ports used by Jitsi using the following command:
sudo ufw allow 80/tcp
sudo ufw allow 443/tcp
sudo ufw allow 10000/udp
sudo ufw allow 22/tcp
sudo ufw enable
These commands open the necessary ports that are used by Jitsi to communicate with the call participants. Jitsi uses 80/tcp for HTTP (Let’s Encrypt), 443/tcp for HTTPS, 10000/udp for media traffic, and 22/tcp for SSH.
Check the UFW firewall status to ensure that ports are open using the following command:
sudo ufw statusOutput indicates all added ports are allowed.
8. Optional Configurations:
The Jitsi allows customization of various settings such as recording, room creation, and user interface behavior through its configuration files which are located in /etc/jitsi. You can use the below Jitsi Meet configuration files:
- /etc/jitsi/meet/[your-domain]-config.js: It defines client-side settings for Jitsi.
- /etc/jitsi/videobridge/sip-communicator.properties: It includes server-side settings for the Jitsi.
The default configuration of Jitsi allows anyone with access to the Jitsi server to create a new conference room, which this publicly available server compromises the security of your online meetings and results in the use of your server’s resources via unauthorized users.
Therefore, it is better to configure Jitsi Meet to restrict room creation to only authorized and registered users.
To configure authentication on Jitsi server for allowing only authorized users to create conference rooms, follow the below steps:
1. To set up authentication, edit the Prosody configuration file:
sudo nano /etc/prosody/conf.avail/jitsi.your_domain.cfg.lua2. Modify the file by changing the value of the authentication = “anonymous” to authentication = “internal_plain” using the search tool (CTRL+W) to force requiring username and password authentication before conference room creation.
3. Add the following lines to the end of the Prosody configuration file to allow any user to join the created conference rooms using a unique URL and a password:
/etc/prosody/conf.avail/your_domain.cfg.lua
...
VirtualHost "guest.jitsi.your_domain"
authentication = "anonymous"
c2s_require_encryption = false
modules_enabled = {
"bosh";
"ping";
"pubsub";
"speakerstats";
"turncredentials";
"conference_duration";
}
4. Set up the guest domain in the Jitsi Meet configuration by editing the Jitsi Meet configuration file using the following command:
sudo nano /etc/jitsi/meet/jitsi.your_domain-config.js5. Edit the line “ // anonymousdomain: ‘guest.example.com’,” to ” anonymousdomain: ‘guest.jitsi.your_domain’,” by removing the double slashes // at the start of the line.
6. To configure authentication, you need to edit the Jicofo configuration file to contain authentication settings using the following command:
sudo nano /etc/jitsi/jicofo/sip-communicator.properties7. Add the following lines:
org.jitsi.jicofo.auth.URL=XMPP:jitsi.your_domain8. Create user accounts on your Ubuntu VPS that will be allowed to create conference rooms using the following command (this user is not a system user and is not able to log in to your server):
sudo prosodyctl register user your_domain password9. Apply the changes by restarting the necessary Jitsi services:
sudo systemctl restart prosody
sudo systemctl restart jicofo
sudo systemctl restart jitsi-videobridge2
You have configured the Jitsi so that only registered users can create conference rooms and every user that has a unique conference room URL and password can join it without registering.
9. Access Jitsi Meet:
At this point, the Jitsi Meet is installed successfully on your Ubuntu VPS and secured with an SSL certificate and authentication configuration.
Now, launch your browser and access the Jitsi Meet using the URL https:// jitsi.yourdomain.com.
When you access your Jitsi portal, you can start the online meeting by selecting the ” Start Meeting ” button.

To start the meeting as the host (admin of the meeting), you must enter your admin username and password in the related fields and click “Login“.
After creating a new meeting you can invite someone by selecting the “Participants” icon in the bottom panel and the “Invite Someone” button.
You can copy and share the meeting link with others to invite those you want to attend the meeting without needing a username and password.
How Can I update Jitsi Meet?
You can update Jitsi by updating your system package list using apt:
sudo apt update && sudo apt upgradeIs 1 GB of RAM enough to run Jitsi Meet on a server?
Installing Jitsi Meet on a Ubuntu server with less than 1GB of RAM is not recommended. Jitsi requires at least 2GB of RAM for smooth and optimal performance, especially when handling multiple participants.
Can I customize the appearance of my Jitsi Meet instance?
Yes, by editing the interface configuration file which is located at /usr/share/jitsi-meet/interface_config.js you can customize the colors, titles, and more appearance features.
Does Jitsi Meet support meetings recording?
Yes, you can record meetings on your Jitsi server via different methods including enabling local recording for participants, using Jibri, and a dedicated recording component.
How can I improve video/audio quality quality when using Jitsi?
To improve the video/audio quality when using Jitsi, consider the following:
- Upgrade the server resource, especially the server’s CPU and bandwidth.
- Check network connection.
- Adjust audio/video settings.
- Update the Jitsi.
Does Jitsi Meet work with all web browsers?
Jitsi Meet is compatible with most modern browsers like Chrome, Firefox, Safari, and Edge.
However, older browsers or some mobile browsers may have compatibility issues.
Is Jitsi secure?
Jitsi is generally considered secure because it encrypts audio and video communication traffic. Also, you can enhance the security of the Jitsi by regularly updating it, setting passwords, and security practices.
In addition, when you run your own Jitsi server, you have enhanced the security against potential vulnerabilities and you will have more control over security.
How can I remove Jitsi from Ubuntu VPS?
To fully remove Jitsi Meet from an Ubuntu VPS you need to remove all related packages and configurations. Therefore remove Jitsi Packages with:
sudo apt purge jitsi*Or
sudo apt remove --purge jitsi-meet jitsi-meet-web jitsi-meet-web-config jitsi-meet-prosody jicofo jitsi-videobridge2 -yThe first command removes all installed packages that have names starting with “jitsi” but the second command removes certain Jitsi packages that are specified.
Delete the Jitsi configuration files using the following command:
sudo rm -rf /etc/jitsi
sudo rm -rf /var/lib/prosody
Remove Jitsi dependencies using the following command:
sudo apt autoremove -yConclusion
The Jitsi Meet server, with the guarantee of data routing only through the server and end-to-end TLS encryption, leaves no room for third-party intrusion or concerns about information compromise and misuse.
At the same time, it offers optimized performance with advanced features compared to other video conferencing tools like Zoom, Skype, and Google Meet.
Now you can enjoy the Jitsi Meet server features for private, secure, and high-quality video/ audio communication over the Internet.