Install Linux on Android with Rooted and Unrooted Devices
Linux is one of the most famous and widely used operating systems worldwide, offering valuable features. As you know, Linux is an open-source and powerful operating system with a single integrated core, runs all the main services of the operating system inside itself, and is compatible with most hardware. Thanks to the advantages and features it offers, Linux is gaining more fans day by day and has become the preference of users in using PCs and servers, which has made Linux VPS one of the most demanded VPS.
With the advancement of technology, computer capabilities are provided by portable devices such as tablets or mobile phones, which you can perform various and extensive tasks with a mobile phone. You may have wished many times that you could use the capabilities of the Linux operating system for various purposes, such as using penetration testing tools, accessing the desktop environment, accessing software that is not supported by Android, using troubleshooting tools, benefiting from powering the LAMP server and using your device as a portable network on your mobile phone and tablet. This is not a wish because, as we have already talked about the compatibility of Android devices in supporting RDP connections and taught how to connect RDP with Android, modern Android devices with high-quality hardware have surpassed computers and, with their high compatibility, support installing Linux operating systems.
Android uses the Linux kernel, that’s why it offers some features and functions similar to Linux, but compared to Linux, it undoubtedly has limitations. You can install different Linux distributions on the Android device to optimize the Android device to the excellent performance and user interface of Linux.
In this article, we will teach you how to install different versions of Linux on a rooted and unrooted Android smartphone or tablet so that you can install and run Linux on Android devices and upgrade your Android device to a pocket PC with Linux features.
How to install Linux on an Android device?
Different methods exist for installing and running Linux on Android devices such as tablets, smartphones, etc., depending on whether the Android device is rooted or not. Now what does root mean? Just as Linux grants users root permission to do anything, in Android devices that are built from the Linux kernel, Linux file system privileges and permissions are given to users to convert from normal users to superusers and have sufficient permissions to complete control and perform any tasks such as uninstalling the program, running the program, etc.
To have root user permission, you need to unlock the bootloader and install custom recovery. Therefore, granting sufficient access and permission to the user for any task is called rooting the device.
Now it is up to you to decide which method you prefer depending on whether your Android device is rooted or not.
Installing Linux on an Unrooted Android Device using UserLAnd
If your Android device is not rooted, you can use various software such as UserLAnd, Debian Noroot, Andronix to install Linux. We will teach a common and user-friendly method to install Linux on Android devices without rooting.
One of the common and simple ways to install the Linux operating system on Android mobile phones is UserLAnd. UserLAnd generates Debian and Ubuntu filesystems via executables and scripts written specifically for this purpose. One of its features is PRoot, an open-source software that implements the same functionality as chroot. Using the PRoot feature, it is possible to run programs using the root directory.
By creating a layer on your mobile phone, UserLAnd allows you to choose between different versions of Linux, such as Kali, Debian, Ubuntu, Arch, and Alpine. In addition, you can install the applications you want using this tool. Before installing Linux on Android, you can install popular software such as Firefox, LibreOffice, and GIMP. UserLAnd has recently added built-in SSH functionality, so you won’t need to install an SSH program. Follow the instructions below to install Linux on an unrooted Android device by UserLAnd:
1. Download UserLAnd app: Google Play Store supports UserLAnd, so search for UserLAnd in Google Play Store and then download it.

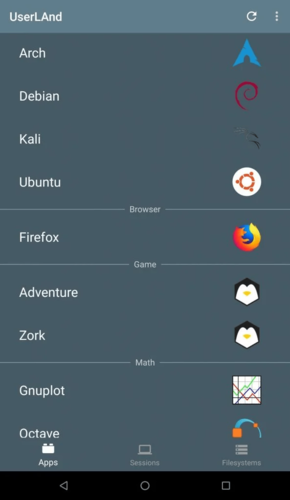
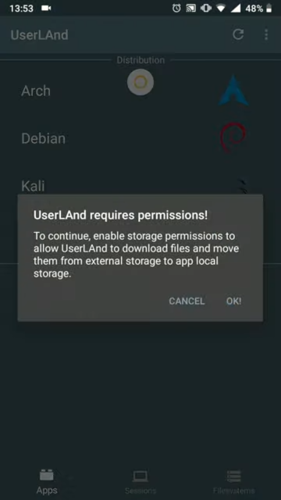
2. Choosing the required Linux distribution: After downloading and running UserLAnd by selecting the “Open” option, you will see a list of distributions provided by UserLAnd in the “Apps” tab. You can choose the Linux distribution you want in the list to install. Before choosing the Linux distribution you want, you must agree with UserLAnd permissions to download files and transfer them from external storage to App local by selecting the “OK” option.
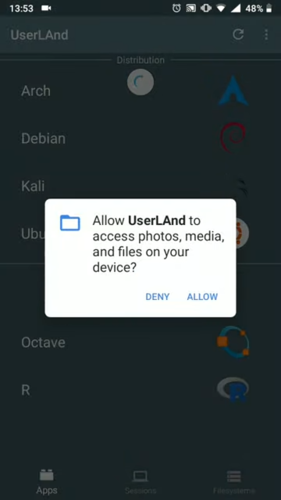
Also, agree with all the permissions required by UserLAnd by selecting the “Allow” option.
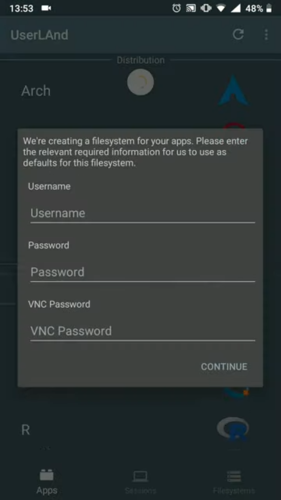
3. Specify the username and password for Linux: UserLAnd program will prompt for login validation, and at this step, you must specify the username, password, and VNC password and click “Continue.”
4. Selecting Connection type: Two options are displayed that indicate the possibility of connection via SSH (command line) or using the VNC program (desktop). Select the “VNC” option and click “Continue.”
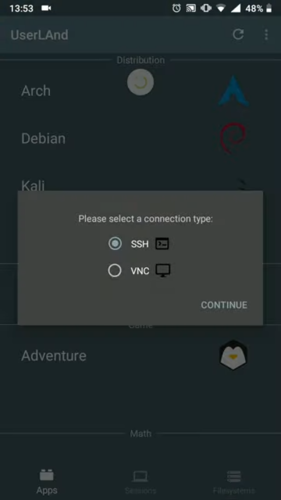
UserLAnd then Loads the necessary plugins and scripts from its GitHub repository that are used to create the file systems. The time needed to load and extract the necessary assets varies according to the Android device’s CPU performance and the user’s internet connection speed. (Usually, the installation process takes up to 20 minutes.)
5. Installing bVNC: after downloading the necessary files and assets for the selected Linux distribution session, you will be directed to the Google play store; at this step, you must download and install bVNC (Secure VNC Viewer) in the play store.
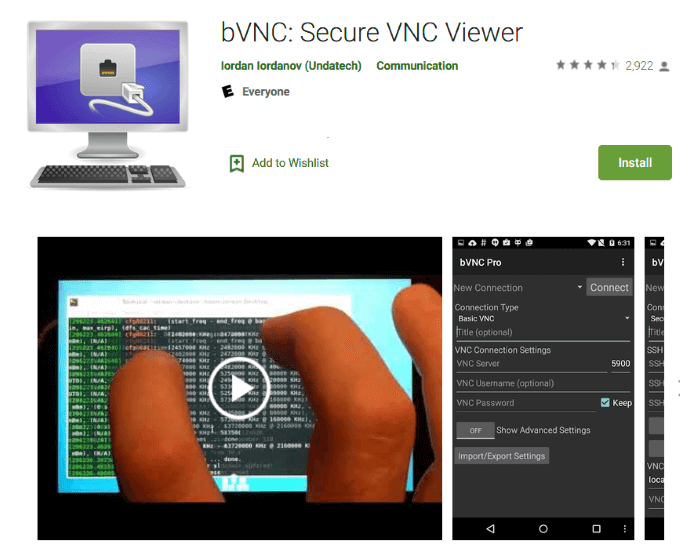
6. Allow bVNC access: After downloading bVNC, click the “Back” button to return to UserLAnd. Confirm the prompt to allow access to files for VNC by clicking “Allow.”
7. launch a Linux session: If you see the option related to the Linux distribution you have installed, select it, otherwise select “Sessions” at the bottom of the screen and then click on the plus sign(+) in the upper right corner of the screen to find the Linux distribution option you installed and select it.
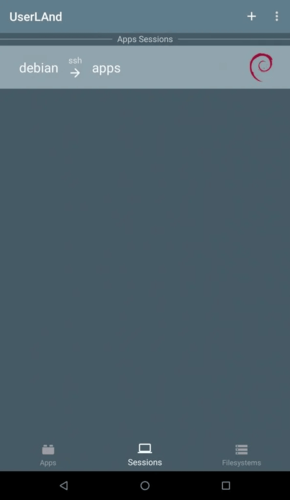
After choosing the name for the New session, select apps. From the File system drop-down menu, select the Linux distribution of your choice and set the Service type to SSH. Then click “Save” to save your changes.
Finally, click again on the “Sessions” option at the bottom of the screen to start a new Linux session to enter the desktop environment of your installed Linux distribution.
8. Open applications: after opening the desktop environment, select “Start menu” on the bottom left of the screen and install Linux software (including Screen, Net-Tools, Netcat, Neofetch, Curl, Git, Wget, Nano, etc.) using the command line and selecting System Tools > LXTTerminal.
9. Close the desktop environment: Click anywhere on the screen and select the three vertical dots. Then you can exit the desktop environment by clicking on “Disconnect.”
Note: If you installed Kali Linux, you must add the Kali Linux repositories using nano to the /etc/apt/source.list file through thenano /etc/apt/sources.listcommand and add thedeb http://http.kali.org/kali kali-rolling main contrib non-freeline to the file you created.
Then save your changes and add the Kali signature key by usingwgetcommand (wget -q -O - https://www.kali.org/archive-key.asc | apt-key add -command ), by getting Ok in the output of these commands, you can be sure of the success of adding the Kali Linux repository.
Note: We recommend using the keyboard and mouse to install the operating system on the mobile phone to go through the installation process more easily. In addition, the touch keyboard on the mobile screen occupies a large part of the screen and will disturb your work.
Installing Linux on rooted Android devices using Linux Deploy
Installing Linux on rooted Android devices is much easier and faster than installing Linux on Unrooted Android devices. We will use Linux Deploy and BusyBox tools to install Linux on rooted Android devices. If you’re ready, let’s get started:
1. Connect to WiFi and install BusyBox to enjoy additional Root capabilities.
2. Install Linux Deploy.
3. First, ensure you have active root permissions and click the “Start” button.
4. Select the “settings” option in the right corner.
5. Select your preferred Linux distribution, including Debian, Ubuntu, Fedora, Gentoo, etc., by clicking on the “Options” menu.
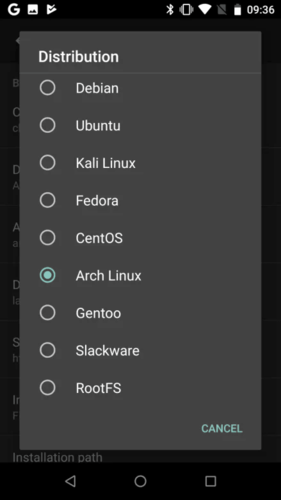
6. To access the Linux desktop environment on the Android device, check the checkbox next to “Enable.”
7. Go to the “Graphics” section, and select “VNC” for all graphics subsystems.
8. Select the desktop environment you want in the “GUI setting” section. (Check the screen resolution suitable for your desktop.)
9. Specify the username and password. Then save your information.
10. Exit the menu and click on the three dots option in the upper corner of the screen.
11. Select “Install” and then “OK.”
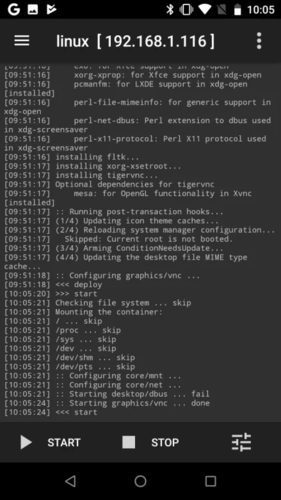
12. After completing the installation process, download VNC Viewer from the Google play store.
13. Run Linux by clicking “Start” in Linux Deploy.
14. Run VNC Viewer and access your desired Linux desktop environment by connecting to localhost:5900.
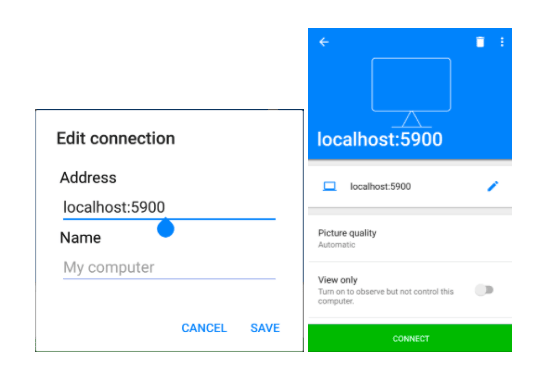
Finally, with the help of a Linux terminal, you can install and run Linux software and enjoy the features of Linux on your Android device.
How to use Linux software on Android devices?
Congratulations, you were able to install Linux on a rooted and unrooted Android device. As a result, you can now benefit from the features of the software that support ARM processors, such as Firefox, LibreOffice, vlc, and other software on your Android device.
For this purpose, enter the Linux session on the Android device and open the Linux terminal. You can install the desired software by using related commands; for example, to install Firefox, enter the following commands:
sudo apt update
sudo apt install firefox-esr
To install other software, replace firefox-esr with your desired software in the previous command.
After installing the desired software, you can find it in the “Applications menu” and use its features.
Note: Since Linux will be a compatible layer on top of the Android operating system and hardware functions such as WiFi are still under the control of Android, you cannot manage low-level hardware functions through Linux. For this reason, the implementation of complex graphics in Android devices cannot be fast and smooth.
FAQ
What are the reasons for installing Linux on an Android device?
- Using software that is not available in Android.
- Great experience with the Linux desktop environment
- Using Linux security features
- Turn the Android device into a penetration-testing tool
- Use your device as a portable network
- Powering the LAMP server
- Using troubleshooting tools
Conclusion
If you need unique features of Linux for various purposes, Android devices with high compatibility with Linux support Linux installation and fulfill your desire so that you can upgrade the features and performance of Android to Linux, but If the purpose of installing Linux on Android is to improve simultaneous multitasking of Android apps and improve Android performance beyond a mobile phone, we suggest using the latest version of Android instead of installing Linux.
In this article, we have taught common methods for installing Linux on rooted and unrooted Android devices. In addition to these methods, there are other software for running Linux or a desktop environment with the Linux kernel that should not be overlooked. The Splashtop application provides a remote desktop environment to Linux systems. The DeX program is ideal for using a desktop environment with Linux kernel on Samsung devices. You can use Termux software on Android to benefit from Linux terminal features.
Perhaps the experience of using the Linux GUI on a small device like a mobile phone is annoying, but the good news is that you can combine the Android device for Linux with a Bluetooth keyboard and mouse and enjoy the world of Linux by using a portable Android device in any location and benefit from Linux facilities at the most affordable cost.
We hope that the content presented in this article was helpful to you. If you have any questions about installing Linux on an Android device, share them with us in the comments section so we can help you as soon as possible.