Final Guide to Update Kernel in CentOS to the New Version
The kernel is the heart of the operating system, which is the interface between the hardware and the software applications running on it. The kernel of an operating system is the central part of the operating system that is responsible for managing hardware resources and providing essential services that cause interaction between software and hardware. The Linux kernel is open-source, free, and integrated; the open-source nature of this kernel means that its source code is publicly available and can be modified and distributed under the terms of the GNU General Public License (GPL). All Linux distributions, such as Ubuntu, Debian, and CentOS, are developed based on the integrated Linux kernel. The Linux kernel is continuously maintained and developed by a large community of developers and receives security updates, improvements, and fixes.
Therefore, checking and regularly updating the Linux kernel is one of the security measures that Linux administrators should pay attention to. Updating the Linux kernel does not mean getting a new kernel, but a base kernel is upgraded to a new version by receiving fixes, improvements, security updates, and expanding support for a wide range of hardware and software configurations.
This article will teach you how to update the CentOS kernel to the new version and benefit from the advanced speed, performance, and security of CentOS. Don’t worry, the steps to update the CentOS kernel are not as complicated and different as updating the Ubuntu kernel, just follow the steps of this guide correctly to update the CentOS kernel to the latest version and become an expert in updating the Linux kernel.
functions and responsibilities of the Linux kernel
As we said, the Linux kernel plays the role of the human heart in the operating system and is one of the main components of the operating system. The Linux kernel, like a bridge, creates interaction and communication between hardware and computer application software processes. The Linux kernel is open-source, modular, and integrated. It is responsible for essential tasks such as drive and hardware operation control, memory management, process management, file system management, security, networking, and system calls. For a better understanding, we will talk more about the responsibilities and functions of the Linux kernel. The most important tasks of the Linux kernel are as follows:
Device management: One of the tasks of the Linux kernel is to manage communication and data transfer between software programs and hardware devices (storage, processor, mouse, keyboard, network adapter, etc.).
Memory management: The kernel controls and monitors the allocation of memory for programs and the use of disk space. In addition, it provides the possibility of using disk memory more than the available physical capacity with virtual memory management.
Process management: The Linux kernel is responsible for planning the execution of application processes, resource allocation, and inter-process communication and synchronization mechanisms.
Security: The Linux kernel controls user permissions and access to protect the system from malicious activities and unauthorized access.
Networking: Communicating between the system and other remote devices through the Internet or other methods is the task of the Linux kernel, which also manages the network function.
Communication with Hardware: One of the main tasks of the kernel is to communicate between hardware resources and the operating system through drives, and it manages drives that are an interface for transferring software requests to hardware.
Is it necessary to update the CentOS kernel?
Updating the Linux kernel may not be an important task for users, while Linux developers advise Linux administrators to update the kernel to the latest version regularly. Updating the Linux kernel is as important as updating software Because the health and proper functioning of the kernel, which is the most important part of the operating system, is not a matter to be ignored. Linux kernel performance affects essential factors such as security, stability, performance, hardware support, and compatibility.
One of the main reasons why it is recommended to update the Linux kernel regularly is to fix security vulnerabilities. New versions of the Linux kernel include improvements and advanced security patches that play an important role in removing security vulnerabilities and malicious agents. On the other hand, updates include bug fixes, stability improvements, and optimizations that guarantee debugging and performance improvement because old kernels usually come with bugs and crashes and disrupt system performance.
With each Linux kernel update, advanced features and settings are added to the Linux kernel that improves the overall experience of the operating system. As you know, an old kernel is not able to support the latest hardware devices, such as graphics cards, network adapters, and other peripherals; updating the Linux kernel adds support for new hardware to its settings and improves compatibility.
So updating the Linux kernel is important to experience extreme speed, performance, and security now all you have to do is follow the instructions in this guide to update the CentOS kernel and optimize your system performance.
CentOS kernel update prerequisites
- Buy Linux CentOS VPS
- Having a user account with sudo privileges
- Terminal access
- Backup your data
Complete guide to update Kernel in CentOS
The yum package manager in CentOS has the necessary permission to update the CentOS kernel, so you will update the CentOS kernel using the yum package manager. Linux kernels have two types of versions: 1. Stable long-term supported kernel release 2. Mainline kernel release.
If long-term support is important to you, Stable long-term supported kernel release is the right choice, but if you are interested in receiving frequent updates, Mainline kernel release is ideal.
1. Check the Current Kernel Version
Before upgrading the CentOS kernel version, it is better to check the current CentOS kernel version; for this purpose, enter the Linux terminal and run one of the following commands:
uname -msrOutput:
Linux 3.10.0-957.1.3.el7.x86-64 x86-64Or
cat /etc/redhat-releaseOutput:
CentOS linux release 7.6.1810 (core)Or
cat /etc/os-releaseOutput:
NAME= “CentOS Linux”
VERSION= “7 (core)”
ID= “centos”
ID_LIKE= “ rhel fedora”
VERSION_ID=”7”
PRETTY_NAME= “ Centos Linux 7 (core)”
ANSI_COLOR=”0;31”
CPE_NAME=”cpe:/o:centos:centos:7”
HOME_URL=”https://www.centos.org/”
BUG_REPORT_URL=”http://bugs.centos.org/”


CENTOS_MANTISBT_PROJECT=”CentOS-7”
CENTOS_MANTISBT_PROJECT_VERSION=”7”
REDHAT_SUPPORT_PRODUCT=”centos”
REDHAT_SUPPORT_PRODUCT_VERSION=”7”
By running each of the previous commands, you get information about the version of the CentOs kernel.
2. Update the list of installed packages in CentOS
Upgrading the package list of CentOS repositories to the latest version using the yum package manager is a necessary step before updating the Linux kernel. So run the following command to update the CentOS repository:
sudo yum -y update3. Add ELRepo Repository
Since the official CentOS repository does not support providing the latest version of the Linux kernel, we need to add the third-party repository ElRepo to the system to get the latest kernel version available on kernel.org through ElRepo. ElRepo is a third-party repository targeting Enterprise Linux, and RHEL-based distributions, including CentOS, Fedora, etc., are compatible with this repository. To install the ElPero repository on CentOS, you must first install the GPG key (digital signature to verify the authority of the software package) to install the ElRepo repository because CentOS prevents the installation of unsigned software packages:
sudo rpm --import https://www.elrepo.org/RPM-GPG-KEY-elrepo.orgThen enter the following command to install the ElRepo repository:
sudo rpm -Uvh https://www.elrepo.org/elrepo-release-7.0-3.el7.elrepo.noarch.rpmOutput:
Retrieving https://www.elrepo.org/elrepo-release-7.0-3.el7.elrepo.noarch.rpm
Preparing…                              ##############################   [100%]
Updating/installing…
   1:elrepo-release-7.0-3.el7.elpero   ##############################   [100%]
To ensure that the ElPero repository is installed and available, run the following command to check the list of enabled repositories:
yum repolistIf you find the ElPero repository in the enable repositories list, make sure the ElPero repository is installed.
4. Access to the list of available Kernels
List the available kernels using the following command:
yum list available --disablerepo='*' --enablerepo=elrepo-kernel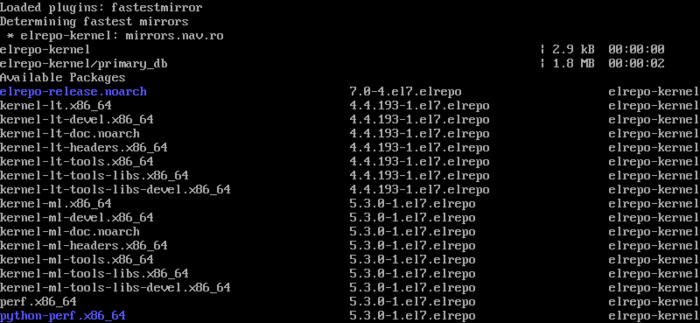
In the list of modules and kernels that are displayed, the Linux kernel versions are as follows:
- kernel-lt (stable long-term support release): to install versions with less updates and long-term support.
- kernel-ml (mainline release): to install a version of the Linux kernel with frequent updates and short-term support.
So, choose the kernel version you want to install based on your needs.
Note: The Linux kernel version contains a series of numbers and letters.
5. Install the newest version of the CentOS kernel
Finally, it is time to install the newest version of the CentOS kernel. To install the kernel version you want, run the following commands using the yum package manager:
- Installing the latest long-term support kernel:
sudo yum --enablerepo=elrepo-kernel install kernel-lt- Installing the latest mainline kernel:
sudo yum --enablerepo=elrepo-kernel install kernel-mlYou have to wait for a while to install the Linux kernel and complete the installation process by typing y and pressing Enter.
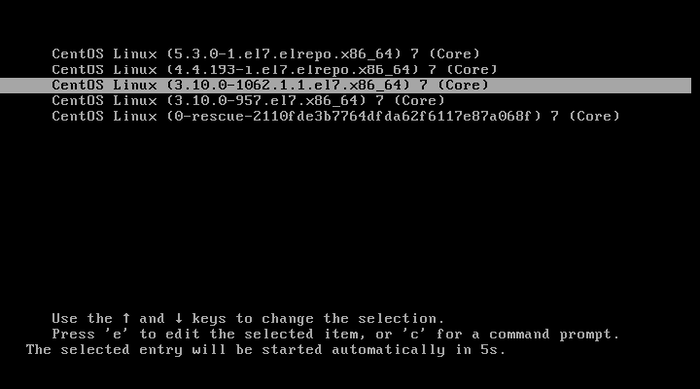
6. Reboot the CentOS system
After completing the installation of the latest Linux kernel, reboot the CentOS system:
rebootAfter rebooting, in the boot or GRUB menu, select the latest version of the Linux kernel you have installed using the arrow keys on the keyboard and press Enter.
7. Configure the new kernel version as the default
After rebooting the system, you should check the operation of the CentOS operating system. If the system boots without errors and you do not see bugs in the performance of programs and operating systems, make sure the compatibility of the new kernel version and configure the new kernel version to load when CentOS boots by default. You need to modify the GRUB boot tool settings to set the updated kernel as default.
Open the /etc/default/ file by running the following command:
sudo vim /etc/default/grubIn the contents of the /etc/default/ file, find the line that contains GRUB_DEFAULT=X and change its value to 0 (GRUB_DEFAULT=0). With this, we set the boot loader to load the first and newest kernel in the list by default when the CentOS system is started.
To apply the changes, save the file and enter the following command to generate the kernel configuration and the grub2 config:
sudo grub2-mkconfig -o /boot/grub2/grub.cfgThen reboot the CentOS system to make sure the bootloader is set to load the latest version of the Linux kernel by default:
rebootHow to remove old versions of the Linux kernel?
If you have several versions of the kernel installed on your system, which are occupying your free disk space, you can get rid of the old versions of the Linux kernel in your system. To remove old versions of the Linux kernel, follow the steps below:
1. Install the yum-utils tool from the official CentOS repository:
yum install yum-utils2. Remove the old version of the Linux kernel by running the following command:
package-cleanup --oldkernelsRemember that you can delete the old versions of the Linux kernel when you have more than three versions installed in the CentOS system. Otherwise, the old kernel cleanup command will not succeed in removing the old Linux kernel versions.
FAQ
"Error: /boot/vmlinuz-X.X.X-X.elX.x86_64 has invalid signature." what does this error mean?
Getting this error is because secure boot is enabled and the Linux kernel is installed with an unsigned key. To solve this problem, you need to add a new kernel's key in the secure boot configuration or disable Secure boot in BIOS settings.
Is the entire operating system updated when the Linux kernel is updated?
No. You can update the kernel independently of other parts of the system. With the help of the package manager, you can update only the kernel package without updating other parts of the operating system
Is it necessary to remove old kernels after updating?
Removing old kernel versions is an excellent way to free up disk space, but keep at least one old version as a fallback option in case of problems.
Is it possible to return to the previous kernel after updating the CentOS kernel?
Fortunately, yes. If there are problems with the operation of the operating system by updating the kernel, you can select the previous version from the boot menu during startup.
Conclusion
You learned how to update the CentOS kernel to the latest version in this article. If you have followed the steps of this guide correctly, now you can enjoy the features of the latest Linux kernel in CentOS and experience smooth and fast performance in CentOS. We hope this article was helpful to you.
If you encounter a problem updating the Linux kernel, let us know in the comments section so that our technical support can guide you in solving the problem as soon as possible.
This does not apppear to work: [~]# rpm --import https://www.elrepo.org/RPM-GPG-KEY-elrepo.org curl: (22) The requested URL returned error: 403 Forbidden error: https://www.elrepo.org/RPM-GPG-KEY-elrepo.org: import read failed(2)
The "403 Forbidden" error typically means that you are not authorized to access the requested resource. Ensure that there are no typos or errors in the URL you're using. The correct URL for importing the ELRepo GPG key is: https://www.elrepo.org/RPM-GPG-KEY-elrepo.org. The ELRepo server might be experiencing issues. Try again later, or visit their website to check for any announcements regarding server problems. Ensure that you have the necessary permissions and privileges to access and import GPG keys. Use sudo to run the command with elevated privileges. Check your internet connection and ensure there are no network restrictions. If you're behind a corporate or institutional firewall or proxy, it might be blocking access to the URL. Check with your network administrator to ensure that the necessary ports and URLs are not blocked.