How to Update Ubuntu Linux Kernel to the Latest Version?
Linux kernel is a free, open-source operating system kernel. It serves as the primary interface between the hardware and processes of the computer and is the main part of the Linux operating system. In this article, you will learn How to Update Ubuntu Linux Kernel to the Latest Version. Instead of offering you the most recent mainline kernel, they frequently use a certain kernel release as the base and deliver updates on this base kernel. But it does not mean that you cannot use Ubuntu or another distribution with the most recent Linux kernel.
As an Ubuntu administrator, you are highly recommended to check and update the Kernel regularly. If you are not used to updating the Ubuntu Linux kernel, do not worry and follow the steps of this guide to become a master in Updating Linux Kernel. There are five ways to Upgrade Linux Kernel in Ubuntu. Join us to learn all of the most used Ubuntu update kernel methods.
What is Linux Kernel, how it Works, and Why should be up-to-date?
The kernel is a computer program that sits at the heart of an operating system. The OS component that loads first and stays in the main memory is this one. The system hardware and application software are connected via the kernel. Linux kernel is a free, open-source, monolithic, modular, Unix-like operating system kernel.
Because the Linux kernel is monolithic, it controls all driver and hardware operations. Virtually every aspect of the operating system operates in kernel space. The Linux kernel supports the insertion and removal at runtime of loadable kernel modules. By keeping only, the necessary modules in kernel memory, the kernel’s memory footprint is reduced and its overall performance is increased.
Consider it this way: The hardware is a powerful executive, and the kernel is their busy personal assistant. The assistant’s responsibilities include communicating with the executive on behalf of staff members and members of the public (users), keeping track of what is kept where (memory), and deciding who has access to the executive at any given moment and for how long.
- The kernel has 4 jobs: Memory management, Process management, Device drivers, and System calls and security.
- Most kernels fall into one of three types: monolithic, microkernel, and hybrid.
It’s imperative to periodically upgrade your Linux kernel. Although it is not required, Linux developers typically advise regularly updating your kernel as and when the updates become available. You may care about updating your apps. Upgrading the Linux kernel is as important as that. To let this vital part of the Linux system do its job perfectly, keep it updated to achieve an uninterrupted and stable environment. It is now clear Why update Linux kernel. Also, you reviewed when to upgrade Linux kernel. You just need to learn how to update Ubuntu kernel. Use this guide to find one of the methods you prefer to Update Ubuntu Linux Kernel.
Prerequisites to Upgrading to Latest Linux Kernel on Ubuntu
To let this tutorial work correctly, provide the options below and go for Ubuntu kernel update:
- A Server running Ubuntu VPS.
- A non-root user with
sudoprivileges. - Access to the Terminal.
- The
apttool, built into Ubuntu. - Optional: The Update Manager, built into Ubuntu.
Multiple Ways to Update Ubuntu Linux Kernel [Complete Guide]
You might know how to Update Ubuntu through Terminal and GUI tool. But there will be more questions like How to update/patch/upgrade Linux kernel or Which commands will install a new version of the Linux kernel? If this is your question, each method answers you somehow. There are multiple ways to update Ubuntu Linux kernel. This tutorial covers 5 different methods to let you find which one is easier for you. Now that you know why you must update Ubuntu Linux kernel, let’s get started and review the best and easiest ways to do this.
Method 1. Using Ubuntu Mainline Kernel Installer [Easiest Way]
For the first suggested method, let’s start with the easiest way since the kernel upgrade procedure is much easier and more convenient with a GUI. Before beginning, be aware that the latest Linux kernel is called the mainline Linux kernel. So, follow the below steps to update Ubuntu Linux kernel using Mainline Kernel Installer.
Step 1. Update system Packages
As usual, you are recommended to update your system before any action. So, at a terminal window (CTRL+ALT+T), run the following command:
$ sudo apt updateAll your packages must be updated now.
Step 2. Check the Current kernel version
To know your existing Kernel Version, type:
uname -rThe installed kernel version number is returned by this command. You can select the next kernel option based on which version is currently installed on your computer.
Step 3. Add the cappelikan PPA Repository
You must add the cappelikan PPA using the following command in order to install the Ubuntu Mainline Kernel Installer on your computer:
$ sudo add-apt-repository ppa:cappelikan/ppa -yThis will add the repository and update your system’s packages for the changes to take effect.
Step 4. Install Ubuntu Mainline Kernel Installer
Now, you are ready to install Ubuntu Mainline Kernel Installer by running the command below:
$ sudo apt install mainline -yStep 5. Upgrade Ubuntu Linux kernel
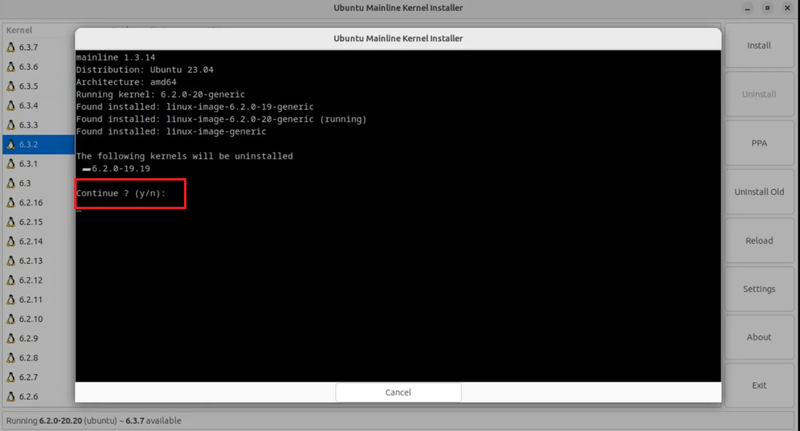
Let’s continue with this step for Ubuntu upgrade kernel. To do this, open the application from your menu once it has been installed. Click the Uninstall Old button on the right side of the installer screen to remove the old kernel before installing the new one.
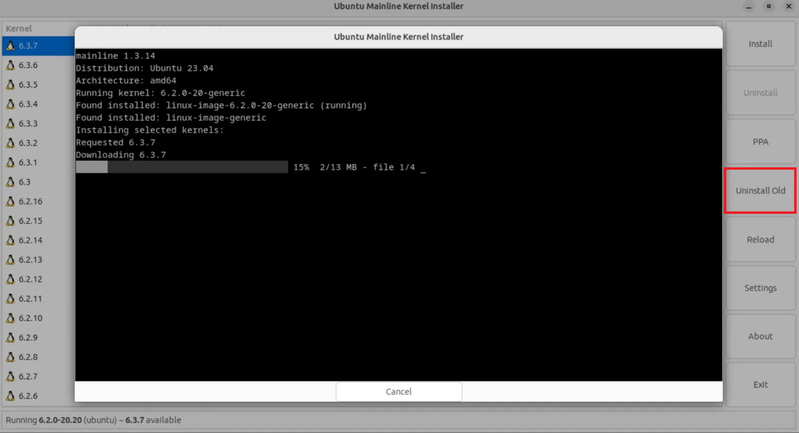
Type Y/N in the confirmation window, then press Enter to submit your response. You need to enter your sudo password to finish the process. Click Install after choosing the kernel version you want to use.
The kernel installation will take some time, so please wait. Finally, close the terminal window for the Ubuntu Mainline Kernel Installer that is opened.
Step 6. Reboot Your System
To check the status of your new kernel, switch back to the Ubuntu Mainline Kernel Installer. There you must see the kernel installed with a newer version compared with the version you viewed in the output of step 2. When you’re all set, you are ready to reboot your system as it asked you in the previous step.
So, for the updated adjustments to take effect, restart your computer:
$ sudo rebootAfter a system reboot, use the uname -r command once more to confirm the version number. As you guessed, this time, the output ought should contain the newly installed kernel version.
In this way, you used and completed the simplest method to Update Ubuntu Linux Kernel.
Method 2. Using CLI [ For Advanced Users]
If you are an advanced user, you can use this method to download the latest kernel packages via CLI. In this way, you can access the latest kernel package from Ubuntu mainline repository and finally install the Linux Kernel Using dpkg. To update Ubuntu Linux kernel with this method, follow the below steps.
Step 1. Download the Latest Kernel Package
To download the Latest Kernel Package, go to the Mainline kernel index page.
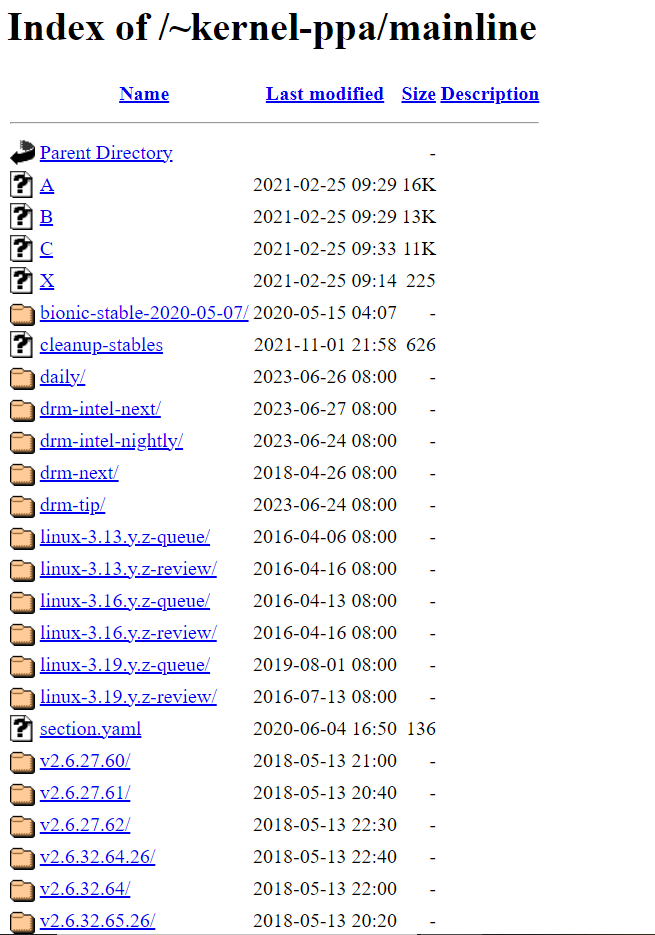
Find the most recent version in the list of kernel packages. The most recent kernel version will typically be at the directory’s very bottom. Open the required URL, and then depending on the architecture of your machine, download the DEB package.
Step 2. Install the Linux Kernel
To install the DEB package, go to the location where you got it and run the command below:
sudo dpkg -i linux-headers*.debIt’ll require some time. Using the following command, you may view and list the kernel files when the installation is complete:
ls -lStep 3. Reboot Your System
After the installation, restart the computer. The uname -r command can be used to verify the installation of the new kernel. As you know, Ubuntu boots into the newer kernel version by default.
So, you have completed this method as an advanced user to install or upgrade to the latest Linux kernel on Ubuntu.
Method 3. Using System Update Process [Safest Way]
Welcome to the third method to update Ubuntu Linux kernel. Follow the below steps if you prefer to use a safe way.
Step 1. Check the Existing Kernel Version
First, run the following command to check your current Kernel-Version:
uname –srStep 2. Update Repository
To update the Repositories, type in your terminal:
sudo apt-get updateThis command updates your local list of software, noting any fresher updates and revisions. The command will locate and mark a newer kernel version for download and installation if one exists.
Step 3. Install the Linux Kernel Upgrade
In this step, use the command below to run the upgrade:
sudo apt-get dist-upgradeUbuntu is instructed to handle any dependencies intelligently by the “dist-upgrade” switch. This command will ensure that the second program is upgraded before the first one if the functionality of one software package depends on another software package. The Ubuntu Linux kernel can be upgraded safely using this method. The kernel updates that you can obtain with this tool have been examined and found to be compatible with your version of Ubuntu.
You finished the third method to Update Ubuntu Linux Kernel.
Method 4. Force a Kernel Upgrade [Exception Case]
This method teaches you how to update Ubuntu Linux kernel using the system update process to force a Kernel upgrade. In some cases, a more recent kernel has been issued without being fully tested with your particular distribution of Ubuntu. There, you need to use a more substantial process to update Ubuntu Linux kernel.
Before going through the required steps to use this method, do not forget to back up your important files.
Step1. Launch the Software Updater
To search for Update Manager, use the software updater by pressing the Windows key. If updates are required, the update manager will let you know. However, if you have already updated your system, it says your computer is up-to-date.
Then, click the Settings button to view a new window with several tabs.
Step 2. Configure the Software Updater
Click the Updates tab to look for the first three checkboxes under ”Install updates from” and tick all of them:
- Important security updates
- Recommended updates
- Unsupported updates
Then, find a drop-down labeled ”Notify me of a new Ubuntu version” click on it and select:
- For long-term support versions (If you want to stick with tested and reliable versions with full support)
- For any new version (If you like playing with the latest-and-greatest, and don’t mind if things are a little buggy)
Reopen this window once it has been closed. If a new version is available, it ought to give the user the choice to upgrade.
Note: The upgrade often becomes accessible a few days after release, and the server traffic gradually decreases.
Step 3. Force the Upgrade
If the system does not automatically offer an upgrade for some reason, you can force it. Just open a terminal and type:
update-manager –d
A window displaying the release notes for the new kernel (and version) of Ubuntu should appear in response from the system. If everything appears to be in order, click Upgrade to start the procedure.
Method 5. Update Ubuntu Linux Kernel Manually [Unsafe way]
There is a 5th method for choosing and installing a new kernel if all you want to do is upgrade to the most recent (untested) kernel that is available and you’re aware of the dangers. Your system could become unusable if you manually Update Ubuntu Linux Kernel. As a result, you must be prepared to recover data from a backup if necessary.
It’s important to check your system configuration before completing this step. Do you use any specialized drivers? Any special packages or configurations? These might not work with the updated kernel.
There should be a recovery mechanism provided in case you make a mistake and discover the new kernel is incompatible.
Additionally, reading the release notes for the kernel you wish to install is a smart idea. Make a note of the revision number and any features you plan to use. Ukuu, a graphical tool for updating the kernel, will be used during this operation.
Step 1. Install Ukuu
Open up your terminal and run the following commands. (Hit enter after each line)
sudo apt-add-repository ppa:teejee2008/ppasudo apt-get updatesudo apt-get install ukuuStep 2. Launch Ukuu
To launch Ukuu graphical tool, run:
sudo ukuu-gtkIn this way, the Ukuu tool will start up and show a list of the Linux kernel versions that are currently available.
Step 3. Install the Kernel
Click the “Install” button on the right-hand side after choosing the kernel you want to use.
Step 4. Reboot the System
Restart your system after the kernel has been installed. You can reopen Ukuu to check the installation once you’re back in the OS.
All the above methods are solutions for how to change kernel version in Ubuntu answer. It is up to you to choose which one is the best for you according to your system and knowledge.
How to Remove the Updated Ubuntu Linux Kernel?
when you finish all the processes of Update Ubuntu Linux Kernel, you might have problems with the new Linux Kernel or not just like it. In this situation, the Kernel can be readily downgraded. You just need to remember the version of the new kernel you installed and follow the instructions below:
1. To delete all the changes you have made, boot into an older kernel and select the Advanced options for Ubuntu on the grub menu. The GRUB, or boot utility, will keep a copy of the old kernel that you can select and boot into.
2. There, you should see all the Linux kernels installed on your system. Select an older one. Do not choose the recovery mode.
3. Once you booted into your old kernel, you are ready to remove the new kernel.
4. To uninstall the installed kernel version, use the apt or dpkg command.
5. Use the commands below to remove the kernel you installed. Do not forget to replace your considered version.
sudo apt remove linux-headers-*.*.**
sudo apt remove linux-image-*.*.**
sudo apt remove linux-modules-*.*.**
FAQ
Does the older kernel remove from the system after updating?
No. Just because a new kernel has been installed doesn't mean the old one has been eliminated from the system. It is still available for use. Ubuntu always boots into the most recent Linux kernel that is available.
How to uninstall the old kernel?
When you completed step 4 of the first method in this guide, you must click the Uninstall Old button (on the right side of the installer screen) to uninstall the old kernel before installing the new one.
I need to uninstall the new kernel but i cannot see the grub menu.
To bring the grub menu, hold the shift key or use the Esc key.
What is my output saying? ''Linux 4.4.0-64 generic''
When you check your existing Kernel Version, you will see something like this in the output. The first two digits are the overall kernel package. The third digit is the version, and the fourth digit shows you the level of patches and fixes.
Conclusion
In this article, you reviewed five different methods to Update Ubuntu Linux Kernel. Check any of the methods to find whether is suitable for your Linux knowledge. I hope you found this tutorial helpful and feel comfortable with at least one of the explained methods to be able to update Ubuntu Linux kernel. Using this guide helps you feel running kernel seems to be up-to-date. However, let us know if you use another method for Ubuntu server update kernel.
If you follow the above steps properly then you can smoothly Update Ubuntu Linux Kernel without any errors but do not hesitate to contact us if you encounter any problems. Our technical support team will try their best to solve your problems.
How to update Ubuntu kernel without rebooting?
Without requiring a server reboot, KernelCare will automatically download and apply new kernel security patches after installation.
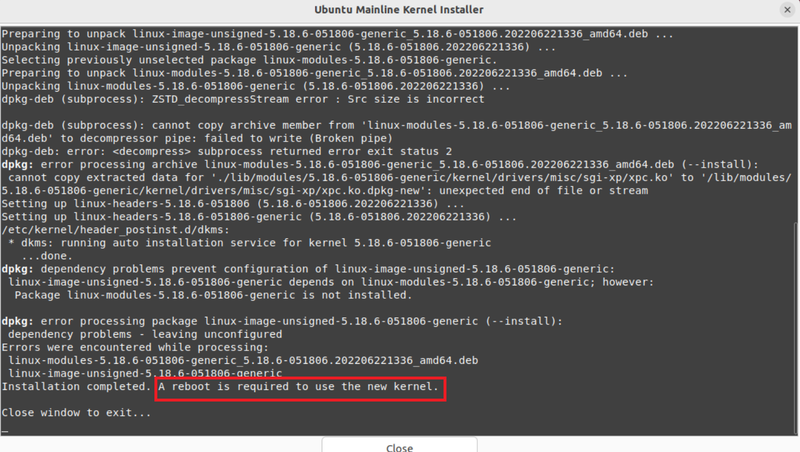
How to fix error processing package - dependency problems issue?
To fix the installation issue and solve dependency error, run the command below:
sudo apt -f installAlso, you can use the following command:sudo aptitude -f installHow often should we update Ubuntu kernel?
Regularly. If kernel updates are not applied on a regular basis, your system becomes susceptible to problems that can lead to crashes, loss of data, or expose you to cunning attackers who can take advantage of holes in the Linux kernel.