Use Nmap Command in Linux for Port Scanning
Use Nmap Command in Linux to scan open ports and identify active services on a network. Nmap is a command-line tool used for network exploration and security auditing by sending packets to target IPs and analyzing their responses.
🤖AI Overview:
Use Nmap Command in Linux for network exploration and security auditing by scanning open ports on a target system. Nmap helps identify which ports are open, closed, or filtered and reveals what services and operating systems are behind those ports. This tool is essential for troubleshooting network issues and assessing security vulnerabilities in Linux environments.
Prerequisites to Use Nmap to Scan Open Ports
To let this article works correctly, provide the below options and move on to exploring how to use Nmap command in Linux to scan open Ports.
Tip: If you have purchased a VPS with IPv6 configuration, secure both your IPv4 & IPv6 network interface with the appropriate tools.
- A non-root user with
sudoprivileges. - Access to a command line or terminal window.
- The apt and yum package manager.
All you need to know about Ports
A Port is an address that helps distinguish traffic destined for different applications or services which is implemented inside the operating system. Ports often have a default usage. TCP, UDP, Ping, and SYN scans are the most basic types of scans that send a specific type of packet to the target IP. According to the received response, the nmap command determines if the port is open or closed in Linux and displays the status of the target machine.
Knowing which ports are open and which are blocked matters. Because the port configuration can cause a security risk. If you are using a modern Operating System, ports are numbered addresses for network traffic. Firewall rules can be used to allow some ports and block others. So, you can configure your Linux firewall to block all traffic on the desired port. Also, you can use a firewall to scan traffic on a particular port and watch for suspicious traffic.
Previously, you learned what are Differences Between IPv4 & IPv6. As you know, IPv6 security is maintained separately from IPv4 in Linux. While by default ‘’nmap’’ scans IPv4 addresses, it can scan IPv6 addresses if the proper option is specified.
In order for a web server, an application server, and a file server to communicate, they each listen on a specific port. Once you are connected to a server, you connect to the IP address and a port. Due to the software you are using, the port will be specified. Stay with us in this guide to explore ports in more detail. Netstat program will be used to identify open ports and then, the nmap program is used to display the information of the machine’s port state on a network. Finally, at the end of this article, you must be able to identify common ports and scan your system for open ports.
Ports Differences
Before going through this guide and finding out how to use Nmap command in Linux, let’s learn how to identify common Ports.
Most ports under 1000 are dedicated and assigned to a specific service. Ports are specified by a number ranging from 1 to 65535. You do not need to concern with the services that tend to bind to specific ports because the number of available ports is so much.
You must have root privileges to assign services to ports below 1024 since they are associated with services that Linux and Unix-like operating systems consider critical to essential network functions.
Ports between 1024 and 49151 are considered as ‘’registered’’. So, they can be ‘’reserved’’ for certain services by issuing a request to the Internet Assigned Numbers Authority (IANA).
Common ports
According to your needs, you should learn how to find the appropriate ports for the applications you are trying to configure within their respective documentation.
In this part, you will get familiar with some of the most used and standard ports. Let’s see their designations.
- 20: FTP data
- 21 – FTP control port
- 22 – SSH
- 23: Telnet
- 25 – SMTP
- 43: WHOIS protocol
- 53 – DNS services
- 67: DHCP server port
- 68: DHCP client port
- 80 – HTTP – Unencrypted Web traffic
- 110 – POP3 mail port
- 113: Ident authentication services on IRC networks
- 123 – NTP
- 143 – IMAP mail port
- 161: SNMP
- 194: IRC
- 389: LDAP port
- 443 – HTTPS – secure web traffic
- 465 – SMTPS (send secure email)
- 587: SMTP – message submission port
- 631 – CUPS printing daemon port
- 993 – IMAPS (secure email inbox)
- 666: DOOM – This legacy game actually has its own special port
If both the client and server are configured to use a non-standard port, the service can be configured to use a port other than the default.
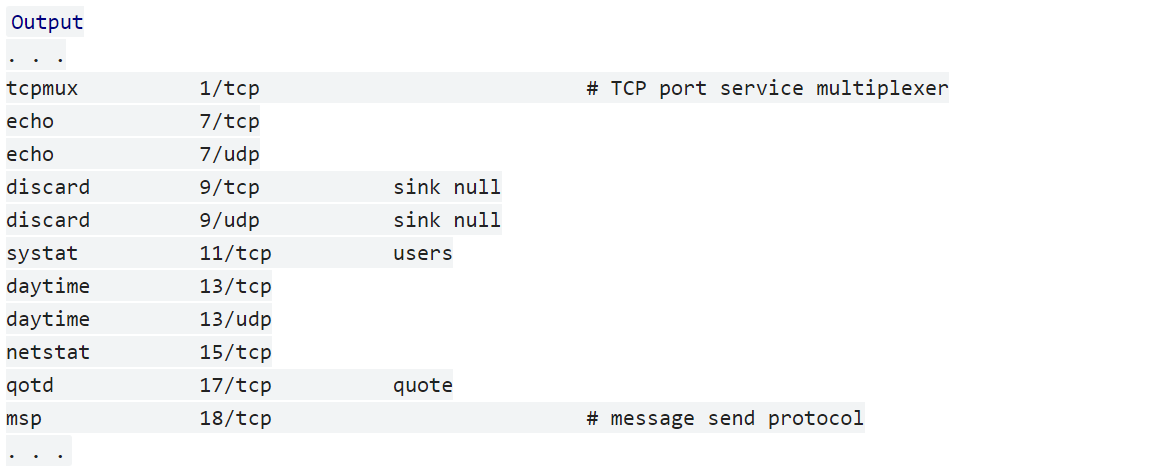
To list some of the common ports, use:
less /etc/servicesYou will get an output like the below one that displays multiple pages depending on your system. To see the next page, press the SPACE key, and to return to your prompt, press Q .
Tutorial Use Nmap Command in Linux to Scan Open Ports
To understand which ports are open, a process of attempting to connect to some sequential ports is needed which is called Port scanning. It also shows what services and operating systems are behind those ports. Each section of the below explanation helps you to reach out the way you can use Nmap Command in Linux.
How to Check Open Ports [Nmap & Netstat]
Here is a useful tip before you continue on learning How to use Nmap command in Linux to scan open Ports. You can use various tools to scan for open ports. Netstat is one of them that is pre-installed on most Linux distributions. Using netstat helps you to discover which services you are running. To use this tool, type:
sudo netstat -plunt![Check Open Ports [Nmap & Netstat]](https://operavps.com/wp-content/uploads/2022/12/Check-Open-Ports-Nmap-Netstat-1024x126.png)
As you see, you can see the port and listening socket associated with the service, which lists both UDP and TCP protocols. In the following of this guide, you can see how to use Nmap as the other tool for port identification.
This is because this section discusses how to use two different tools to scan for open ports: Nmap and Netstat. The link to Check Open Ports in Linux can then provide more information about using Netstat, which is a more basic tool than Nmap.
How to Use Nmap Port Scanner
Nmap is one of the most common and powerful tools that allow you to discover your system weaknesses to secure your network. Use the commands below to install nmap on your Ubuntu or Debian server.
sudo apt-get update
sudo apt-get install nmap
And to see a more extensive association between ports and services by looking in this file, run:
less /usr/share/nmap/nmap-servicesScan Nmap Ports
Open the terminal and run the command below to scan Nmap ports on your remote machine. Here is the basic format for Nmap.
sudo nmap 192.168.0.1Clearly, you must replace your system IP address with the above IP address to view the information of ports on your system.
To scan a host, type:
nmap www.hostname.comYou might need to scan a range of IP addresses. For example, 1-10. To do this, use the command below with the recent explanation about replacing your IP address.
nmap 192.168.0.1-10Also, you can run Nmap on a subnet:
nmap 192.168.0.1/13If you consider scanning targets from a text file, type:
nmap –iL textlist.txtScan a single or series of ports Using Nmap
Using Nmap enables you to scan a single port or a series of ports. To do this, you just need to scan port 80 on the system you are testing.
nmap –p 80 192.168.0.1Then, scan ports 1 through 200:
nmap –p 1-200 192.168.0.1Use the following command to scan the most common ports:
nmap –F 192.168.0.1And finally, you will be able to scan all ports (1 – 65535) by running:
nmap –p– 192.168.0.1Type of Nmap Port Scans
Using Nmap allows you to experience different types of scans. As we mentioned, there are some basic types of scans like TCP, UDP, Ping, and SYN scans. Let’s see how these types perform.
In TCP/IP and UDP networking, ports are endpoints for logical communications. It takes longer to scan using TCP, but it is more likely to connect.
nmap –sT 192.168.0.1The other type of Nmap Port scan is the default SYN scan:
nmap –sS 192.168.0.1Also, you can use Nmap to scan UDP ports instead of TCP ports.
nmap –sU –p 80,130,255 192.168.0.1the –p switch specifies ports 80, 130, and 255.
To perform a ping scanning or host discovery, use:
sudo nmap -sn 192.168.10.0/24While host discovery uses ping, many server firewalls do not respond to ping requests. Use the command below to run a fast scan on the target system, but bypass host discovery.
nmap –Pn –F 192.168.0.1the other usage of the nmap tool is to detect the operating system of a particular target:
nmap –A 192.168.0.1Anytime you want to probe for the services that might be using different ports, you can easily use nmap:
nmap –sV 192.168.0.1Conclusion
Mastering how to use Nmap command in Linux empowers developers and system administrators to perform effective network exploration, open port scanning, and security auditing. By understanding ports, scan types, options, output interpretation, and best practices, you can enhance your network troubleshooting and security assessment capabilities.
Nmap remains a fundamental tool in managing Linux-based network environments, ensuring applications are reliable and protected.
This guide has presented a comprehensive overview to help you confidently use the Nmap command in Linux and integrate its functions into your professional toolkit.
FAQ
2. How do I install Nmap on a Linux system?
Nmap can be installed using package managers. On Debian or Ubuntu, use 'sudo apt-get update' followed by 'sudo apt-get install nmap'. On RHEL or CentOS, use 'yum install nmap'.
3. How do I perform a basic port scan using Nmap?
Use the command 'sudo nmap [IP_Address]' replacing [IP_Address] with the target IP. This scans common ports on the target host.
4. What types of port scans can I conduct with Nmap?
Nmap supports several scan types such as TCP connect scan (-sT), SYN scan (-sS, default), UDP scan (-sU), and ping scan (-sn) for host discovery.
5. How can I specify ports to scan with the Nmap command?
Use the '-p' option followed by port numbers or ranges, for example, 'nmap -p 80 192.168.0.1' to scan port 80 or 'nmap -p 1-200 192.168.0.1' to scan ports 1 through 200.
6. Does Nmap support scanning of both IPv4 and IPv6 addresses?
Yes, Nmap scans IPv4 addresses by default. For IPv6 scanning, specify the IPv6 address with the appropriate options to enable Nmap to analyze IPv6 hosts.
7. What are the security considerations when using Nmap on a network?
Scanning must be authorized to avoid being perceived as malicious activity. Unauthorized scans can trigger alerts or be legally questionable. Always scan systems you own or have permission to test.
8. How does Nmap differ from other port scanning tools like Netstat?
Netstat shows open ports on the local system, listing active connections and listeners. Nmap performs network-wide scans, probing remote hosts to discover open ports and services.
9. Can I use Nmap to detect the operating system of a target host?
Yes, using the '-A' option, Nmap can perform OS detection, version detection, script scanning, and traceroute to gather detailed information about the target.
10. How do I perform a fast scan of common ports using Nmap?
Use the '-F' option with Nmap, for example, 'nmap -F 192.168.0.1', to scan the most common ports quickly, reducing scan time while covering important ports.