What Is Port Forwarding In Windows How to Use It!

What Is Port Forwarding In Windows? How to Use It!

One of the critical reason for using Port forwarding in windows; Is that allows you to manage requests sent to your IP through the router. Most networks have a firewall to block incoming ports. The firewall blocks these ports to ensure network security, so access to data and services becomes more difficult without forwarding the Port.

This article will fully explain how to use port forwarding (port mapping); If you care about your connection speed and fast online traffic on the server, this post can help you; port forwarding security and port forwarding in Windows will be the factors that we will describe.

What Is The Port Number?

The lexical definition to any input that passes and reflects sound, signal, and other items to hear that sound, such as speakers or headphones; It is called a gateway as a port. These ports are called hardware ports; We have defined the port as hardware to get acquainted with the word port more easily. The main discussion on this topic will be software ports.

While we are using the IP address to find the computer, the port/gateway is used to find the computer’s process. In the following, we will introduce you to the numbers used for specific services; to understand the port number more efficiently. Here you can see the port numbers described for each program.

1- Ports 1 to 1024

These ports (known ports) are called, and each of these is used for specific services and are among the most popular ports; different services already reserve them.

2- Ports 1024 to 49151

Ports in this range are called (registered ports) that can be temporarily assigned to non-standard processes to increase security.

3- Ports 49151 to 65535

Ports in this range can be called (private ports) used without restrictions; these ports are usually used to transmit viruses or malware.

In the table below, you can see the specific services that are assigned to some ports.

Network ports

ServicesPort Numbers
HTTP80
HTTPS443
DNS53
REMOTE DESKTOP3389
FTP21
Login to CPanel2082
TELNET23

You can also visit the IANA site to view all port numbers.


What Is Port Forwarding? (Mapping)

In short, port forwarding is a process that allows you to send your network traffic through your desired port number and make it available to others on your local network or Internet.

Port forwarding is a method that opens specific ports for particular tasks; for example, Port forwarding in windows server makes internal networking systems accessible from outside the network to store copies of your important files online in several different locations.

Types Of Port Forwarding In SSH

1) Local Port Forwarding

The user can connect to various servers from his system and certain access pages blocked by the firewall; Also, the transfer of information between computers and applications on servers will be secure as a connection.

2) Remote Port Forwarding

You can access client services in SSh server applications.

In a more straightforward expression with (RDP-PF), you can forward the RDP port defined as 3389 and define this port as the IP of a device; You can access that system at any time and place.

ATTENTION: FOR SECURITY REASONS, DO NOT OPEN YOUR SERVER RDP PORT TO THE INTERNET (VERY IMPORTANT)

Also: if you have any problem of RDP connection, you can be able to solve your problem by visiting the topic for ( 6 Reasons Why The RDP Server Is Not Connecting )

3) Dynamic Port Forwarding

This type of forwarding mapping, or port forwarding on the network, does the same thing as a proxy; You can go through open ports in the firewall.

In fact, a server will act as an intermediary in which information can be sent and received to one or more servers securely.


General Method Of Using Port Forwarding

There is a general way to use the forwarding port:

  • Port forwarding with PUTTY application

NOTE: You can download the putty software by clicking on the given link:

DOWNLOAD PUTTY SOFTWARE


 SSH Port Forwarding With Putty


You can now do port forwarding, according to the three types of port forwarding you saw above. To start the ssh forwarding port using PUTTY software, you first need to install this software on your operating system; Then, after running the putty, you should continue the following steps according to the photos.

Local Port Forwarding with PuTTY


Port forwarding using Putty step 1

SSH Forwarding Port Using Putty

Step1

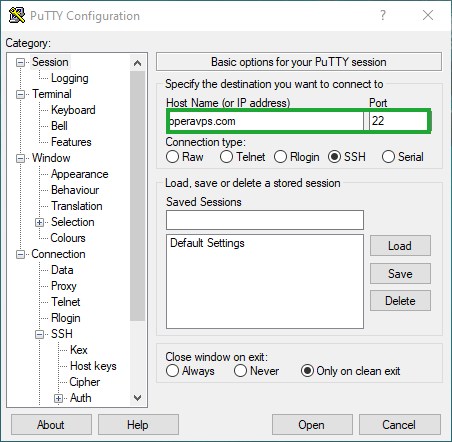
Like in the photo, to the upper left part of the Session tab, you can enter localhost or IP Address, and in the right position, you can also enter the port number.

For example: Localhost > Operavps.com ; Port number > 22

Port forwarding in putty

Source Port And Destination Address

Step2

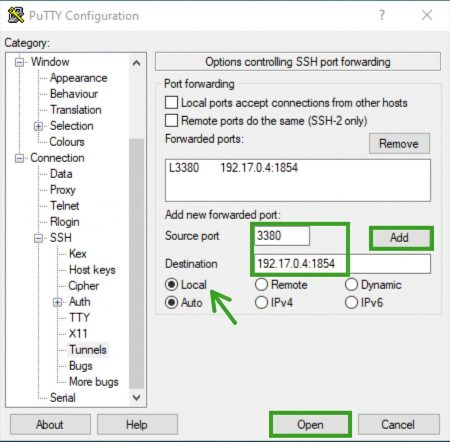
As you can see in the picture below; According to the CATEGORY tab, you must select the LOCAL option on the left with the address Connections / SSh / Tunnels

  1. you need to enter the (port number) at the SOURCE PORT section and type the (destination address) in the destination section, which you can see in the photo; For example ( Destination > 192.17.0.4:1854; Source port > 3380 )
  2. Click the ADD on the right side of the SOURCE PORT section
  3. After completing the second part and adding the source section and destination address; Now your port forwarding is done in LOCAL mode; with the OPEN option at the bottom of the Putty software, you can start the port forwarding process in local SSH

Note: we can start port mapping with the remote and dynamic mode too, like all steps that you have seen last time on LOCAL mode, but we have to change the type of connection, then we are ready to go :


Port forwarding in windows 10

On remote mode


Port forwarding using Putty Dynamic mode

On Dynamic Mode


Open A Firewall Port to Port Forwarding On Windows ( Using Firewall )


Port Forwarding In Windows 10 Using Firewall

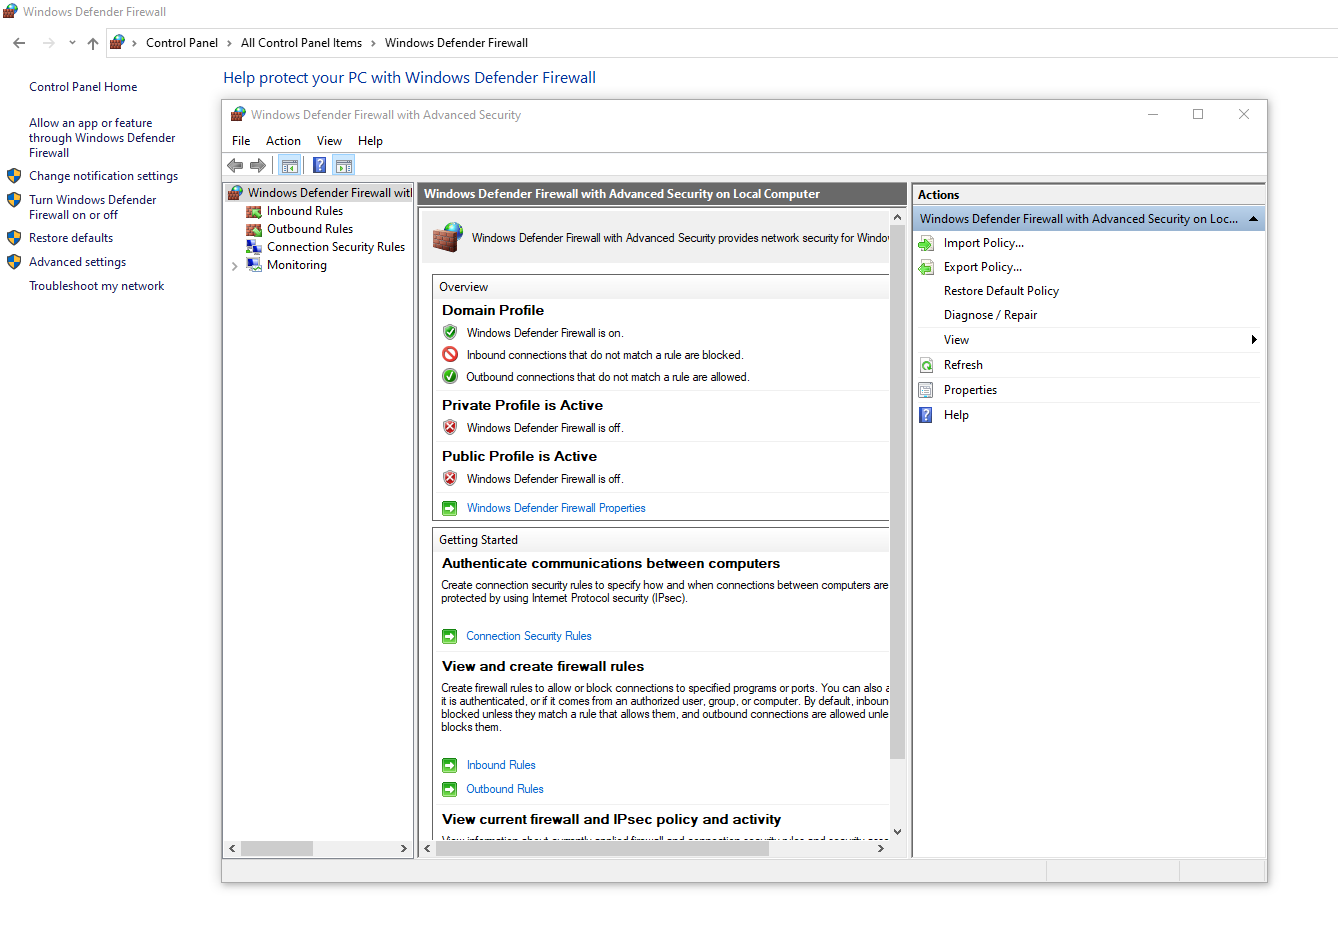
  1. First, you need to go: (control panel/windows defender firewall) and click on the Advanced Settings at the left side of the page to see the below window.
  2. Right-click on the INBOUND RULES and enter the new rule.
  3. Select the port section and click on the Next button.
  4. Type your specific port number and select one of the ( UDP or TCP ) protocols.
  5. At the next window, we need to select allow the connection, radio button.
  6. In the new window, select the network type based on Domain, Private or Public, and click Next.
  7. In the final step, you need to name your rule, for example ( Port forwarding on port 443 ), and click on the finished button.

Awesome! You now have access; to a port that was blocked in Windows Firewall, to start your forwarding port. way to start port forwarding, that we mentioned in the LOCAL SSH Port Forwarding section above by putty

Note: You must do the same steps for OUTBOUND RULES as well.


You can also refer to the given link for more information on how to open a port on the Windows VPS Firewall.


 Is Port Forwarding Safe?

It is generally safe to use post-forwarding, but do not open all ports on the network in the forwarding port under any circumstances because the possibility of hackers and malware infiltrating your system is high if you want to forward the port only for the internal server. when you are using the Minecraft server or PS4 or PS5 games from the Forward port, You have no security problems, and you can use it easily.

Note that you can increase security by setting traffic restrictions with IP or restricting them to one country or region.
DDOS attacks are also among the security features that you can reduce attacks by limiting bandwidth; so that you do not have to worry about the DDOS attacks when using a forwarding port on the server.


For more information, you can take a closer look at how you can prevent DDS attacks

Most Uses Of Port Forwarding

1- Access to remote CCTV cameras

2- Remote access to your laptop or server files from anywhere

3- Share access to your services by changing ports using the forwarding port

4- Set up a private gaming server to connect permanently to prevent ports from being closed by routers on a private server opened by a forwarding port
Conclusion

We hope you enjoy reading this article; thank you for your valuable time to read this article; If you have experience using the forwarding port, please let us know in the comments section; See you later in the next post 🙂

Leave a Reply

Your email address will not be published. Required fields are marked.