Install phpMyAdmin on Ubuntu and Debian Easily
Install phpMyAdmin on Ubuntu and Debian to manage MySQL or MariaDB with a web interface. Use terminal commands to install, configure Apache, and secure your installation for efficient database management.
🤖AI Overview:
Install phpMyAdmin on Ubuntu and Debian provides a web-based interface for managing MySQL or MariaDB databases efficiently. It involves updating packages, installing phpMyAdmin with Apache configuration, and securing the setup for production use. This enables easy database control through a browser on Linux servers.
Prerequisites to Install phpMyAdmin on Ubuntu and Debian
To let this tutorial work correctly, provide the options below and move on.
- Buy Linux VPS running Ubuntu/Debian.
- A non-root user with
sudoprivileges. - Access to a command line/terminal window.
- Update your system package to avoid conflicts during the phpMyAdmin Ubuntu install or Debian phpMyAdmin setup:
- To use phpMyAdmin on Ubuntu or Debian, you need a working LAMP stack on Debian & Ubuntu. If you haven’t installed it yet, use:
sudo apt install apache2 -y
sudo apt install mysql-server -y
sudo apt install php php-mbstring php-zip php-gd php-json php-curl php-mysql libapache2-mod-php -y- phpMyAdmin install on Ubuntu and Debian systems depends on specific PHP extensions:
sudo phpenmod mbstring
sudo systemctl restart apache2
Install phpMyAdmin on Ubuntu and Debian Step-by-Step
Now that your system is ready, here’s how to install phpMyAdmin on both Debian and Ubuntu securely.
In the end, you will be able to administer MySQL and MariaDB servers and interact with your target database server.
Step 1. Update Your System Packages
First, ensure your system is up-to-date. This avoids conflicts during the phpMyAdmin Ubuntu install or Debian phpMyAdmin setup:
sudo apt update && sudo apt upgrade -yThis step applies to both Ubuntu and Debian systems, whether you’re planning to install phpMyAdmin Debian 10, Debian 11, or the latest Ubuntu phpMyAdmin version.
Step 2: Install phpMyAdmin Package on Ubuntu or Debian
Use the following command to install phpMyAdmin on Linux:
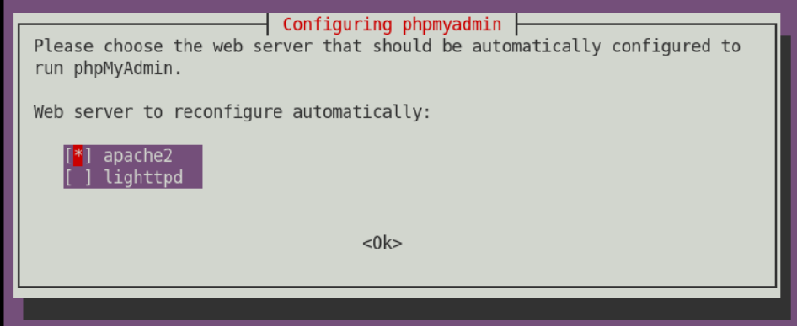
sudo apt install phpmyadmin -yDuring the installation, you’ll be asked to choose a web server. Select apache2 using the spacebar, then press Enter.
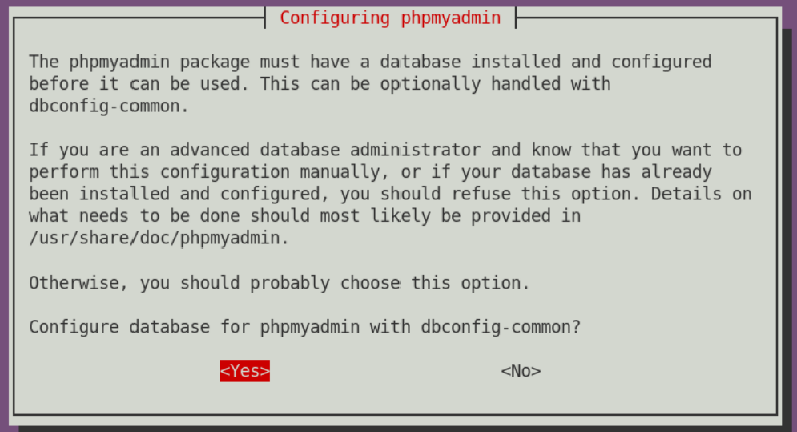
Next, choose Yes to configure the database with dbconfig-common and set your MySQL application password.
This step installs all the core components needed for Debian and Ubuntu install phpmyadmin, which sets up their database schema.
Step 3: Configure phpMyAdmin on Ubuntu and Debian
phpMyAdmin requires a web server to be served over a web browser using either the local network or the Internet.
On Ubuntu:
On Ubuntu, choose the apache2 web server to automatically configure. Just press Tab to navigate to <ok> and hit Enter.
Once the installer asks to configure the database for phpMyAdmin, select <Yes> and hit Enter.
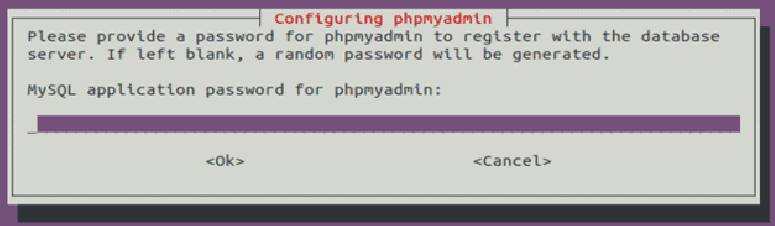
The default username is ‘’phpMyAdmin’’. Choose a strong password (which works as an administrator password) when you are prompted by the installer.
When you are finished, hit Enter, then confirm the password and hit Enter again.
On Debian:
On Debian, you can use both MariaDB and MySQL because of their common features and commands. Here, we use MariaDB as an open-source database management system.
sudo apt install mariadb-server mariadb-client -ysystemctl status mariadbWhen you see the active (running) status, you are ready to configure the MariaDB database.
sudo mysql_secure_installationThen, to set a root password, type y and press Enter to create a strong root password for your database. A specified user is required for the phpMyAdmin tool to connect to your database. It is safer and easier to manage the degree of rights given to a user when you create a new MariaDB user.
So, creating a new MariaDB user could be one of the essential steps when you are done installing phpMyAdmin on your Debian.
Step 4: Enable Apache Configuration for phpMyAdmin
On some systems, phpMyAdmin’s Apache config may not be enabled automatically. Link and enable it manually:
sudo ln -s /etc/phpmyadmin/apache.conf /etc/apache2/conf-available/phpmyadmin.conf
sudo a2enconf phpmyadmin
sudo systemctl reload apache2
This ensures that Apache serves the phpMyAdmin interface properly. Now your Ubuntu phpMyAdmin panel should be functional.
Step 5: Allow Web Traffic Through the Firewall (for Apache Access)
If you’re running UFW on your server, you’ll need to explicitly allow Apache. Otherwise, even a correct phpmyadmin install won’t be reachable via the browser.
sudo ufw allow 'Apache Full'Without this, the phpMyAdmin web interface won’t be accessible through the browser.
Step 6: Access phpMyAdmin from a Browser
Once installed, open your browser and visit:
http://your-server-ip/phpmyadminLog in using your MySQL root user or any MySQL account with sufficient privileges. You’ve now completed the phpMyAdmin install Ubuntu process.
Access phpMyAdmin on Ubuntu
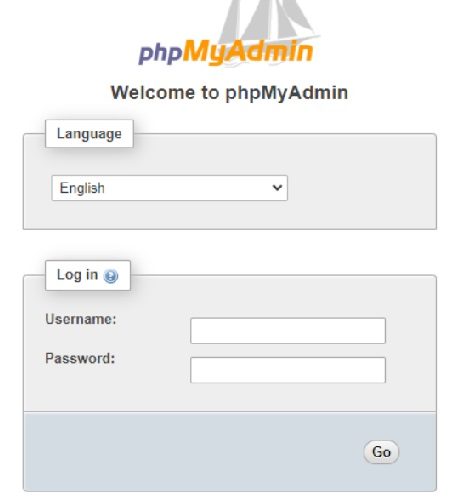
Upon completion of the installation process, launch a browser and navigate to http://your-server-IP/phpmyadmin. Substitute the IP address of the server for your-server-IP.
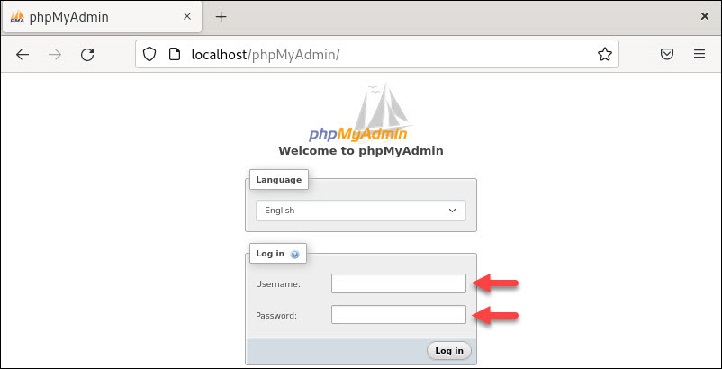
Use the URL http://localhost/phpmyadmin if you’re using localhost. This is how the phpMyAdmin login screen will appear.
Access phpMyAdmin on Debian
To access phpMyAdmin, open a web browser and type localhost/your_phpMyAdmin_directory into the address bar. In our instance:
localhost/phpMyAdminAs soon as you connect to the locally built Apache, MariaDB, and PHP files, the machine displays the phpMyAdmin login screen.
Use the username and password you created for the MariaDB user to access phpMyAdmin.
Step 7: Test phpMyAdmin on Ubuntu
To test whether phpMyAdmin is working correctly or not, run the commands below and replace your information:
localhost/phpMyAdminYour server’s IP address/phpMyAdminwww.domain.com/phpMyAdminThe browser shows you a screen with a login form that welcomes you to phpMyAdmin. Please enter your username and password.
The phpMyAdmin dashboard is loaded by the browser.
Step 8: Create a New MySQL User for phpMyAdmin (Bypass auth_socket)
Ubuntu by default uses auth_socket to authenticate a root user with MySQL versions 5.7 and later.
This type of authentication is highly secure and validates the socket username against the name listed in the MySQL user table. But this makes using phpMyAdmin challenging.
The type of authentication can be altered. Making a new MySQL administrator account is a simpler way to get around auth_socket.
First, type the command below to log in to the MySQL server:
sudo mysqlReplace UserName with the username of your choice, and Password with a suitable strong password when entering the commands below:
CREATE USER 'UserName'@'localhost' IDENTIFIED BY 'PassWord';GRANT ALL PRIVILEGES ON *.* TO 'UserName'@'localhost' WITH GRANT OPTION;To exit the MySQL shell, run:
exitStep 9: Back Up phpMyAdmin Configuration and MySQL Databases
Before modifying configs or locking down access, always back up your phpMyAdmin-related files and databases.
A misstep could lock you out or break your Ubuntu phpMyAdmin install entirely.
- Backup MySQL Databases:
sudo mysqldump -u root -p --all-databases > /root/all-databases-backup.sql- Backup phpMyAdmin Configuration File:
sudo cp /etc/phpmyadmin/config.inc.php /etc/phpmyadmin/config.inc.php.bak- Backup Apache Configuration:
sudo cp /etc/apache2/conf-available/phpmyadmin.conf /etc/apache2/conf-available/phpmyadmin.conf.bakThese quick backups ensure you can restore your phpmyadmin install Ubuntu setup in seconds if needed. It’s a safety net every smart Linux admin uses.
Step 10: Secure Your phpMyAdmin Installation
Out of the box, phpMyAdmin is accessible to anyone who knows the URL. This makes it a common attack target. Let’s harden the installation.
Configure Apache to Serve phpMyAdmin
In some systems, phpMyAdmin is not linked automatically. If you don’t see it at http://your-server/phpmyadmin, create a symbolic link:
sudo ln -s /usr/share/phpmyadmin /var/www/html/phpmyadminDisable MySQL Root Login via phpMyAdmin (Critical Production Hardening)
Exposing root access in phpMyAdmin is one of the fastest ways to get hacked. You absolutely must disable it for every serious phpmyadmin Ubuntu or debian phpmyadmin deployment.
sudo nano /etc/phpmyadmin/config.inc.phpFrom here, you can:
- Define the Blowfish secret for encryption.
- Enable multiple database server support.
- Change the default language, theme, or timeout.
For advanced Ubuntu phpmyadmin setups or multi-server deployments, this file is where you’ll do the tuning.
Add or update this line:
$cfg['Servers'][$i]['AllowRoot'] = false;This simple change locks the front door tight, phpmyadmin install Ubuntu doesn’t need to be root-friendly.
Limit Access by IP
Restricting access to only trusted IPs is a good first line of defense. Open the Apache config:
sudo nano /etc/apache2/conf-available/phpmyadmin.confFind the <Directory /usr/share/phpmyadmin> block and insert:
Require ip your.ip.address.hereReload Apache:
sudo systemctl reload apache2Now, only your IP can access the phpMyAdmin on the Ubuntu panel, best practice for phpMyAdmin Linux setups.
Add this line inside the block:
AllowOverride AllThen save and close (Ctrl + X, then Y, Enter), and enable rewrite module:
sudo a2enmod rewritesudo systemctl restart apache2Add HTTP Authentication
An additional login layer can stop bots or bad actors. Install Apache’s authentication utilities:
sudo apt install apache2-utilsCreate a password file:
sudo htpasswd -c /etc/phpmyadmin/.htpasswd youradminEnter a strong password. Then edit your .htaccess file:
sudo nano /usr/share/phpmyadmin/.htaccessModify the config again:
<Directory /usr/share/phpmyadmin>
    AuthType Basic
    AuthName "Restricted"
    AuthUserFile /etc/phpmyadmin/.htpasswd
    Require valid-user
</Directory>
Apply changes:
sudo systemctl restart apache2This is a strong enhancement for anyone using phpMyAdmin Ubuntu in production.
Whether you’re deploying on a Cheap Linux VPS, setting up a cost-effective Linux VPS hosting stack, or looking for Linux distributions for secure browsing, having a well-hardened phpMyAdmin install is essential for long-term stability.
Finally, to check your phpMyAdmin setup is secured and ready to use, run:
sudo systemctl restart apache2Step 11: Install SSL Certificate with Let’s Encrypt (HTTPS is Not Optional)
Using HTTP on a live phpmyadmin on Ubuntu setup is reckless. A free SSL certificate not only encrypts your session but also builds trust and protects credentials in transit.
sudo apt install certbot python3-certbot-apache -y
sudo certbot --apache
This instantly upgrades your install phpmyadmin Ubuntu instance to production-grade with HTTPS.
Step 12: Update phpMyAdmin on Ubuntu or Debian (Optional)
To avoid security vulnerabilities, periodically update your installation. Run:
sudo apt update && sudo apt upgrade phpmyadmin -yThis keeps your Ubuntu phpMyAdmin install safe and up to date.
Step 13: Confirm phpMyAdmin is working
To visit if your phpMyAdmin is working, check out:
http://your-server-ip/phpmyadminLog in with your MySQL root or another database user.
How to Use phpMyAdmin on Debian
When you are done with installing and configuring phpMyAdmin, you are ready to go through the remaining steps to use it on your Debian.
Step 1. Configure and Unpack phpMyAdmin
Run the following command to create a phpMyAdmin directory in the Apache web root directory:
sudo mkdir /var/www/html/phpMyAdminTo access the Downloads directory and unpack the phpMyAdmin tar.gz files to the newly created directory, type:
sudo tar xvf phpMyAdmin-latest-all-languages.tar.gz --strip-components=1 -C /var/www/html/phpMyAdminUse the following command to create a default configuration file:
sudo cp /var/www/html/phpMyAdmin/config.sample.inc.php /var/www/html/phpMyAdmin/config.inc.phpOpen your preferred text editor and add a secret passphrase to the config.inc.php file:
sudo nano /var/www/html/phpMyAdmin/config.inc.phpLocate the following line:
$cfg['blowfish_secret'] = '';Between the single quotes, insert a secret passphrase. For instance:
$cfg['blowfish_secret'] = 'My_Secret_Passphras3!';Select a challenging passphrase, exit, and save the file (Ctrl+x).
Change the config.inc.php file’s permissions:
sudo chmod 660 /var/www/html/phpMyAdmin/config.inc.phpRun the command below to change ownership of the phpMyAdmin directory:
sudo chown -R www-data:www-data /var/www/html/phpMyAdminTo restart Apache, type:
sudo systemctl restart apache2Step 2. Check phpMyAdmin GPG Key
Every downloaded package has an associated.asc file with its key signature. The signature can be checked once both files are in the same folder.
Download the phpMyAdmin keyring to the previous location you used to verify the GPG key for phpMyAdmin. In this instance, Downloads:
wget -P Downloads https://files.phpmyadmin.net/phpmyadmin.keyringTo navigate to the Downloads directory, then import the keyring:
cd Downloadsgpg --import phpmyadmin.keyringDownload the relevant GPG.asc file for your phpMyAdmin version and stay in the same directory.
wget https://www.phpmyadmin.net/downloads/phpMyAdmin-latest-all-languages.tar.gz.ascAgain, stay in the same directory and verify the .asc file against the keyring you downloaded:
gpg --verify phpMyAdmin-latest-all-languages.tar.gz.ascNow you can contrast the developer credentials on the phpMyAdmin documentation page with the GPG key.
Conclusion
In this guide, we covered how to install phpMyAdmin on Ubuntu and Debian systems using Apache as the web server.
From updating your system packages to configuring Apache and securing your MySQL root access, each step was designed to give you production-ready access to phpMyAdmin on Ubuntu or phpMyAdmin Debian environments.
You now know exactly how to install phpMyAdmin, properly configure phpMyAdmin, and even how to manage access via the /phpmyadmin URL securely.
Following this guide can save you time and headaches when dealing with databases. If you want to learn more, exploring the official phpMyAdmin documentation and community forums can provide additional insights and advanced usage tips.
By following this step-by-step tutorial, you can confidently install phpMyAdmin on Ubuntu and Debian systems, enabling you to efficiently manage your databases in a secure and user-friendly manner.
FAQ
2. How do I install phpMyAdmin via terminal?
Run "sudo apt update && sudo apt install phpmyadmin", select Apache2, configure "dbconfig-common", and set MySQL app password.
3. How to configure Apache for phpMyAdmin?
Link config with "sudo ln -s /etc/phpmyadmin/apache.conf /etc/apache2/conf-available/phpmyadmin.conf", enable with "sudo a2enconf phpmyadmin", then reload Apache.
4. How to access phpMyAdmin securely?
Use "http://your-server-ip/phpmyadmin", set strong passwords, disable root login in phpMyAdmin, restrict access by IP, and add HTTP authentication.
5. How to secure phpMyAdmin installation?
Disable root login, restrict IPs in Apache, enable HTTPS with SSL, and add HTTP auth for extra security.
6. How to create a new MySQL user for phpMyAdmin?
Use MySQL commands to create a user and grant privileges, avoiding socket authentication issues.
7. How to update phpMyAdmin?
Regularly run "sudo apt update" and "sudo apt upgrade phpmyadmin -y" to keep secure.
8. What if phpMyAdmin is inaccessible after install?
Check Apache service, firewall rules, phpMyAdmin config enablement, and correct URL.
9. How to back up phpMyAdmin settings and databases?
Dump MySQL databases and copy config files to backup locations.
10. How to verify phpMyAdmin installation?
Login via browser; if dashboard loads and Apache runs, installation was successful.
I'm using PHP 8.1 with phpMyAdmin 5.2.1 and encountering issues like missing CSS and authentication problems. Help me resolve this
Dear Rudra, these issues can arise due to compatibility problems between phpMyAdmin and PHP 8.1. Ensure that all necessary PHP extensions are installed. Install the using below command:
sudo apt install php-mbstring php-zip php-gd php-jsonRestart Apache when installation is complete:sudo systemctl restart apache2This should resolve the display and authentication issues. Let me know if it is not.Why after upgrading PHP or Apache, phpMyAdmin no longer works?
Dear Kamal, upgrading PHP or Apache can sometimes break phpMyAdmin due to compatibility issues or missing configurations. So, ensure that the phpMyAdmin configuration is still included in Apache's configuration. If not, add the following line to your Apache configuration file:
Include /etc/phpmyadmin/apache.confThen, restart Apache by running below command:sudo systemctl restart apache2This should restore phpMyAdmin functionality.I get a "404 Not Found" error when accessing http://localhost/phpmyadmin after installation. Please help
Dear Lion, this typically occurs when Apache isn't configured to serve phpMyAdmin. During installation, if you didn't select Apache for automatic configuration, the necessary alias might be missing. To fix this, manually include the phpMyAdmin configuration by adding the following line to your Apache configuration file (e.g., /etc/apache2/apache2.conf):
Include /etc/phpmyadmin/apache.confAfter adding this line, restart Apache:sudo systemctl restart apache2This should resolve the 404 error.My large database makes phpMyAdmin slow or it times out. How can I improve performance?
Dear Toby, You can increase PHP limits (e.g., memory_limit, upload_max_filesize), disable unnecessary UI features in config.inc.php, and for large imports, use MySQL CLI instead of phpMyAdmin. You can also optimize MySQL settings for better performance.
I’m new to phpMyAdmin on Ubuntu. I ran sudo apt-get install phpmyadmin, chose Apache2, but I get a 404 page at http://localhost/phpmyadmin. What did I miss?
Dear Lily! You likely need to enable the phpMyAdmin config for Apache. To solve it, Run:
sudo ln -s /etc/phpmyadmin/apache.conf /etc/apache2/conf-available/phpmyadmin.confThen:sudo a2enconf phpmyadminandsudo systemctl reload apache2Also, ensure required PHP extensions are enabled (e.g., php-mbstring). Check logs if issues persist.