Change DNS Server in Windows ➞3 Useful Methods
To change DNS server in Windows may be it if you are seeking a solution to solve your internet connection problems. DNS servers are set automatically in Windows to connect to the local network. This is why changing them can lead to troubleshooting your internet connection problems.
There are several reasons why it’s better to change DNS server in Windows. The DNS IP addresses that the ISP (internet service provider) uses are usually not so much private and fast. Besides, you must change the server address if your DNS server is not responding.
Based on the version, there are three ways to Change DNS Server in Windows, which we will discuss in this article. The fastest way is using the CMD, while the other solutions are more user-friendly. Meanwhile, the best method is to buy Windows VPS, which ensures high speed and stability 7/24, regardless of your network.
It’s best to choose the solution according to your preferences. Here, we cover the methods to change DNS Server in Windows 7 / 8 / 10 and 11, how to test the DNS address changes, and how to revert them. So, let’s start.
What is DNS?
First, let’s discuss the DNS server definition. Like the doorplate showing the designated number of the house, IP is the given name of any website, server, and client who connects to the internet. Now, you may wonder how DNS is related to this.
Similar to the map apps where you enter the name and it shows you the destination, DNS translates IP addresses (198.192.6.6, for example) to domain names (e.g., Operavps.com). In fact, DNS equals “Domain Name System.”
It’s more like your phone’s contact list, where anyone gets a number. DNS does so, like your phone’s OS, which translates the name of the contact you wish to call to its dial-up number, especially when it’s done with the help of voice assistants.
DNS is here to help us get rid of remembering long numbers, which are called IP addresses. All we have to do is type the domain name (e.g., OPERAVPS.COM) and hit the Enter button.
Why you should change your DNS?
Your internet service provider gives you a DNS server all customers use by default. For better connectivity, it’s suggested that you change the DNS settings. Changing the DNS server adds an extra layer of security and improves your browsing and download speed.
Besides, by using a different DNS server, you may benefit from parental control over the web content your children see. In some cases, you may bypass geographical restrictions and gain access to blocked content.
Make sure to select a server from a well-known DNS provider. Some of the most-used and famous DNS providers are listed below, with the primary and alternative DNS addresses:
| DNS Service Provider | Primary DNS | Alternative DNS |
|---|---|---|
| 8.8.8.8 | 8.8.4.4 | |
| Cloudflare | 1.1.1.1 | 1.0.0.1 |
| Cisco OpenDNS | 208.67.222.222 | 208.67.220.220 |
| Comodo Secure DNS | 8.26.56.26 | 8.20.247.20 |
Now that you read this article, chances are you are seeking solutions and methods to change your DNS server in Windows. Let’s start by reviewing the methods to do so.
How to change DNS server in Windows 10/11?
Generally, there are three ways to change DNS server in Windows. Unlike the other two methods, the first can be used in Windows 7 and 8. The other two methods, namely using “Settings” and “CMD,” are specific to Windows 10 and 11.
Note that you can change the DNS server on any OS and device. It means you can even configure the DNS server in Windows server, and Likewise Windows, you can use Terminal to change DNS server settings in Linux.
Changing the DNS server in Windows through the Control Panel
In the first method, we change the DNS addresses through the “Control Panel.”
1. Go to Control Panel > Network and Sharing Center.
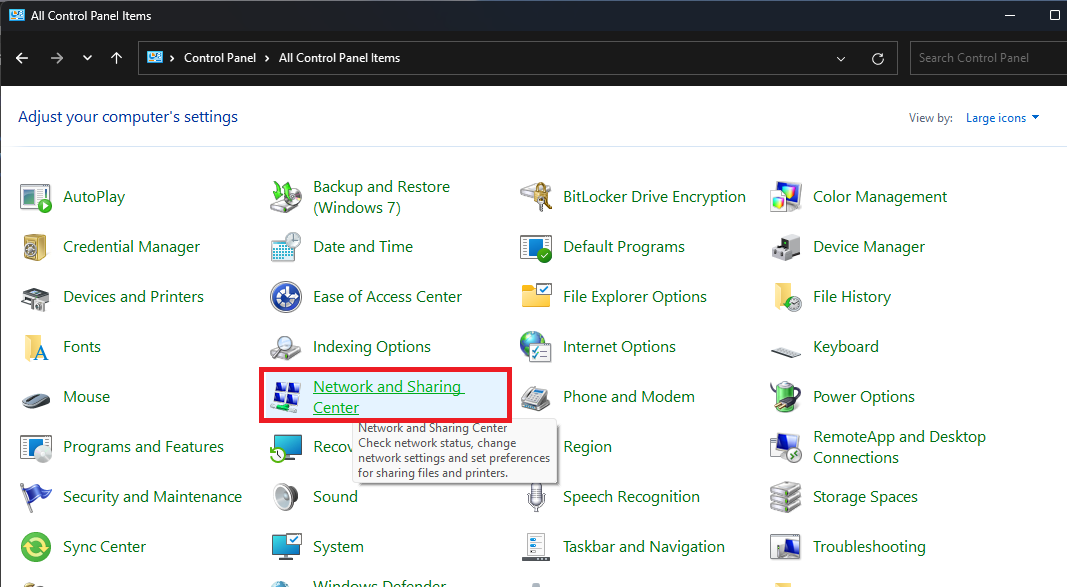
2. Head to the “Change adapter settings.”
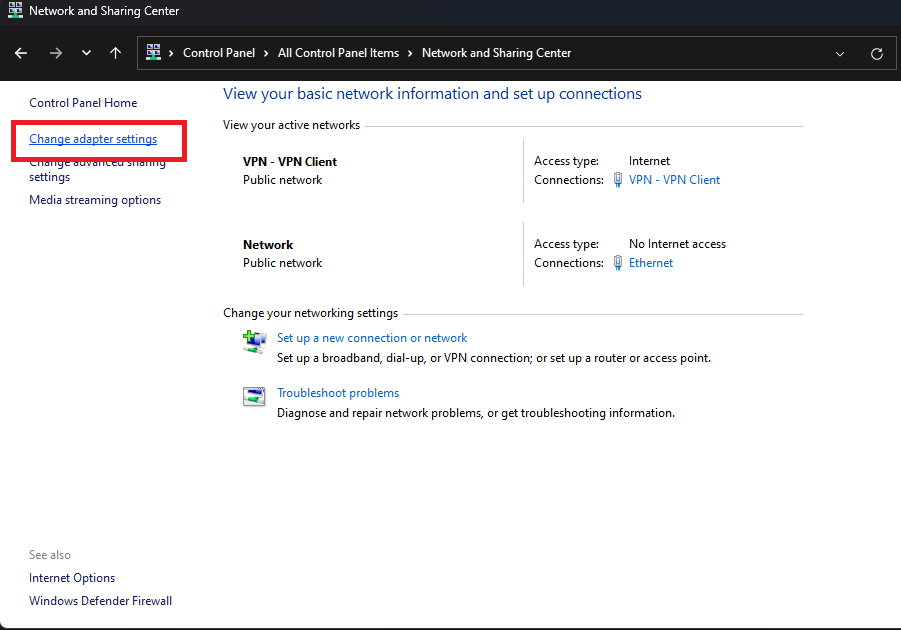
3. Select the network, then click on “Properties.”
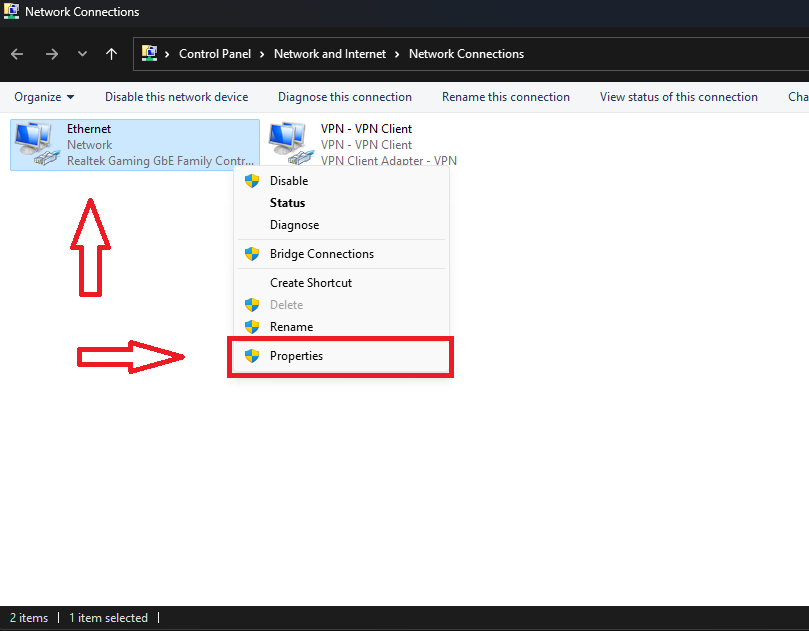
4. In the new window, select the “Internet Protocol Version 4 (TCP/IPv4)” option and then click on the “Properties” button.
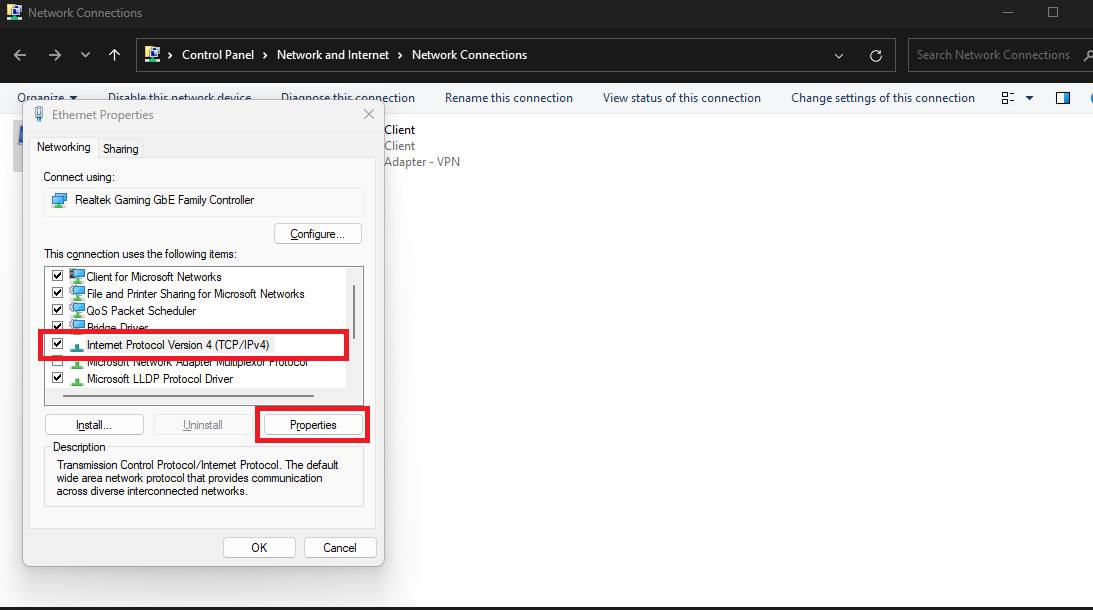
5. In the newly opened window, select “Use the following DNS server addresses” and enter your preferred DNS server addresses, then click on the “OK” button to save changes.
* In this article, we use Google Public DNS IP addresses to change DNS Server settings in Windows.
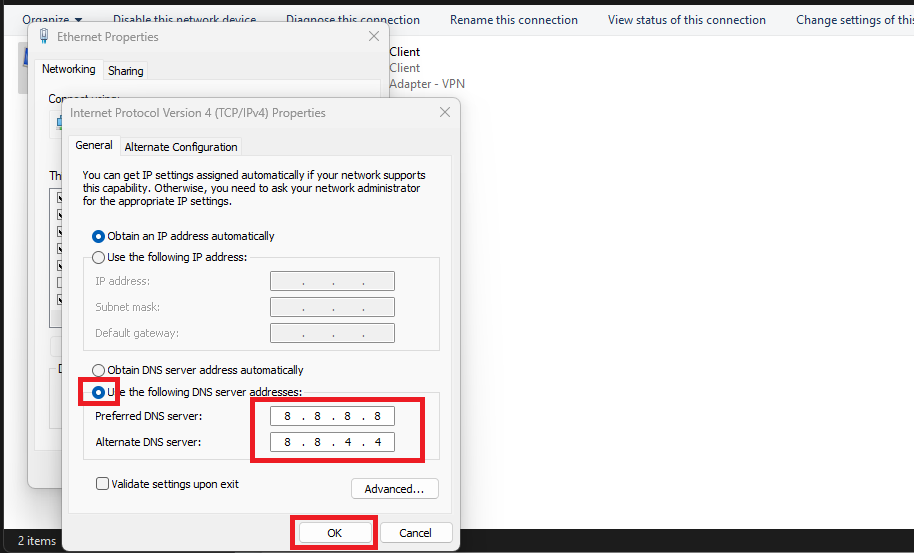
6. Click on the “OK” button to finish the process. Don’t forget to restart your computer so changes can take place.
Changing the DNS server in Windows 10/11 using Settings
To change DNS Server in Windows 10 using Settings section, you should:
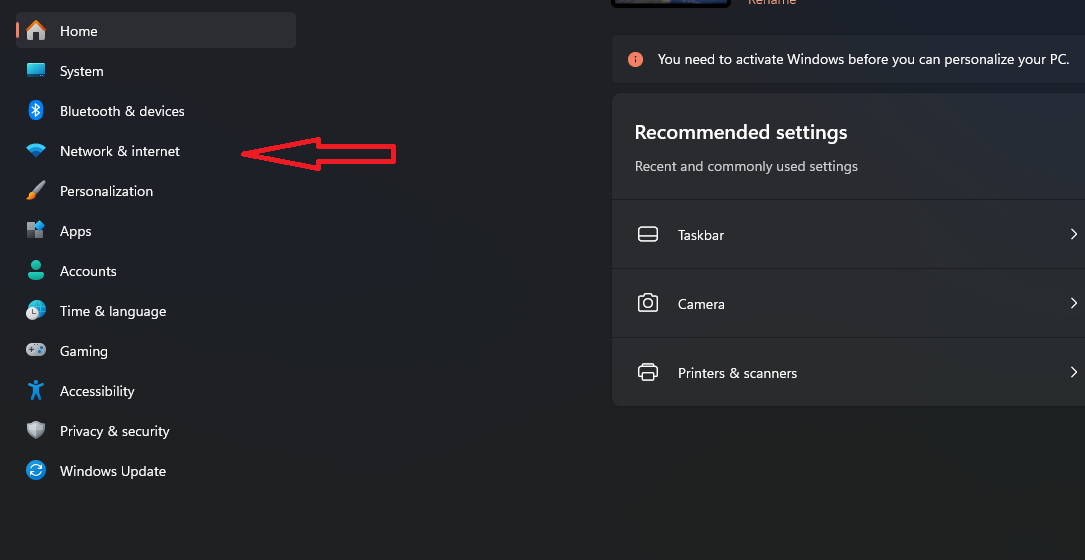
1. Open Settings.
2. Go to “Network & Internet”.
3. Select the connection you are currently using. In this guide, we will change DNS in an Ethernet network.
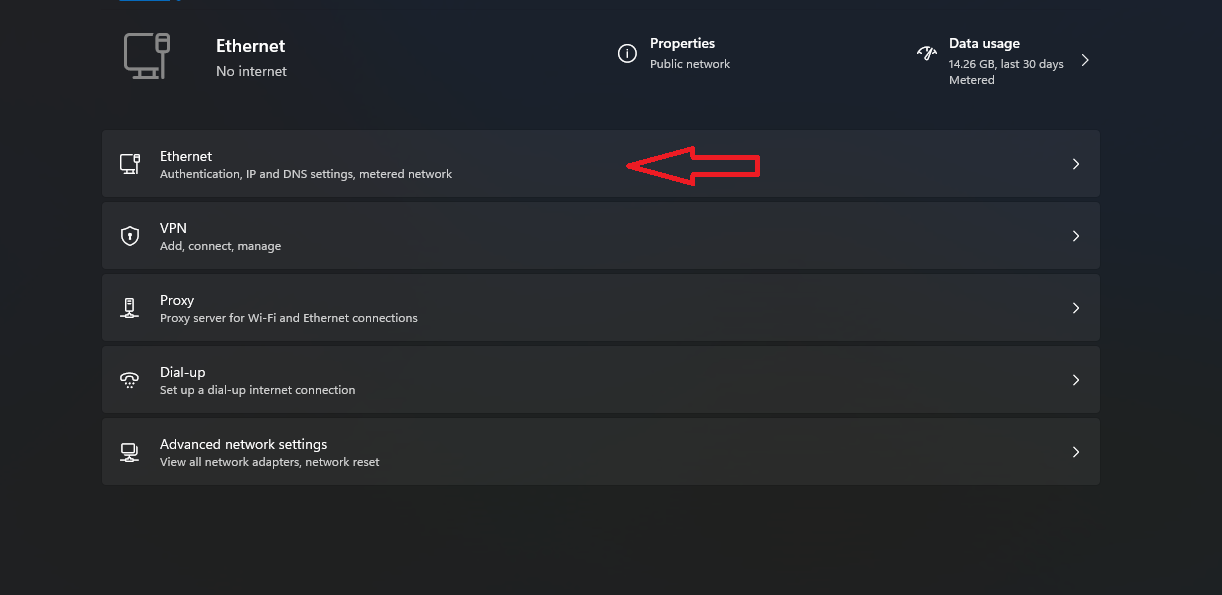
4. Scroll down, and under the “IP Settings” section (Windows 11) or in front of the “DNS server assignment” option (Windows 10), click on the “Edit” button.
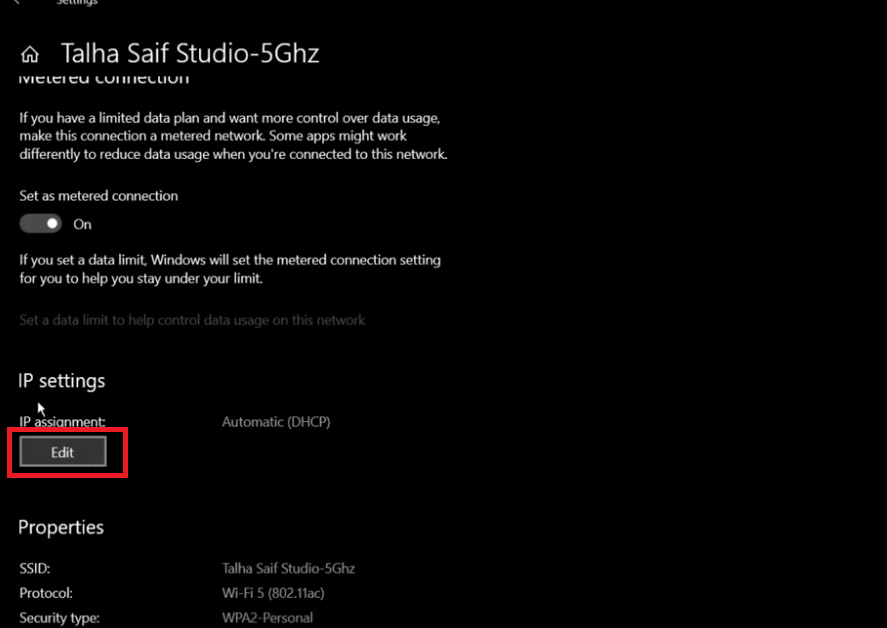

5. Select the Manual Option from the drop-down menu when the window opens. Activate IPv4 and enter your primary and alternate DNS addresses (Popular DNS server addresses are mentioned at the beginning of the article)

6. Click on the “Save” option to save changes.
How to Change DNS Settings in Windows 10/11 through Command Prompt
1. Press “Windows + R” buttons, then type “CMD” in the “Run” window. In the “CMD” window, type the command below to launch the network shell.
netsh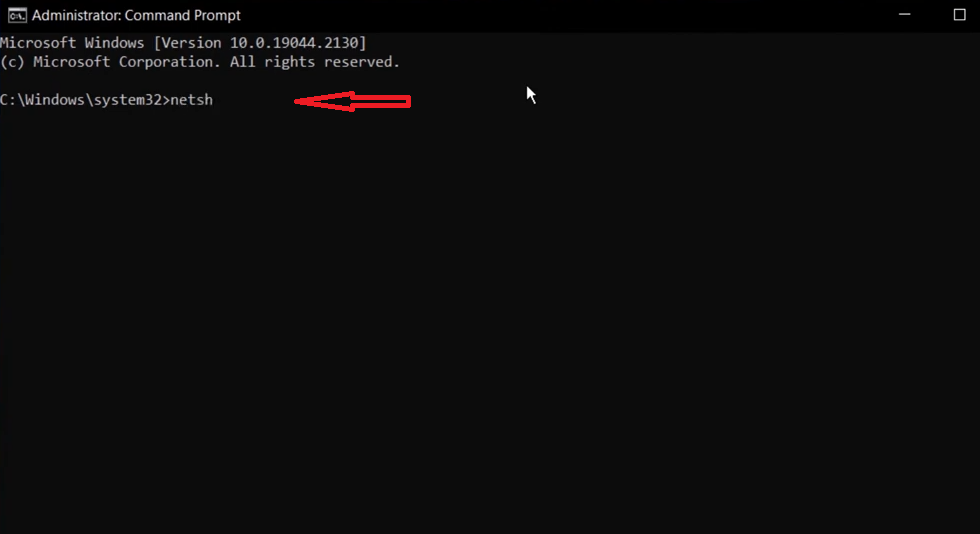
2. Now run the following command so all the configs about your IP and interface will be shown.
interface ip show config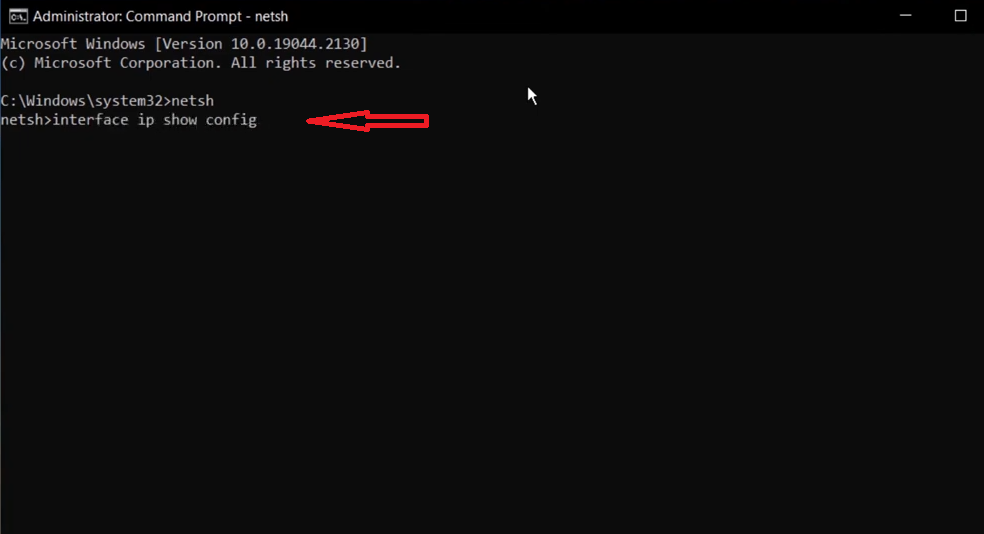
3. To change the DNS server of this interface (Wi-Fi), type in this command, then hit Enter:
interface IP set dns "Wi-Fi" static 8.8.8.8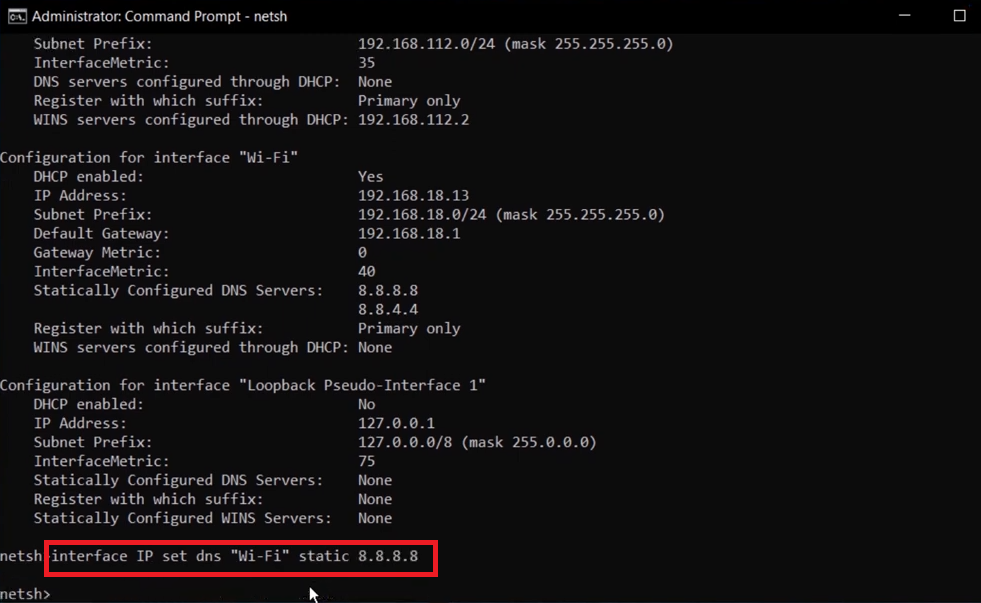
Note that by adding the “Index” value to the end of the command and doing some changes, you can set alternate DNS addresses as well:
interface ip add dns name="Wi-Fi" 208.67.220.220 index=2Feel free to use any DNS server addresses.
Test your new DNS settings
In order to make sure that your new DNS settings are working, do as follows:
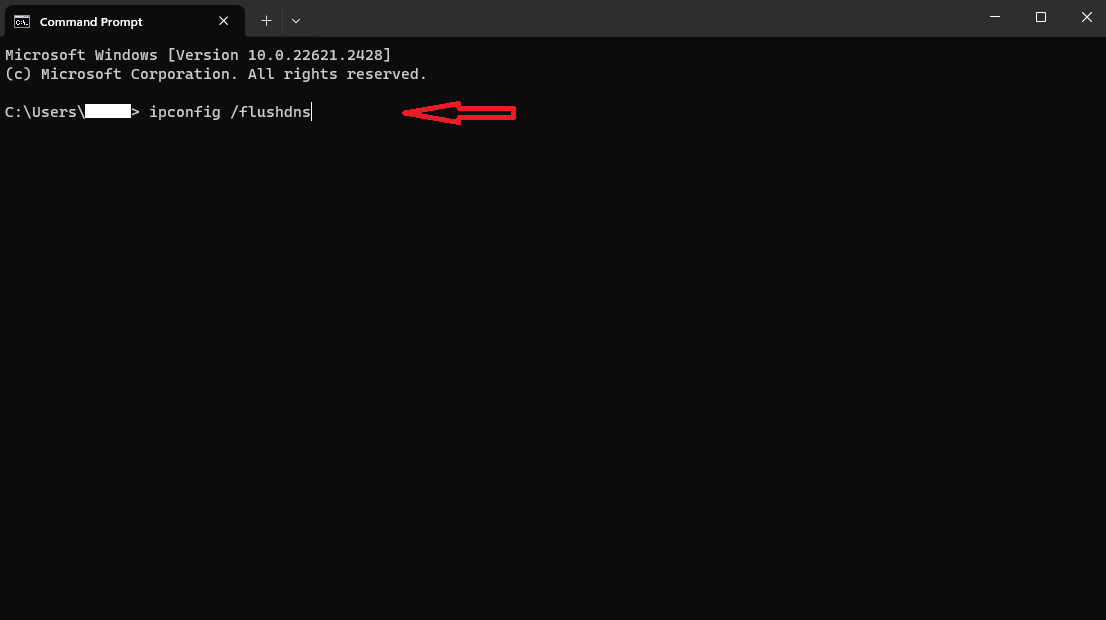
1. Open the command prompt by entering “cmd” in the Windows search bar and choosing the “Command Prompt.”
2. Run the following command:
ipconfig /flushdns
This command clears your computer’s DNS cache.
3. let’s use the “Ping” command to see whether your new DNS settings work. Run the command below:
ping operavps.com
4. The command’s result displays the response time after sending a request to the specified website. The result will determine if the DNS settings were resolved correctly. Otherwise, if you encounter any errors, it probably means DNS settings are incorrect.
But you can still switch back to your previous DNS settings.
How to Switch back to your old DNS settings
to switch back to your old DNS settings, go to the control panel > Network and Sharing and select the connection. Then, in the next window, click the Properties button, and select “Internet Protocol Version 4 (TCP/IPv4).” Again, in this window, click the Properties option.
Select “Obtain DNS server address automatically,” then click the OK button. Windows will set your DNS address automatically, and the errors will be solved.

Conclusion
In this article, we talked about changing the DNS (Domain Name System) in multiple Windows versions and demonstrated three ways to do it. Besides, we mentioned that the best way to ensure a stable, private, and fast connection is to use a Windows VPS, regardless of your device.
We discussed how to test the changes in DNS server addresses and how to switch back to your previous DNS.
Note that changing the DNS server in Windows doesn’t affect your router or other devices, and they also should be configured if needed.
After reading this article, you can change DNS configuration in Windows 7, 8, 10, and 11.