Configuring Storage Spaces in Windows Server Guide
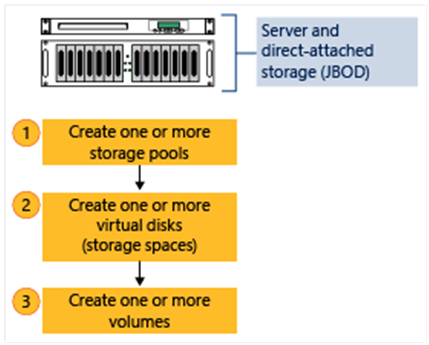
Configuring Storage Spaces involves creating storage pools and virtual disks from physical drives to optimize storage use and enhance data protection in Windows Server environments.
🤖AI Overview:
Configuring Storage Spaces in Windows Server allows for grouping physical disks into storage pools, then creating virtual disks and volumes on them. This setup enhances performance and reliability with multiple layout options like simple, mirror, and parity, supporting scalable and fault-tolerant storage management.
Once you purchase your Windows VPS, you are ready to deploy Storage Spaces on it. All the required steps to Configure Storage Space in Windows will be explained in this tutorial.
Prerequisites to Windows Storage Space Configuration
Before you jump in Windows Storage Space Configuration, ensure your PC meets the following options:
- Physical or virtual disks for combination in a single Storage Pool.
- Disk bus types: SAS, SATA, iSCSI, and Fibre Channel Controllers.
- Disk configuration: At least 4 GB for Physical disks. Disks must be blank and not formatted. Don’t create volumes.
- HBA: Simple host bus adapters (HBAs) that don’t support RAID functionality are recommended. If RAID-capable, HBAs must be in non-RAID mode with all RAID functionality disabled. Adapters must not abstract the physical disks, cache data, or obscure any attached devices.
Steps to Configuring Storage Space in Windows Server
Let’s go through this guide to learn the way you can do the Windows Storage Space Configuration.
Step 1. Create a Storage Pool
Available disks are automatically added to a pool called the primordial pool. The storage doesn’t match the criteria for Storage Spaces if there isn’t a primordial pool specified under STORAGE POOLS in this case. Ensure that the disks satisfy the conditions listed in the Prerequisites section.
Then, follow the below instructions to create a Storage Pool while you are logged in your Windows Server:
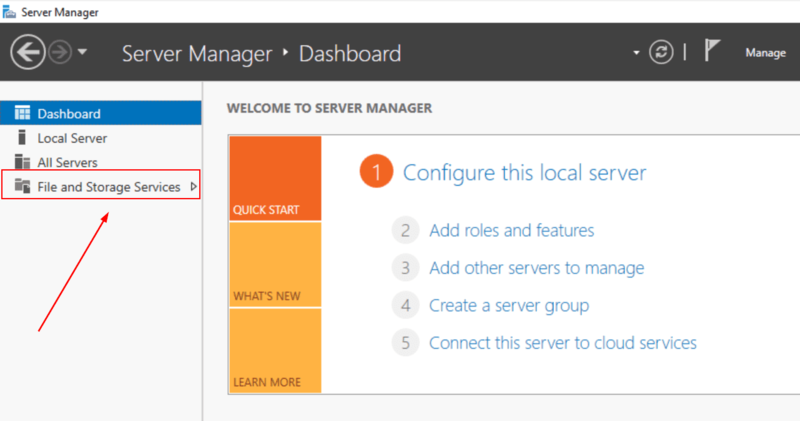
1. Open Server Manager and select File and Storage Services.
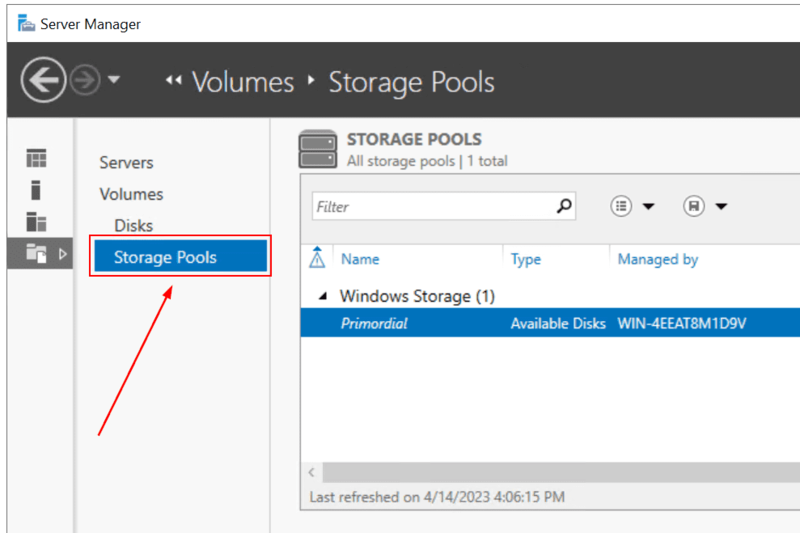
2. Click on Storage Pools under Volumes.
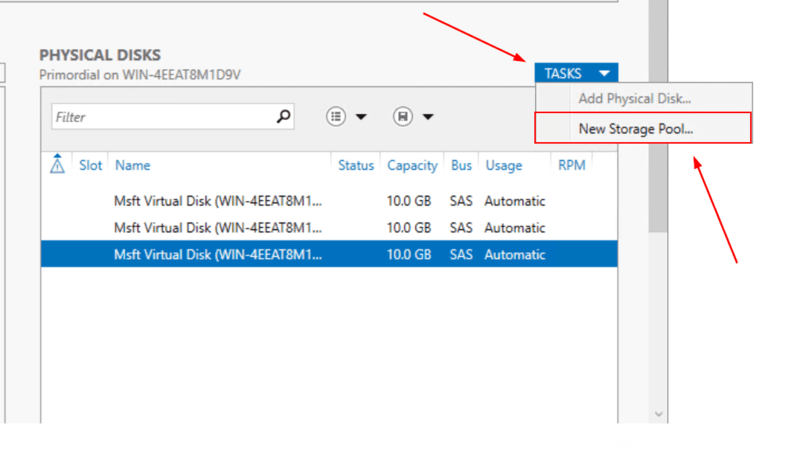
3. Choose New Storage Pool from the TASKS list under STORAGE POOLS. The New Storage Pool Wizard opens.
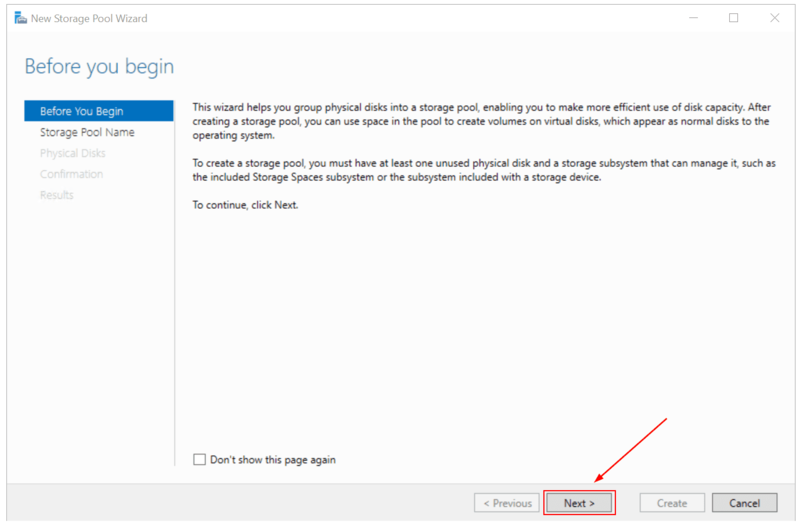
4. On the Before you begin page, select Next.
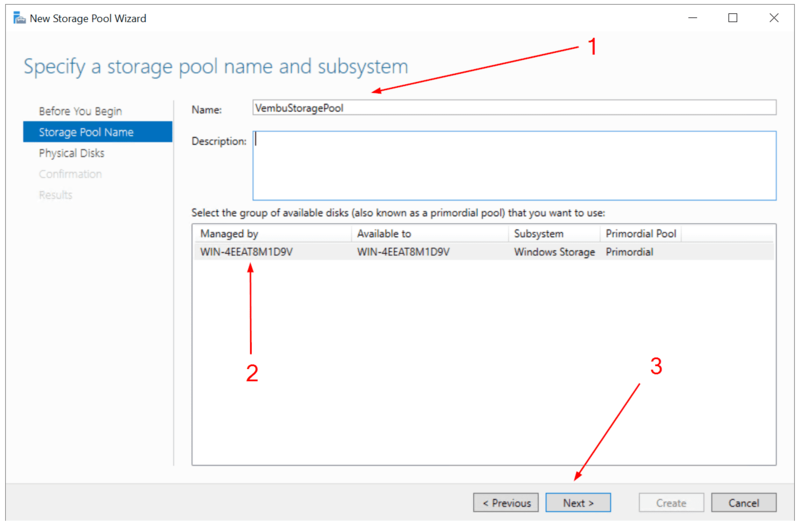
5. Enter a name and optional description for the storage pool on the Specify a storage pool name and subsystem page, choose the collection of accessible physical disks you wish to utilize, and then click Next.
6. Select Next after performing the following actions on the Select physical disks for the storage pool page:
- Each physical disk that you want to include in the storage pool should have a checkbox next to it.
- Select the drop-down arrow under Allocation, then click Hot Spare to designate one or more disks as hot spares.
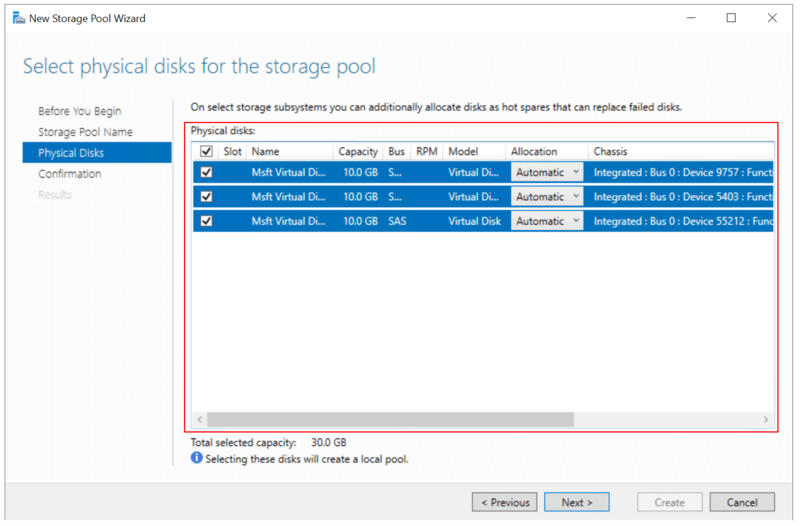
Let’s see what the above options say:
- Automatic – automatically distributes available capacity to the disks in the pool.
- Hot spare – automatically replaces failed disks.
- Manual – you manually assign a specific amount of capacity to each disk in the pool.
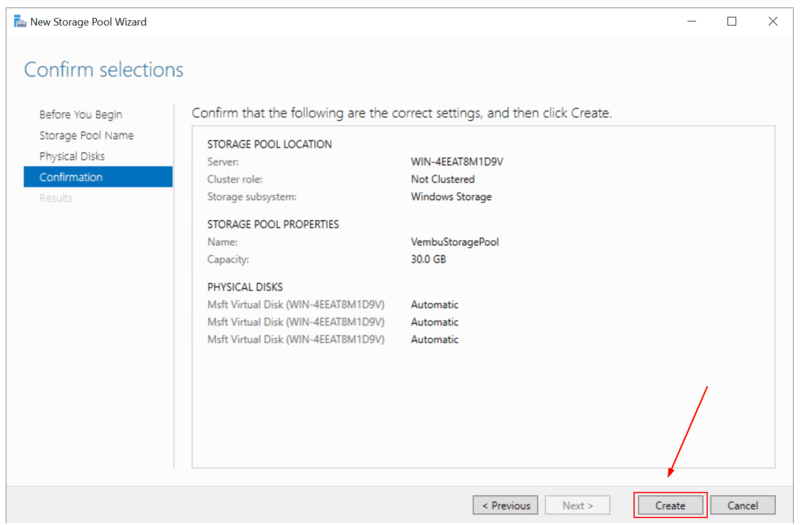
7. Make sure the settings are accurate on the Confirm selections screen, then click Create.
8. Verify that every task has been performed on the View results page before choosing Close.
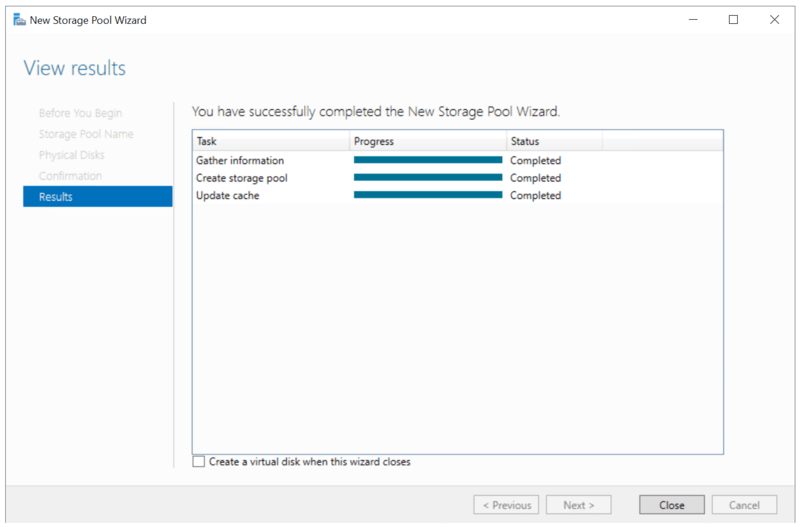
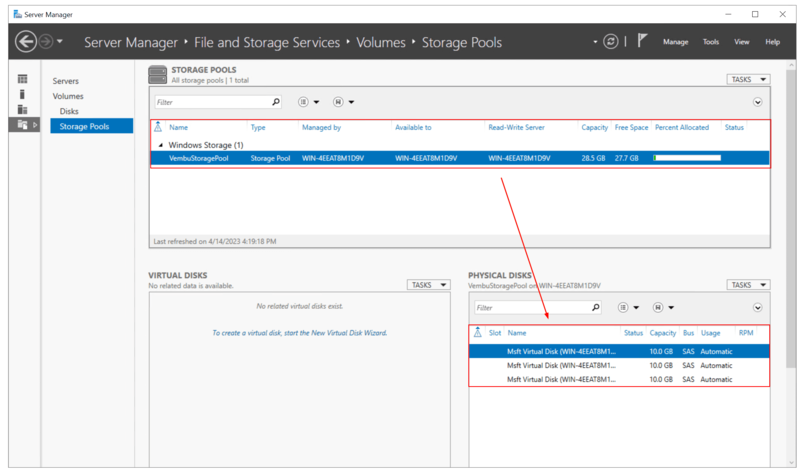
You can choose to Create a virtual drive when this wizard closes the checkbox to move on immediately to the next stage. The New Storage Pool configuration has been successfully finished. A new storage pool has now been created, as you can see if you open Server Manager and go to Storage Pools.
9. Check to see if the new storage pool is mentioned under STORAGE POOLS.
Step 2. Create a virtual disk
In the middle of Windows Storage Space Configuration, you successfully created a storage pool. In this step, you will create a virtual disk. To do this, from the storage pool, you must create one or more virtual drives. You can choose how the data is distributed among the physical drives when you establish a virtual disk. Both performance and dependability are impacted by this decision. Additionally, you can decide whether to construct fixed- or thin-provisioned drives.
Let’s continue and follow the below path to achieve the purpose of this step.
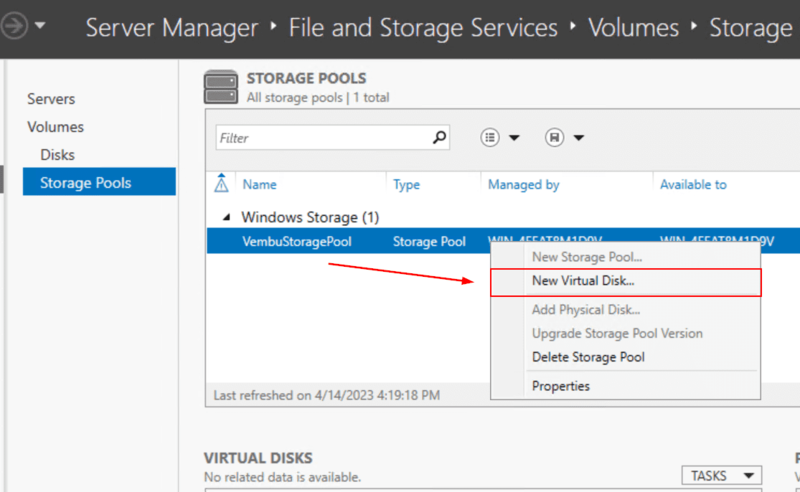
1. Open Server Manager, Click on File and Storage Services, and on Storage Pools.
2. Select New Virtual Disk from the TASKS list under VIRTUAL DISKS. The New Virtual Disk Wizard opens.
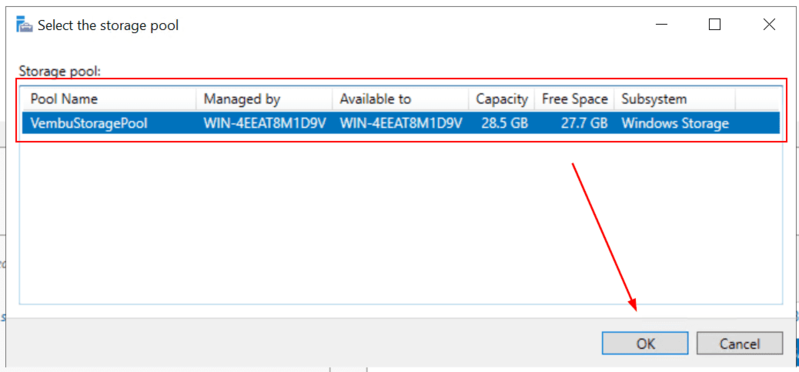
3. Choose the preferred storage pool on the Select the storage pool page, then click Next.
4. On the Before you begin page, select Next.
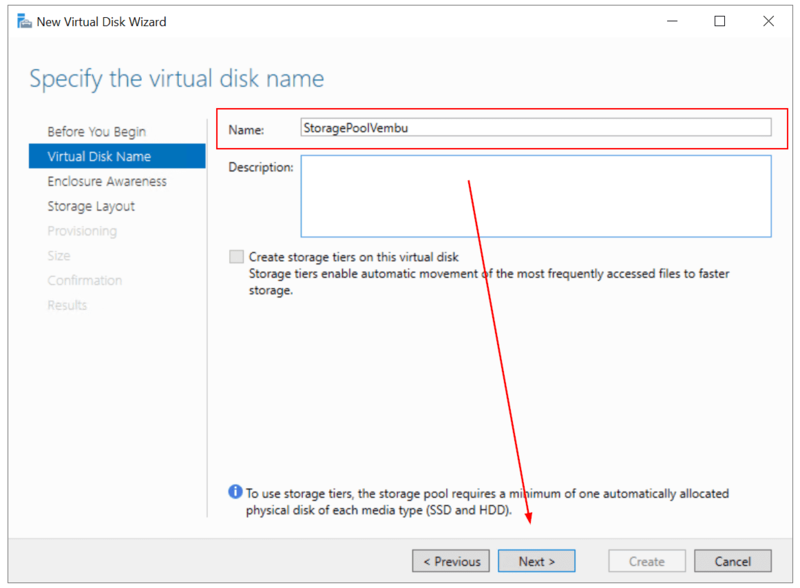
5. Enter a name and optional description on the Specify the virtual disk name page, then click Next.
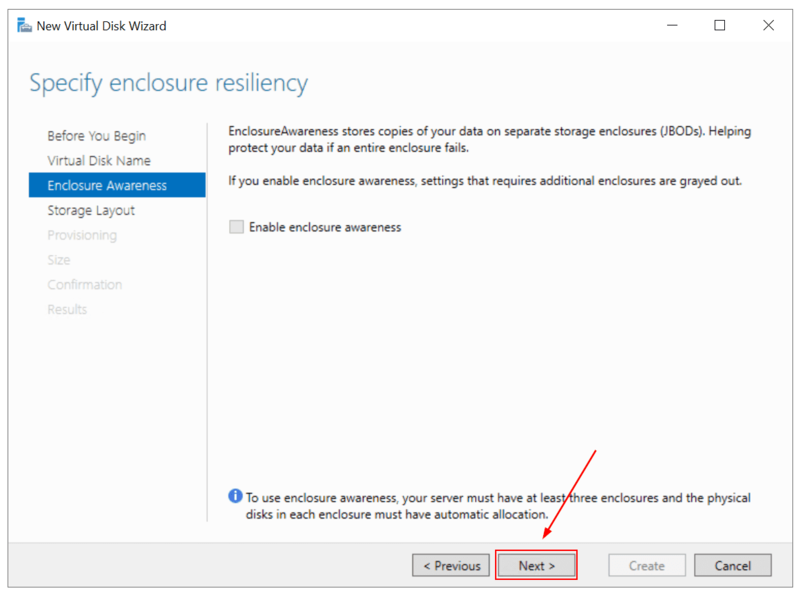
6. Click Next under Enclosure Awareness. Your data is duplicated and kept on various storage enclosures via Enclosure Awareness. Your server must have at least three enclosures in order to leverage enclosure awareness, and each enclosure’s physical disks must have automatic allocation.
7. On the Select the storage layout page, select the preferred layout, then select Next. If you choose a layout for which you don’t have enough physical disks, an error warning appears when you click Next.
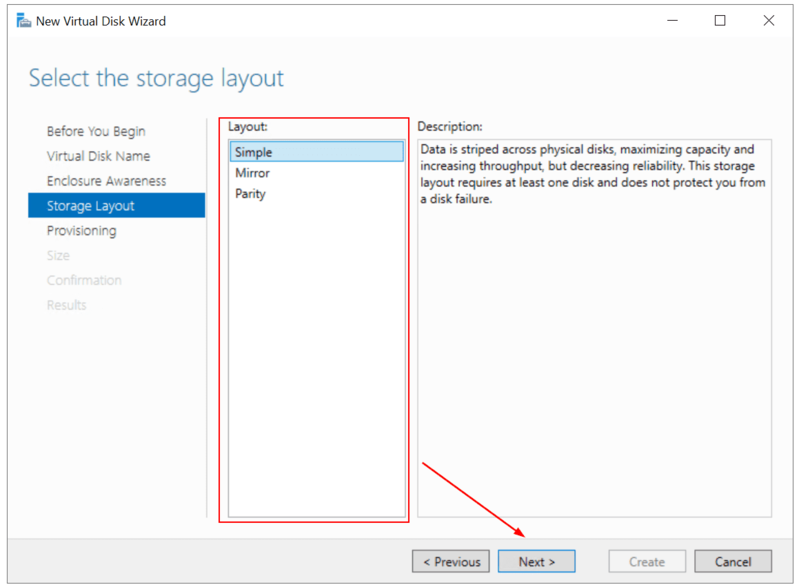
Let’s review the layouts:
- Simple layout – Data is striped over all disks in a straightforward storage structure to maximize capacity and boost throughput. Disk failover tolerance does not exist.
- Mirror layout – Copies of the data are created by striping the data over all disks. This storage arrangement reduces capacity while enhancing reliability. Use two disks or more in the event of a single disk failure. The overall storage capacity for Mirror will be 10 GB if you have two drives with a capacity of 10 GB each. Utilize a minimum of five disks to protect against the failure of two disks. The Configure the resiliency options page will appear if you chose Mirror as the storage layout and there are five or more disks in the pool. Choose from the following possibilities: Two-way mirror, Three-way mirror.
- Parity layout – Data is striped over all disks to increase reliability but at the cost of performance and capacity. Utilize at least three drives to safeguard against single-disk failure. Your data won’t be lost if your disk fails.
8. Choose one of the following options on the Specify the provisioning type screen, then click Next.
You can create both thin- and fixed-provisioned virtual disks using Storage Spaces in the same storage pool. For instance, you may host a database on a fixed-provisioned virtual disk and the related log files on a thin-provisioned virtual disk.
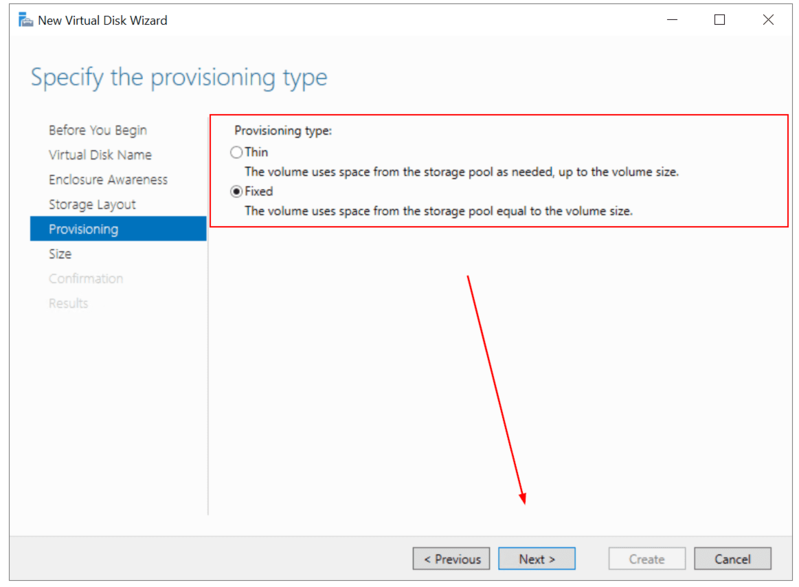
Thin
Space is allotted using thin provisioning only as needed. The use of the available storage is optimized by this choice. However, due to the potential for over-allocating storage with this setting, you must closely watch the amount of disk space that is available.
Fixed
When a virtual disk is built using fixed provisioning, the storage capacity is immediately allocated. As a result, fixed provisioning consumes storage pool space that is equivalent to the size of the virtual disk.
9. Choose one of the following actions on the page Specify the size of the virtual disk:
– Follow these steps if you choose thin provisioning in the previous step:
- Enter a virtual disk size in the Virtual disk size box.
- Select Next after choosing the unit (MB, GB, or TB).
– Choose one of the following options if you choose fixed provisioning in the preceding step:
- Specify size.
Enter a value in the Virtual disk size box, choose the unit (MB, GB, or TB), and then specify the size.
The virtual drive needs more free space than the size you provide if you pick a storage architecture other than basic. Select the Create the largest virtual disk feasible, up to the specified size check box to prevent a potential error where the volume’s size exceeds the storage pool’s empty space.
- Maximum size
To construct a virtual disk that utilizes the storage pool’s full capacity, use this option.
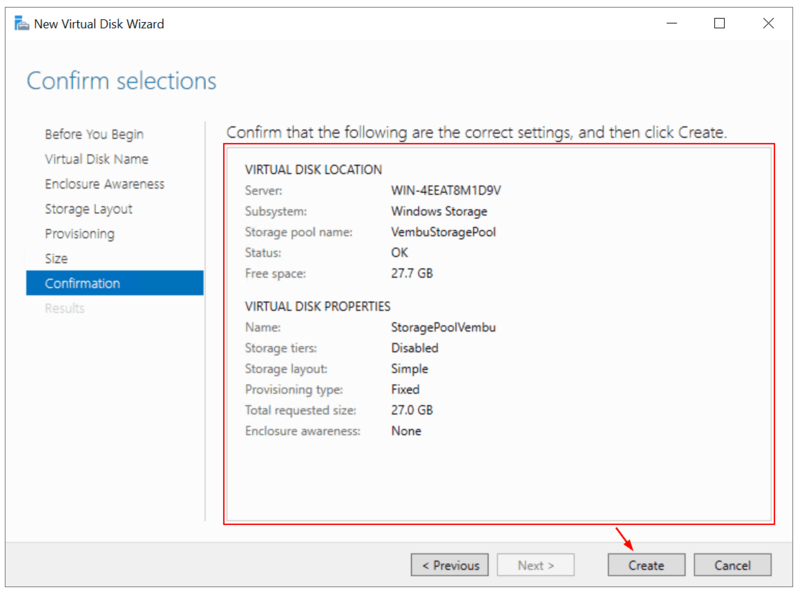
10. Make sure the settings are accurate on the Confirm selections screen, then click Create.
11. Make sure that all the tasks are finished on the View results screen, then click Close.
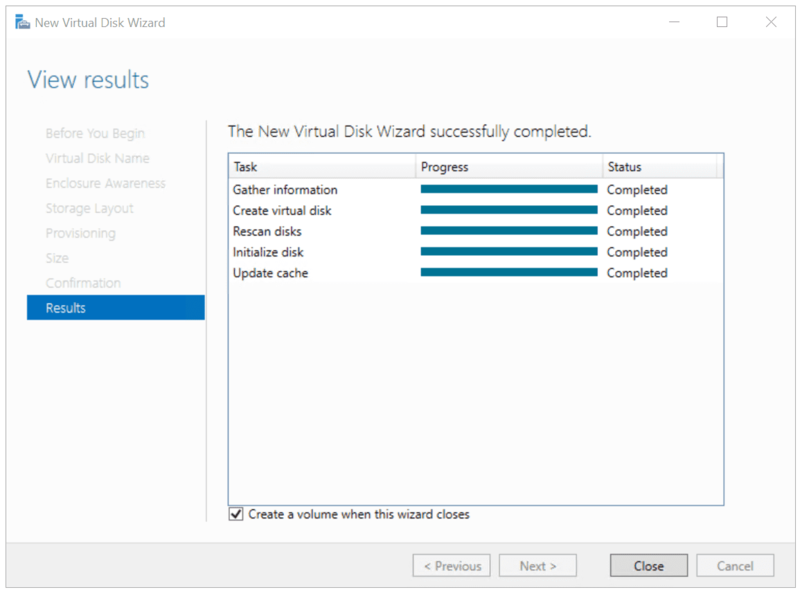
When this dialogue closes, the Create a volume check box is by default selected. This advances you immediately to the following action.
Step 3. Create a volume
You are so close to finishing Windows Storage Space Configuration. To store your data, you need to create volume in the latest step of this tutorial. The volume can then be formatted with a file system after you can optionally designate a drive letter or folder.
Let’s review all the required actions for this step:
1. Once the New Volume Wizard opens, select Next on the Before you begin page.
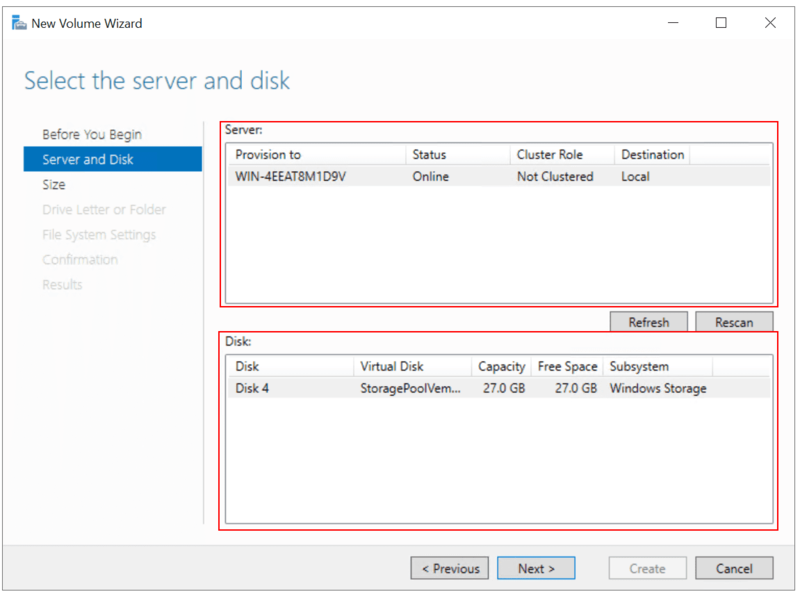
2. Make the following selections on the Select the server and disk page, then click Next:
- Choose the server you wish to provision the volume on from the Server section.
- Choose the virtual disk on which you wish to construct the volume from the Disk section.
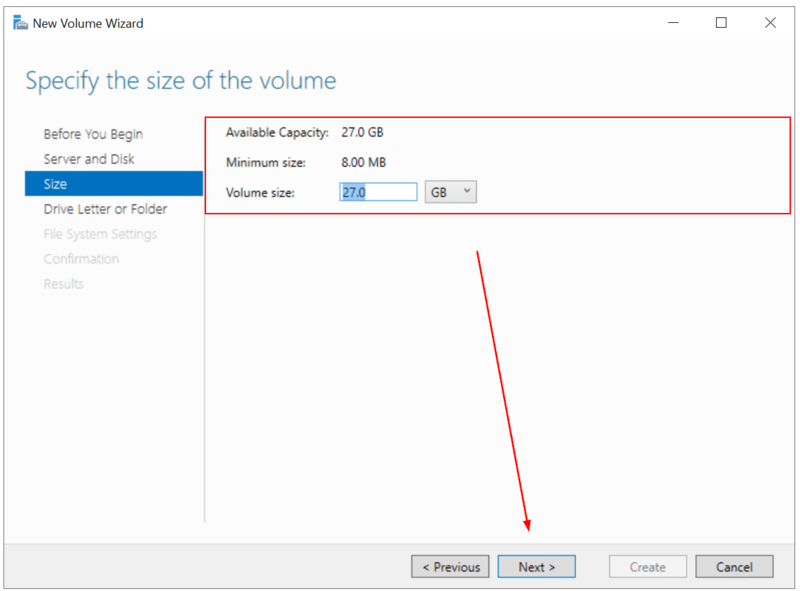
3. Enter the volume size, the units (MB, GB, or TB), and click Next on the Specify the size of the volume page.
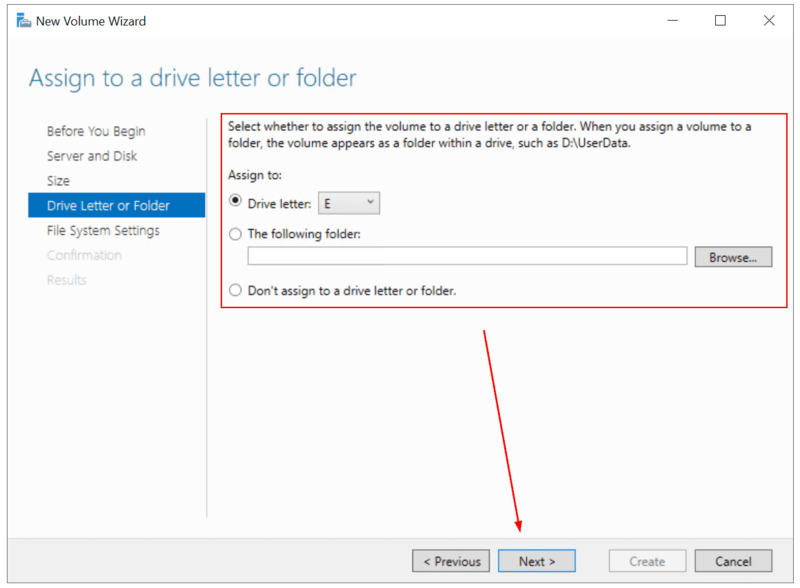
4. Configure the desired selection on the Assign to a drive letter or folder page, then click Next.
5. Make the following changes on the Select file system settings screen, then click Next.
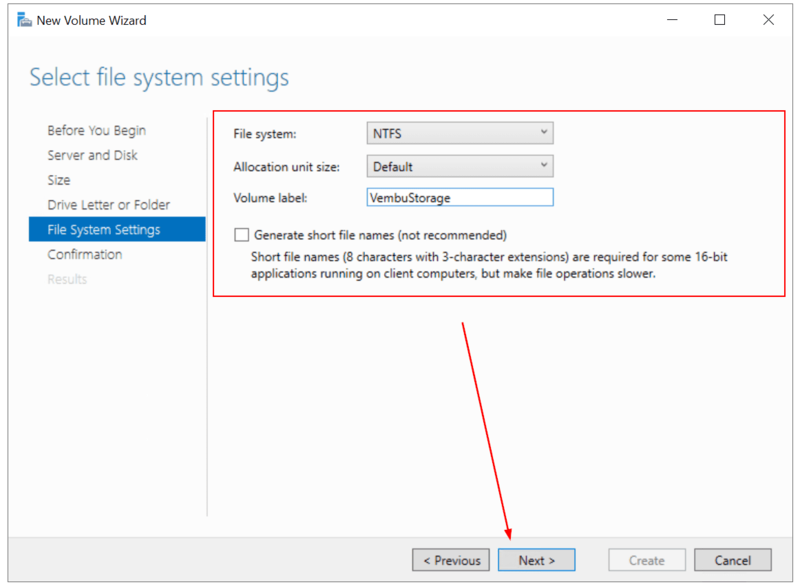
- Choose either NTFS or ReFS from the list of file systems.
- Leave the setting at Default or change the allocation unit size in the Allocation unit size list.
- You can also type a volume label name, such HR Data, in the Volume label box. (Optional)
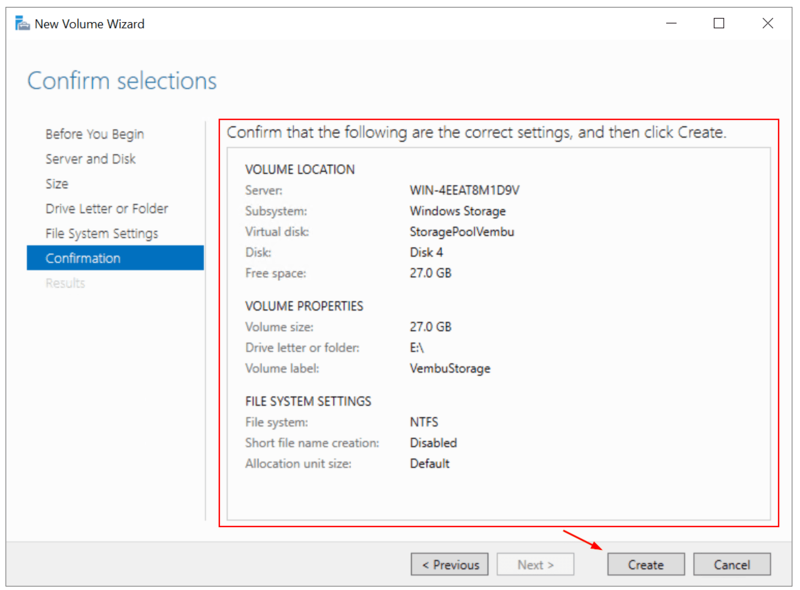
6. Make sure the settings are accurate on the Confirm selections screen, then click Create.
7. Verify that every task has been performed on the View results page before choosing Close.
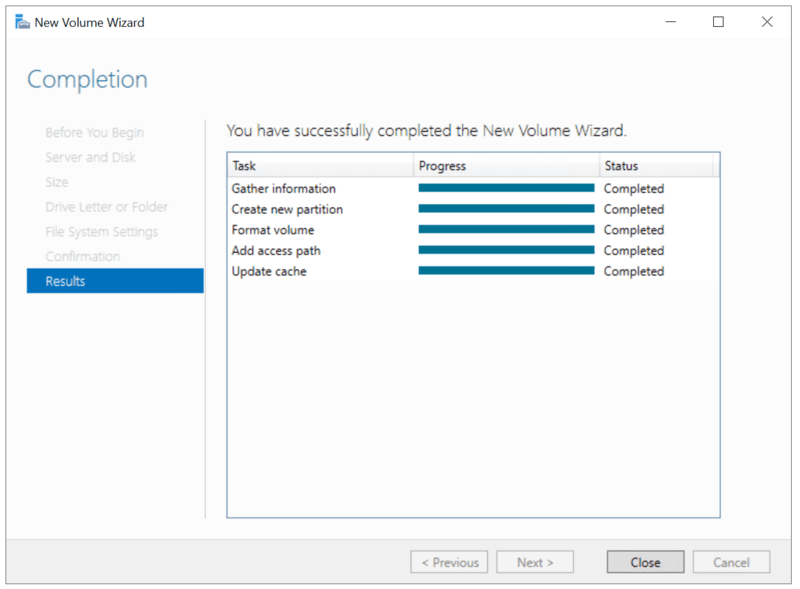
8. Select the Volumes page in Server Manager to check if the volume was created. The server where the volume was produced is listed there. In Windows Explorer, you may confirm that the volume was created.
How to Configure Storage Spaces in Windows Using PowerShell
The previous procedure’s task is also carried out using the following Windows PowerShell cmdlet or cmdlets. Let’s see how to use Windows PowerShell to do the same as the above for each step.
1. Create Storage Pools
The physical disks that are present in the primordial pool are illustrated in the example below.
Get-StoragePool -IsPrimordial $true | Get-PhysicalDisk -CanPool $TrueIn the example that follows, a brand-new storage pool called StoragePool1 is created and all accessible disks are used.
New-StoragePool –FriendlyName StoragePool1 –StorageSubsystemFriendlyName "Windows Storage*" –PhysicalDisks (Get-PhysicalDisk –CanPool $True)The next example uses four of the available disks to construct a brand-new storage pool called StoragePool1.
New-StoragePool –FriendlyName StoragePool1 –StorageSubsystemFriendlyName "Windows Storage*" –PhysicalDisks (Get-PhysicalDisk PhysicalDisk1, PhysicalDisk2, PhysicalDisk3, PhysicalDisk4)The storage pool StoragePool1 can add the available physical disk PhysicalDisk5 as a hot spare by running the sample PowerShell sequence shown below.
$PDToAdd = Get-PhysicalDisk –FriendlyName PhysicalDisk5
Add-PhysicalDisk –StoragePoolFriendlyName StoragePool1 –PhysicalDisks $PDToAdd –Usage HotSpare
2. Create a Virtual Disk
The tasks carried out by the previous procedure are duplicated by the subsequent Windows PowerShell cmdlets. Even though they may seem word-wrapped across multiple lines here due to formatting restrictions, enter each cmdlet on a separate line.
In the scenario that follows, a storage pool called StoragePool1 receives a 50 GB virtual disk called VirtualDisk1.
New-VirtualDisk –StoragePoolFriendlyName StoragePool1 –FriendlyName VirtualDisk1 –Size (50GB)In the example that follows, a storage pool called StoragePool1 receives a virtual disk with the name VirtualDisk1 that is mirrored. The disk makes use of all available storage in the storage pool.
New-VirtualDisk –StoragePoolFriendlyName StoragePool1 –FriendlyName VirtualDisk1 –ResiliencySettingName Mirror –UseMaximumSizeIn the example that follows, a storage pool called StoragePool1 receives a 50 GB virtual disk called VirtualDisk1 that is created. The thin provisioning type is used by the disk.
New-VirtualDisk –StoragePoolFriendlyName StoragePool1 –FriendlyName VirtualDisk1 –Size (50GB) –ProvisioningType ThinIn the example that follows, a virtual disk called VirtualDisk1 is created on a storage pool called StoragePool1. The virtual disk has a fixed size of 20 GB and utilizes three-way mirroring.
New-VirtualDisk -StoragePoolFriendlyName StoragePool1 -FriendlyName VirtualDisk1 -ResiliencySettingName Mirror -NumberOfDataCopies 3 -Size 20GB -ProvisioningType FixedThe above cmdlet won’t function unless the storage pool has at least five physical disks. (Hot spare disk allocations are not included in this.)
3. Create a volume
The example that follows initializes the disks for virtual disk VirtualDisk1, makes a partition with a designated drive letter, prepares the volume with the standard NTFS file system, and then initializes the volume.
Get-VirtualDisk –FriendlyName VirtualDisk1 | Get-Disk | Initialize-Disk –Passthru | New-Partition –AssignDriveLetter –UseMaximumSize | Format-VolumeConclusion
Configuring Storage Spaces is an effective strategy for business owners to implement scalable, resilient, and easily manageable storage infrastructures leveraging existing hardware.
By following the structured approach of creating storage pools, virtual disks, and volumes, and by adopting best practices in monitoring and security, businesses can ensure their critical data is protected and accessible.
Properly configured Storage Spaces offer a cost-efficient solution that adapts to evolving storage demands while maintaining high levels of data availability and performance. This empowers business owners to focus on growth and operations with confidence in their storage infrastructure.
FAQ
2. How do I create a storage pool?
Use Server Manager's Storage Pools section to group disks by following the New Storage Pool wizard for disk selection and setup.
3. What storage layouts does Storage Spaces offer?
Simple, mirror, and parity layouts are available, each balancing capacity, performance, and fault tolerance differently.
4. What is thin versus fixed provisioning?
Thin provisioning allocates space on demand, optimizing usage, while fixed provisioning reserves space upfront ensuring dedicated capacity.
5. How to create virtual disks?
Virtual disks are created from storage pools via Server Manager or PowerShell by selecting layout, size, and provisioning.
6. Can I use PowerShell for Storage Spaces?
Yes, PowerShell cmdlets automate pool, virtual disk, and volume creation with flexible configurations.
7. How does Storage Spaces provide redundancy?
Through mirror and parity layouts; mirrors duplicate data for high availability, parity uses parity info for fault tolerance.
8. What common issues might arise?
Incompatible disks, RAID-enabled HBAs, or insufficient disks; ensure prerequisites and troubleshoot with error messages.
9. How does Storage Spaces support scalability?
It allows adding disks to storage pools and using thin provisioning to efficiently expand capacity.
10. Is Storage Spaces available on all Windows versions?
Supported on Windows 11 and Windows Server 2012 onwards, with consistent core features.
Why on the third step, the New Volume Wizard did not open?
Right-click the desired virtual disk on the Storage Pools page in Server Manager, under VIRTUAL DISKS, and then select New Volume to open it.