How to Check RDP Status and Enable Remote Desktop
Remote Desktop Protocol (RDP) enables you to take control of the remote control of another device and use your screen to observe what is exactly happening on that remote computer. In this article, you will learn How to Check RDP Status and Enable Remote Desktop. You must first enable RDP on the remote server or PC in order to connect using RDP to another Windows PC or server. To securely access work-related papers, retrieve data from another PC, or remotely guide a friend, relative, or coworker you will need to know how to use RDP.
Since Remote Desktop access is disabled in Windows by default, join us with this tutorial to review the way you can check RDP status and enable this Window’s built-in feature. It is certainly useful when you buy cheap RDP to know how to access a PC from another computer remotely.
How Essential is Enabling Remote Desktop?
There are numerous excellent justifications for connecting to one computer from another. Retrieving files from the target PC, accessing work-related data and document securely, and connecting with people you need from a distance are the most reasons for enabling and using RDP. So, it is a good and reasonable idea to Check RDP Status and Enable Remote Desktop.
IT professionals frequently utilize Remote Desktops to remotely troubleshoot computer problems. An issue can be identified and fixed by clicking through the computer settings once they have access to the device they are mending. In order to work remotely more conveniently or to access a file or application from a different device, Remote Desktop can be used to control a work computer from home. Private work files should not be accessed from a public or unsecured computer or device. This is a much more secure way to do it. You will completely secure and protect the privacy of the files you are managing by completing these actions on the remote desktop.
Also, consider that you don’t need to enable Remote Desktop if you only want to use your PC while you are physically present. When you enable Remote Desktop, a port on your computer becomes accessible to the local network. Only use Remote Desktop in trusted networks, like your own home network. Additionally, you shouldn’t enable Remote Desktop on any PC with restricted access. Be advised that enabling Remote Desktop will allow any member of the Administrators group as well as any extra users you choose to access their accounts on the machine from a distance. Make sure that a strong password is set up for each account that has access to your computer.
3 Easy Ways to Check RDP Status on Windows
Before you enable Remote Desktop, you can check whether the Remote Desktop is enabled or not. In two situations, you might need to check the RDP status. First, when you have no idea if Remote Desktop is enabled, and second when RDP is not connecting. In the second one, you will need to troubleshoot the Remote Desktop connection.
To find out if Remote Desktop is enabled on Windows or not, try the below methods.
Solution 1. Running sysdm.cpl
To check if RDP is enabled by running sysdm.cpl, you must press Win + R, type sysdm.cpl, and then hit the Enter key.
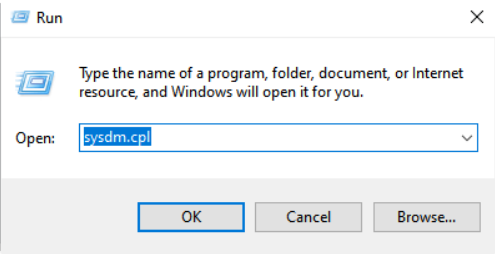
Now, to view the relevant Remote Desktop settings, locate the “Remote” tab. Then, you can easily check if the Remote Desktop feature is enabled or not. To do this, check if the “Allow connections to this computer” is selected.
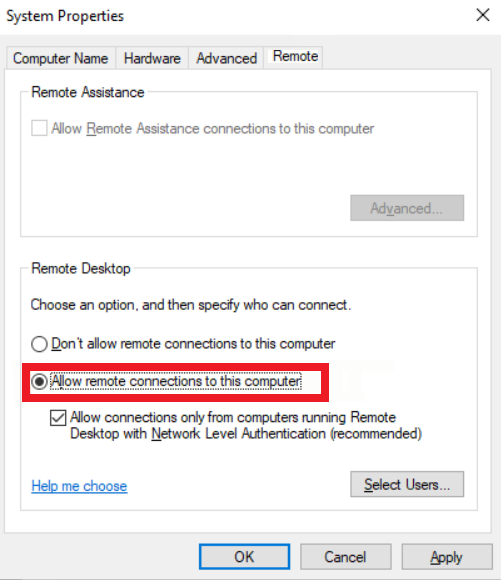
Note: By default, RDP only allows local Administrator group members to connect remotely to a machine. Click Select Users to give additional users access to RDP.
Solution 2. Check the Settings
To check if RDP is enabled, you can go through Settings. Just do as follows to check whether Remote Desktop is enabled.
Open Settings by pressing “Win + I“. Then, click on “System” > “Remote Desktop“. As you see below, if the Enable Remote Desktop toggle switch is turned on, you can make sure that RDP is enabled on the remote PC.
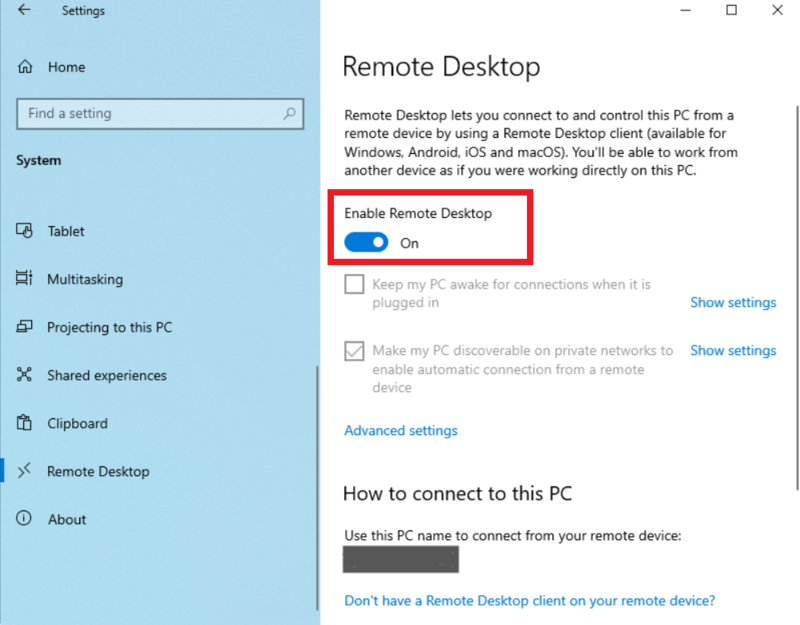
Note: On Windows 10 Home edition, RDP cannot be enabled. Only Windows 10 Professional and Enterprise editions support a Remote Desktop service.
Solution 3. Running Registry Editor
The third way of checking RDP status is to run the Registry Editor. Simply press Win + R, type regedit, and hit the Enter key.
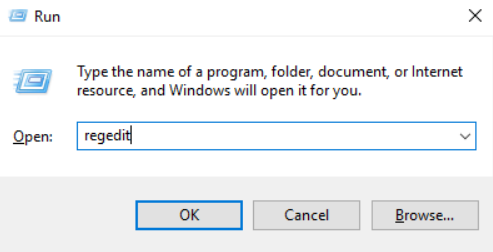
Next, navigate to HKEY_LOCAL_MACHINE\SYSTEM\CurrentControlSet\Control\Terminal Server or to HKEY_LOCAL_MACHINE\SOFTWARE\Policies\Microsoft\Windows NT\Terminal Services.
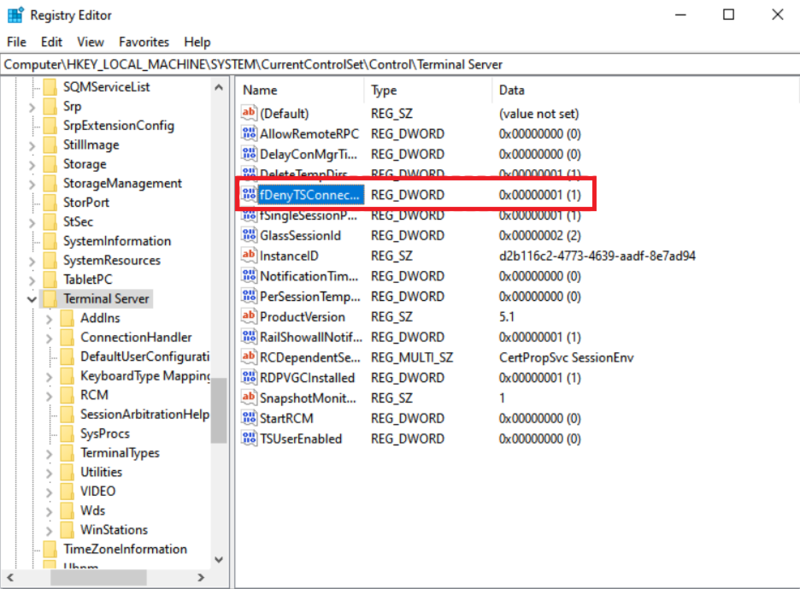
RDP is enabled if the fDenyTSConnections key value is 0.
RDP is not enabled if the fDenyTSConnections key value is 1.
In this way, you learned how to check RDP status. At this point, if you view the value as 0, skip to read How to Use Remote Desktop. But if you see that RDP is disabled (value is 1), continue reading the next part which helps you to troubleshoot the Remote Desktop if you can’t turn on RDP in the user interface or the value of fDenyTSConnections reverts to 1 after you’ve changed it to 0.
How to Enable Remote Desktop Protocol on Windows?
As we mentioned, you can check if Remote Control is enabled if you do not know about its status, and when it is not working. If you have done the three above solutions, and you could not turn RDP on, follow the below instructions to troubleshoot and enable RDP. Then, you will be able to use the Remote Desktop connection.
Technique 1. Check Whether GPO Blocks RDP on a Local Computer
In the previous part, on solution 3, you reviewed that you might not be able to turn on RDP in the user interface or the value of fDenyTSConnections reverts to 1 after you’ve changed it. It means a GPO (Group Policy Object) may be overriding the computer-level settings.
Open a Command Prompt window as an administrator and type the following command to check the group policy configuration on a local computer:
gpresult /H c:\gpresult.htmlOpen gpresult.html when this command has finished running. Locate the policy Allow users to connect remotely by using Remote Desktop Services in Computer Configuration\Administrative Templates\Windows Components\Remote Desktop Services\Remote Desktop Session Host\Connections.
- If the RDP connection block setting for this policy is set to Enabled, Group Policy does not apply.
- Check Winning GPO if the setting for this policy is disabled. This GPO is the one preventing RDP connections.

***

Technique 2. Check Whether GPO Blocks RDP on a Remote Computer
The command is nearly identical for checking the Group Policy configuration on a remote machine as it is for a local one:
gpresult /S <computer name> /H c:\gpresult-<computer name>.htmlThe information format used by the file that this command creates (gpresult-computer name>.html) is the same as that used by the version on the local computer (gpresult.html).
Technique 3. Changing a Blocking GPO
Both the Group Policy Object Editor (GPE) and the Group Policy Management Console (GPM) allow you to change these settings.
Use one of the following techniques to change the blocking policy:
Navigate to Computer Configuration > Administrative Templates > Windows Components > Remote Desktop Services > Remote Desktop Session Host > Connections in GPE. Access the appropriate level of GPO (such as local or domain). Enable remote desktop connections for users by using Remote Desktop Services.
- Put the policy’s setting at Not Configured or Enabled.
- Run the gpupdate /force command on the affected systems from an administrator-level command prompt window.
- Go to the organizational unit (OU) in GPM where the blocking policy that affects the affected machines is implemented, and then delete the policy from the OU.
Technique 4. Check the RDP Service’s Status
The following services must be active on both the local (client) computer and the distant (target) computer:
- Services for remote desktops (TermService)
- Desktop Remote Services Redirector of UserMode Ports (UmRdpService)
The Services MMC snap-in can be used to remotely or locally manage services. If the remote machine is set up to accept remote PowerShell cmdlets, you can also manage the services locally or remotely using PowerShell.

Clicking Yes will cause the Remote Desktop Services UserMode Port Redirector service to restart automatically when you start the Remote Desktop Services service.
Note: Start the services if they are not already operating on either computer.
Technique 5. Check the RDP Listener’s Status
You are in the middle of the Check RDP Status and Enable Remote Desktop tutorial, and it is time to check the status of the RDP listener. You can use a PowerShell instance with administrator privileges for this procedure. You can also use a command prompt with administrative privileges for a local machine. However, PowerShell is used in this process because the same cmdlets function locally and remotely. Follow the below steps to use this technique.
1. Run the cmdlet below to connect to a remote computer and then enter qwinsta.
Enter-PSSession -ComputerName <computer name>
2. The RDP listener is operational if the list contains rdp-tcp with a status of Listen. Check the RDP listener port after that. If not, move on to the next step.
3. Export the RDP listener settings from a computer that is up and running. Then, access the registry of a computer that has the same version of the operating system as the affected computer (for instance, by using Registry Editor).
Now, navigate to the following registry entry:
HKEY_LOCAL_MACHINE\SYSTEM\CurrentControlSet\Control\Terminal Server\WinStations\RDP-Tcp
To create a.reg file, export the entry. For instance, right-click the entry in Registry Editor, choose Export, and then type a filename for the exported settings. Transfer the exported.reg file to the affected machine.
4. Open an administrative PowerShell window on the affected machine in order to import the RDP listener setup.
Run the following cmdlet to back up the existing registry entry:
cmd /c 'reg export "HKLM\SYSTEM\CurrentControlSet\Control\Terminal Server\WinStations\RDP-tcp" C:\Rdp-tcp-backup.reg'Also, you can use the below cmdlet to remove the existing registry:
Remove-Item -path 'HKLM:\SYSTEM\CurrentControlSet\Control\Terminal Server\WinStations\RDP-tcp' -Recurse -ForceTo import the new registry entry and then restart the service, type:
cmd /c 'regedit /s c:\<filename>.reg'
Restart-Service TermService -Force
Remember to put the name of the exported.reg file in place of “filename”.
5. By trying the remote desktop connection once more, you may verify the configuration. Restart the troubled PC if you still can’t connect.
6. Check the status of the RDP self-signed certificate if you are still unable to connect.
Technique 6. Check the Status of the RDP Self-signed Certificate
If the connection issue persists, launch the Certificates MMC snap-in. Select Computer account, then choose the affected computer, when required to choose the certificate store to manage. Then, delete the RDP self-signed certificate from the Remote Desktop folder’s Certificates subfolder.
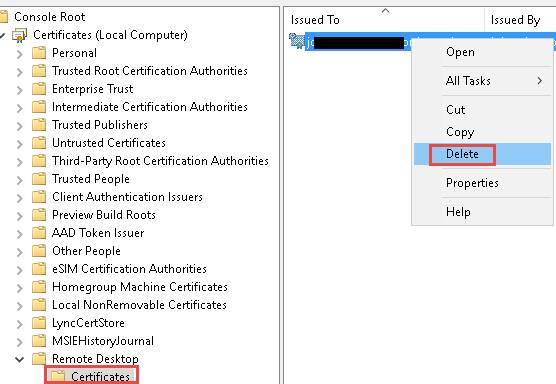
Next, restart the Remote Desktop Services service on the affected machine. The Certificates snap-in should be updated. Finally, verify the permissions of the MachineKeys folder to see if the RDP self-signed certificate has been regenerated.
Technique 7. Check the RDP Listener Port
The RDP listener must be open on port 3389 on both the local (client) and remote (target) computers. This port shouldn’t be used by any other programs.
You can use the Registry Editor to check or change the RDP port. To do this, follow the below steps:
1. Enter regedt32 into the text box that appears by choosing Run from the Start menu.
- Choose File, followed by Connect Network Registry to establish a connection to a distant computer.
- Enter the remote computer’s name in the Select Computer dialog box, click Check Names, and then click OK.
2. Open the registry and navigate to
HKEY_LOCAL_MACHINE\SYSTEM\CurrentControlSet\Control\Terminal Server\WinStations\<listener>.
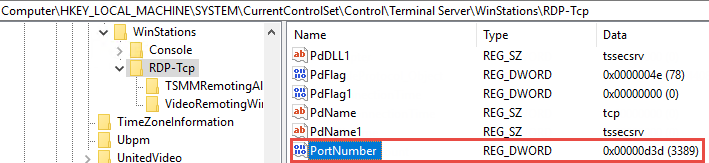
3. Change PortNumber’s value to 3389 if it isn’t already.
Technique 8. Verify no other Program is Using the Same Port
Use a PowerShell instance with administrator permissions for this procedure. You can also use a command prompt with administrative privileges for a local machine. However, PowerShell is used in this process because the identical cmdlets function both locally and remotely.
Open a PowerShell window. To connect to a remote computer, enter Enter-PSSession -ComputerName <computer name>.
Run the command below:
cmd /c 'netstat -ano | find "3389"'![]()
Look for a TCP port 3389 entry (or the designated RDP port) with a listening status. Now, enter the following command to find out which program is utilizing port 3389 (or the designated RDP port):
cmd /c 'tasklist /svc | find "<pid listening on 3389>"'
In the netstat output, look for an entry for the PID number connected to the port. The right column displays the services or processes connected to that PID. If a program or service other than Remote Desktop Services is using the port, one of the following techniques will help you resolve the conflict:
- Configure the other application or service to use a different port (recommended).
- Uninstall the other application or service.
- Configure RDP to use a different port, and then restart the Remote Desktop Services service (not recommended).
Technique 9. Verify if the Firewall Blocks the RDP Port
To see if you can connect to the affected machine via port 3389, use the psping tool. To download psping, you must use a computer that is not affected. The following command should be entered after opening a command prompt window as an administrator, switching to the directory where you installed psping:
psping -accepteula <computer IP>:3389Look for the following outcomes in the psping command output:
- Connecting to <computer IP>: The remote computer is reachable.
- (0% loss): All attempts to connect succeeded.
- The remote computer refused the network connection: The remote computer is not reachable.
- (100% loss): All attempts to connect failed
Test the connectivity of many computers to the impacted PC by running psping on each of them. Also, keep track of whether the impacted computer prohibits connections from any, some, or all other computers.
That’s it! you can use the three ways to Check RDP Status or the above 9 techniques to Enable Remote Desktop. Do not worry if you need to Enable Multiple Sessions. Just refer to our related article and review the required steps.
How to Use Remote Desktop Protocol on Windows?
So far, you learned How to Check RDP Status and Enable Remote Desktop. Now, you have enabled the remote PC successfully and you are ready to start the remote connection via Remote Desktop. Follow the below steps to use RDP on Windows.
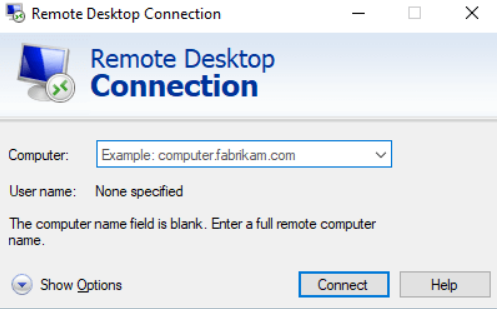
Step1. In the computer you are using to control another computer, “remote desktop connection” and double click “Remote Desktop Connection” to open it.
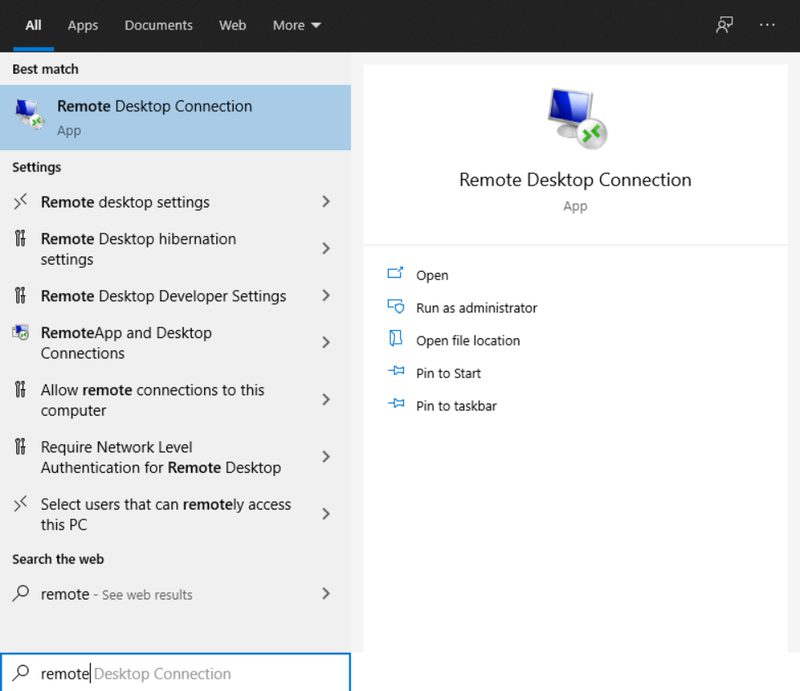
Step 2. Once you are in Remote Desktop Connection, type the PC name or the IP address of the remote PC and click “Connect“.
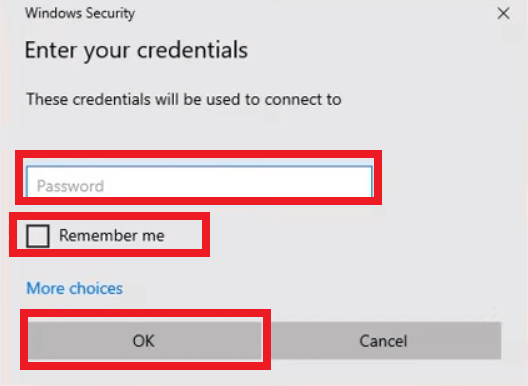
Step 3. When you are asked, type the password and username and the password of the host PC to connect it. When you’re all done, you feel like you are controlling the remote computer just like you are sitting in front of that PC.
FAQ
Is it Important to allow connections only for RDP clients?
Yes, in the system properties, allow connections only for RDP clients with NLA support for security reasons. You are recommended to check the box ‘’Allow connections only from computers running Remote Desktop with Network Level Authentication’’.
My PC is awake, but I cannot connect to my PC.
Your network must resolve the name of your PC correctly through DNS. Try using the IP address instead of the hostname and then connect again.
Why I cannot connect to the Windows Vista Home?
Windows Vista Home and some others are not supported without 3rd party software
Is RDP dangerous?
Since it allows hackers to completely bypass the need for usernames or passwords to gain access, yes it could be dangerous.
What are Remote Desktop alternatives?
LogMeIn, TeamViewer, or free alternatives like Apache Guacamole.
Does RD Client support Terminal Server Gateway
Yes, it supports it or Remote Desktop Gateway.
Conclusion
In this article, you learned How to Check RDP Status and Enable Remote Desktop. Now, you must be able to access your computer from a remote location by using RDP. Consider that, you can use this tutorial on Windows 7, 8, 10, and 11. Unlike desktop Windows 10 & 11 versions, Windows Server 2019/2022 supports two concurrent RDP connections by default. These connections are used by administrators to manage the server.
Keep in mind that the wrong modification of the register can result in serious issues. Make a backup of the registry before you begin editing it so you can restore it if something goes wrong. If you follow the above steps properly then you can Check RDP Status and Enable Remote Desktop without any errors but do not hesitate to contact us if you encounter any problems. Our technical support team will try their best to solve your problems.