Use fsck Command in Linux Ubuntu and CentOS
File systems play a crucial role in organizing, storing, and retrieving data on storage devices, and the failure of file systems can have irreparable consequences. As a Linux system administrator, you should prioritize the maintenance and health of the storage system and enhance your knowledge in this area.
The powerful command-line tool fsck (file system consistency check) in Linux is available by default in all Linux distributions, including Debian, Ubuntu, CentOS, Fedora, and Arch Linux. It helps you identify and repair potential inconsistencies and errors in the file system. The fsck command in Linux is used to check the compatibility of the file system, ensure the integrity of the hard disk, and repair file systems on the disk.
Learning how to repair disk errors in Linux is necessary for Linux system administrators. Using this guide, you will learn how to use the fsck command in Linux Ubuntu and CentOS and become proficient in maintaining and repairing Linux disks in emergency situations. Reading this article to the end is beneficial for Linux administrators, so don’t overlook it.
Basic fsck Syntax
The primary syntax of the Linux fsck command for checking and repairing file system inconsistencies on disks is as follows:
fsck [options] [filesystem]- options: You can use a wide range of options that fsck supports to modify its behavior.
- filesystem: The device, partition, or mount point on which the file system check is performed.
Note: If you do not specify the filesystem part in the syntax of the fsck command, this command checks the devices listed in the fstab file.
It is important to note that executing the fsck command on a mounted file system poses a risk of data and file corruption. Therefore, it is recommended to unmount the file system or use a live CD/USB to check the root file system when running the fsck command for repair purposes. Also, when the file system requires repair, it is a good practice to create a backup before examining the file system. Furthermore, since the fsck command is associated with Linux operating systems, to run the fsck command for potential file system errors on a disk, you should use a Linux system or Linux VPS and have a user account with sudo privileges.
Common Options for fsck Command in Ubuntu & CentOS
The fsck command-line tool offers a wide range of options to enhance its functionality and cover various objectives. Here are some of the most common options for the Linux fsck command:
| Options | Description |
|---|---|
| -A | Checks the file systems listed in /etc/fstab. |
| -a | Automatically repairs the file system without asking for user confirmation. |
| -C | Displays a progress bar during the file system check and repair process to facilitate monitoring. |
| -f | Forces the fsck command to check a file system. |
| -r | Enables interactive repair and prompts the user for confirmation before making repairs. This option is helpful for increased control during the repair process. |
| -R | Skips checking the root filesystem (useful in combination with the -A option). |
| -M | Ignores mounted file systems during the check. |
| -n | Performs a dry run, meaning it checks the file system without making actual changes (useful for previewing potential file system issues). |
| -y | Runs fsck in non-interactive mode and assumes "yes" for all prompts (useful for scripting or situations where user interaction is not possible). |
| -l | Prevents programs from using the partition during check and repair. |
| -P | Checks multiple file systems in parallel. |
| -t | Allows specifying the file system type to check. |
| -T | Conceals the title. |
| -V | Provides a detailed report of the ongoing actions. |
Understanding fsck command
Storage devices like hard drives use file systems to organize and store data. A file system malfunction can cause the loss of stored data, inaccessibility of vital data, system instability (sluggish performance or system boot failure), file corruption (unreadable or unusable files), and disc errors due to storage device physical health.
The fsck command in Linux stands for “file system consistency check,” and it is executed to identify potential errors and repair inconsistencies in file systems on disks. The fsck command in Linux is used to obtain reports on issues and inconsistencies in file systems, analyze problems, fix file system errors on disks, and ensure the integrity of the hard disk.
How to use fsck Linux Command
Using the following examples, you will learn how to use fsck command in ubuntu and centos:
Checking and Repairing File System
Step 1: Identify the device or partition containing the corrupted file system
The initial step in checking and repairing file system errors is identifying the devices containing the corrupted file system you intend to check. To accurately determine the device’s name or partition hosting the corrupted file system, you can utilize commands such as lsblk, fdisk, or df. To list the filesystem disks or all partitions and disks on your Linux system, execute one of the following commands:
lsblkOr
df -hOr
fdisk -lThe lsblk command prints a list of devices associated with system partitions, and thedf -h command displays data consumption on your system and filesystems, which is useful for identifying the disk containing the desired file system. Thefdiskcommand outputs the disk location in your system and all mounted devices.
If you used thedf -hcommand to scan mounted disks, select your desired disk from the output and check its partitions using the following command. For example, we have selected the disk /dev/sdX:
sudo parted /dev/sdX 'print'Replace /dev/sdX with the actual device name of the partition you want to check.
As a result, the partitions on the specified disk will be displayed.
Step2: Unmount device
Step Two involves unmounting mounted disks and partitions because the fsck command cannot be executed on mounted disks and partitions for checking and repair purposes, and it prints an error. Additionally, performing this action has irreparable consequences, as mentioned earlier. Therefore, using theunmountcommand, unmount your selected disk:
sudo umount /dev/[partition]For example:
sudo umount /dev/sdXReplace /dev/sdX with the disk or partition you want (eg /dev/sda,sdb,sdc).
Note: root filesystems cannot be unmounted.
Step 3: Check for disk issues using fsck
Now you can run ubuntu fsck command to scan your selected disk:
sudo fsck /dev/[partition]For example:
sudo fsck /dev/ sdXIf there is a problem with the disk, an error message will appear in the output. The error codes you may receive are as follows:
0      No errors
1      Filesystem errors corrected
2      System should be rebooted
4      Filesystem errors were left uncorrected
8      Operational error
16     Usage or syntax error
32     Checking canceled by user request
128    Shared-library error
Step4: Remount the disk after checking
After detecting the issue and repairing it, in order to use the disk, you need to mount it:
mount /dev/[partition]For example:
mount /dev/ sdXThese are the main steps to check and repair the file system in Linux, you will learn how to use the fsck command for different purposes.
Detecting Errors and Automatically Repair
You may encounter more than one error in a file system, and interactive repair of each may be time-consuming. In such situations, we all wish for the automatic detection and repair of errors without user supervision and intervention, don’t we? Fortunately, you can use the fsck command in a way that automatically detects potential problems and repairs errors without the need for user intervention. To achieve this, use the ‘-a‘ option with the fsck command in Ubuntu and CentOS:
sudo fsck -a /dev/[partition]The fsck command, after scanning the file system, prints the repaired errors. This process may take some time, especially for larger storage systems.
Repairing a Linux File System (Non-Interactive Mode)
If you intend to have potential file system issues repaired without prompting for your confirmation, you can use the ‘-y‘ option with fsck in Linux Ubuntu and CentOS:
sudo fsck -y /dev/[partition]The ‘-y’ option causes the fsck command to consider ‘yes’ as the response to all prompts for confirming the fixing of identified errors from the user. As a result, you will non-interactively repair file system errors.
displaying a progress bar during the file system check
Using the ‘-C‘ flag with the ubuntu fsck command for file system inspection allows you to monitor the checking process. This feature is helpful for long-running checks:
sudo fsck -C /dev/[partition]This command displays the progress bar during the file system check.
Scanning and repairing All Filesystems at Once via fsck
You can check all file systems in Ubuntu and CentOS systems, except for root file systems, and address any potential issues they may have:
fsck -ARWith the execution of the previous command, the content of the etc/fstab file will be checked altogether. Since root file systems cannot be unmounted, running the fsck command with the intention of repairing root file systems will result in an error message. Therefore, we used the ‘-R‘ in the previous command.
To check and repair all file systems in the system in non-interactive mode, you can use the following command:
fsck -AR -yIgnoring specific file system for check and fix
The following command is useful when, during the inspection and repair of all file systems, you want to instruct the fsck command to skip a specific file system check. For example, to skip the ext4 file system, run the following command:
sudo fsck -AR -t noext4 -yThe ‘-t‘ option with ‘no‘ in the previous command causes the fsck command to check all file systems except for a specific type that you have specified (in our example, ext4).
Forcing to check the file system through fsck
The default behavior of fsck when checking a clean device is to skip it. To change the default behavior of fsck when checking a clean device or partition, you can use the ‘-f‘ option with fsck command ubuntu and centos:
sudo fsck -f /dev/[partition]This command forces the fsck command to check a specific partition or device, even if it assumes that there is no issue with the device.
Performing a dry run using fsck
To only have a preview of issues in the specified file system without repairing them, use the ‘-n’ option with the fsck command:
sudo fsck -n /dev/[partition]This command only displays errors in the corrupted file system but does not fix them. The message ‘WARNING: Filesystem still has errors‘ in the output of this command indicates the existence of issues that have not been repaired.
Skipping Mounted filesystem for checking
Using the ‘-M‘ flag prevents the fsck command from running on mounted file systems to check them. To achieve this, execute:
sudo fsck -M /dev/[partition]As a result, if the partition you specify is mounted, the fsck command will not check it.
Repairing Specific File System Type with fsck
If you are aware of the file system type, you can specify it for checking a particular type of file system (e.g., ext4) using the ‘-t‘ option:
sudo fsck -t ext4 /dev/[partition]Replace ext4 with the actual file system type.
Repairing Linux Root File System with fsck
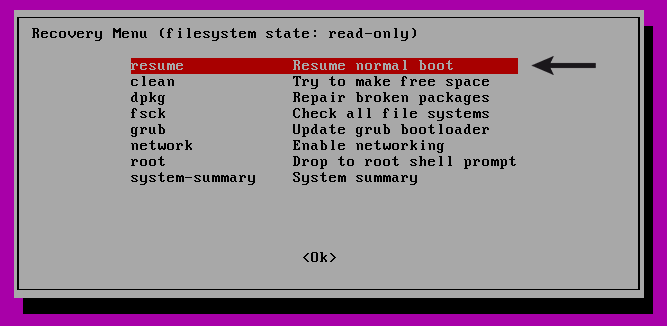
As you are aware, since the root file system is mounted and in use, you cannot execute the fsck command on root partitions of a running machine because you cannot unmount the root file system. If you need to check and repair the root file system, you must boot the Ubuntu and CentOS Linux systems in recovery mode or use a Live CD/USB, and then you can run fsck. Follow the steps below for this purpose:
1. Reboot your Linux system after preparing your system and stopping critical services like MySQL/MariaDB, etc., by running the following command in the terminal:
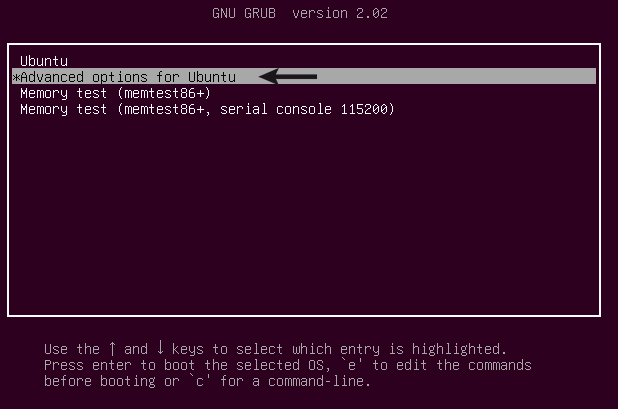
sudo reboot2. Press and hold the Shift key during boot-up to access the GNU GRUB menu.
3. Select the Advanced options for Ubuntu from the menu.
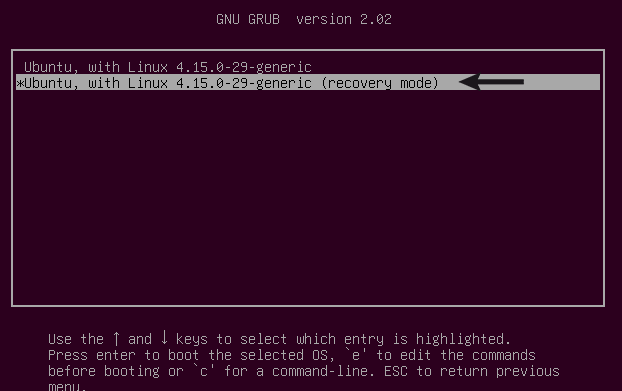
4. Then, choose the (recovery mode) entry to display the Recovery Menu.
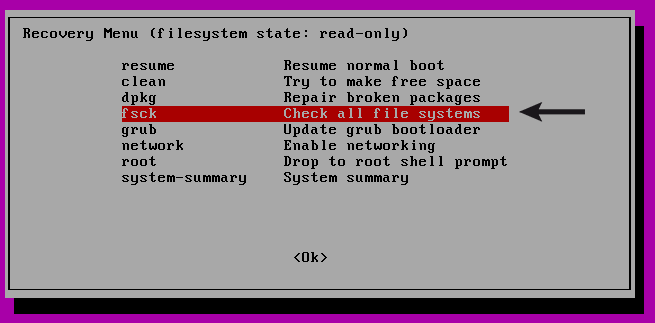
5. From the menu, select the fsck option.
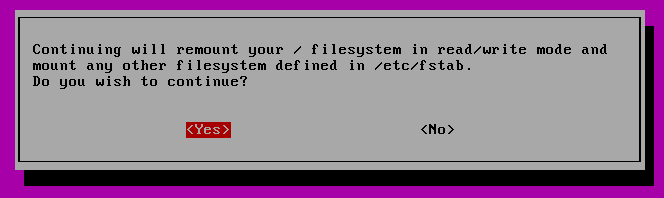
6. Respond with yes if you wish to have your filesystem remounted.
7. After completing the process, select the resume option from the recovery menu to boot up the machine.
Forcing fsck to check and repair during system boot
There is a possibility to force fsck to run at boot time on a Linux system and fix any potential damaged file system errors. For this purpose, you need to create a file named ‘forcefsck’ in the root partition of your Linux system:
sudo touch /forcefsckAs a result, now that the /forcefsck file has been created on your system, the execution of the fsck command is forced and scheduled for the next boot.
For SystemD-based distributions to force the fsck command to run at system boot, apply the following kernel boot parameters:
fsck.mode=force
fsck.repair=yes
It is crucial to note that if system boot time is a critical concern for you, especially when your system includes a large number of inodes, this capability can be troublesome. This is because running the fsck command may be time-consuming under these conditions, and the system may not boot until the process is complete. To prevent the execution of the fsck command during system boot, you can delete the ‘/forcefsck’ file on each system boot in older systems. Additionally, you can be more sensitive when making the scheduling of the fsck command in the boot execution plan.
Displaying fsck Schedule
To find out the last time your devices and partitions were checked using the fsck command, run the following command:
sudo tune2fs -l /dev/[partition]| egrep -i 'check|mount'By running this command, you can view the check frequency number, current mount count (the count of mounts before a file system check), the time of the last check for a specific partition, and the check interval (maximum time between checks of two different file systems).
Getting More information on using fsck in Linux
For more information on how to use the fsck command in Linux, including codes, detailed explanations, and additional options, you can execute the following command and review the manual page:
man fsckImage 1
This command is also helpful for a better understanding of fsck Exit Codes. Therefore, if you didn’t gain sufficient knowledge from the output of the fsck command, execute the previous command to comprehend the fsck command output better.
The fsck command supports various file systems, and depending on the type of file system, you can use different options. To familiarize yourself with additional options for a specific file system type, such as ext4, use the following command:
man fsck.ext4Use cases for the fsck command in Linux
The primary purpose of running the Linux fsck command is to check and repair file systems on disks. However, here are some use cases and scenarios in which executing the fsck command can come to your rescue:
- Checking the compatibility of file system metadata and data structures.
- Identifying bad blocks, which are damaged sections of the storage device leading to data corruption.
- Interactive repair for increased control during the repair process.
- Automatic repair and maintenance of specific file system inconsistencies without user intervention.
- Preventing data damage by examining and addressing issues in the file system.
- File system recovery during the system boot process in case of an unexpected system failure or power outage.
- Identifying file system errors when the system fails to boot.
- Fixing file system issues and errors when encountering an input/output error.
- Checking and repairing external storage devices such as USB drives or external hard disks.
- Checking and repairing various file system types such as ext2, ext3, ext4, XFS, etc.
- Providing process monitoring capabilities by displaying a progress bar during the file system check.
Important Considerations
- To prevent data loss or further disk corruption, make sure to back up your important data before running fsck.
- For a successful examination of the hard disk and to prevent issues, unmount the file system before executing fsck.
- Schedule regular checks using fsck to ensure the health of your disk.
- Pay attention to error messages that appear after running the fsck command, as they help you identify issues accurately and guide you in resolving them.
- For the root file system, it’s common to run fsck from a live CD/USB or during the system boot process when the file system is not mounted.
- Running the fsck command requires superuser (root) privileges.
Conclusion
The fsck command-line tool is a powerful and flexible utility for maintaining file system integrity in Linux, known for its control and commendable features. Every Linux system administrator should be proficient in using the fsck command to leverage this valuable tool for ensuring the integrity, stability, and reliability of the hard disk. While the fsck command-line tool is safe for checking and repairing hard disks, caution is advised to prevent unintended data loss.
For effective and secure file system maintenance, learning how to use the fsck tool, understanding its options, and knowing the appropriate times to use them are crucial. In this comprehensive article, you have learned how to use the fsck command in Linux Ubuntu and CentOS. If you have any questions, feel free to ask us in the comments section.