Import SSL Certificate in MikroTik to Secure Connection
SSL stands for Secure Socket Layer which is a security protocol. As a digital certificate, an SSL certificate creates an encrypted link between a web server and a web browser. In this article, you will learn How to Import SSL Certificate in MikroTik to Secure Connection. If you are managing a company or organization, you will need to add SSL certificates to your websites. Since an SSL certificate authenticates the identity of your website, you can ensure that your connections will be encrypted and online transactions are secured. Customers also find your company reliable because their information is kept private and secure.
Websites require SSL certificates to protect user data, confirm the site’s ownership, stop hackers from building a false version of the site, and inspire trust in users. To cover your networking purposes, you might need to buy MikroTik VPS. So, you are recommended to import SSL Certificate in MikroTik and guarantee the security of your connections. Let’s get familiar with the SSL certificate and review the required steps for importing that in MikroTik RouterOS.
What is SSL Certificate & Why Import it?
SSL certificate, often known as TLS, is a protocol for encrypting Internet communication and confirming the identity of servers. SSL/TLS is used by any website with an HTTPS web address. The public key, the certificate’s issuer, and the associated subdomains are all displayed in an SSL certificate, which is crucial information for confirming a website’s owner and encrypting online traffic using SSL/TLS. When referring to a file hosted on the website’s origin server, an SSL certificate is used. This file contains the data that browsers access when you view and interact with the page.
SSL protects internet connections by preventing hackers from reading or altering data sent between two computers. When the URL in the address bar has a padlock icon next to it, SSL is being used to secure that particular website.
An HTTPS web address needs an SSL certificate. Since HTTPS is the secure variant of HTTP, SSL is used to encrypt traffic on HTTPS websites. HTTP sites that lack SSL certificates are typically marked by browsers as “not secure.” This makes it evident to consumers that the website might not be trustworthy, which encourages companies that haven’t switched over to HTTPS to do so.
Quick Method to Import SSL Certificate in MikroTik [Winbox Tool]
Secure communication between servers and clients is made possible by SSL/TLS certificates. Let’s go through the steps of this guide to learn How to Import SSL in MikroTik. To use and finish this method, you just need a CA root certificate, a private (device) certificate, and a key for the private certificate.
Step 1. Upload SSL Certificate to Files Directory
Previously, you learned What is Winbox and How to Use it. Here, you can also use Winbox to upload Certificate files in RouterOS. The numerous features and applications of MikroTik RouterOS make it more than just a straightforward router operating system. By running on a regular and personal computer, this program is capable of converting them into specialized routers. While MikroTik RouterOS keeps all files in the File directory, you can upload files in Files Window through Winbox. Using both FTP Client and drag and drop files is possible.
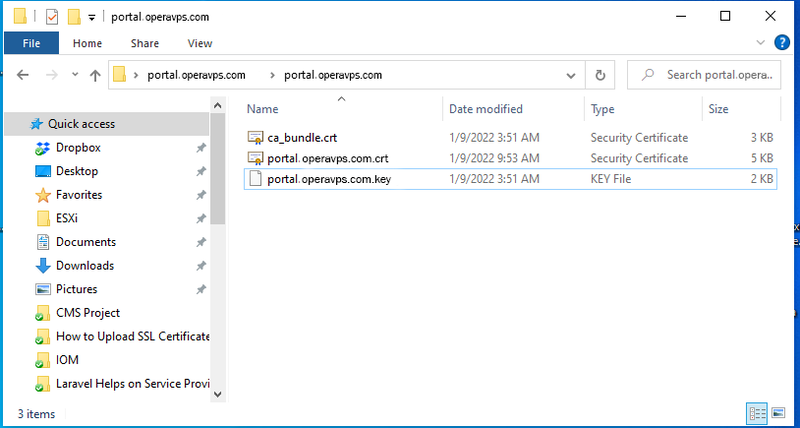
Typically, an SSL certificate comprises two files. Private key files (.key) and certificate files (.crt) are two examples. The certificate file (including ca_bundle.crt) will be provided to you by the service provider after it has been signed and the private key file will be in your possession while you are creating your own CSR file if you purchase an SSL certificate from any service provider. You are recommended to rename your certificate file and private key file to match the name of your domain or subdomain.
Now, you can use Winbox to upload these private key and certificate files to RouterOS. Follow the below instructions to upload SSL certificates to RouterOS’s Files directory:
- Open Winbox, then log in as a full-permission user to MikroTik RouterOS.
- Select Files from the Winbox menu. There will be a File List window.
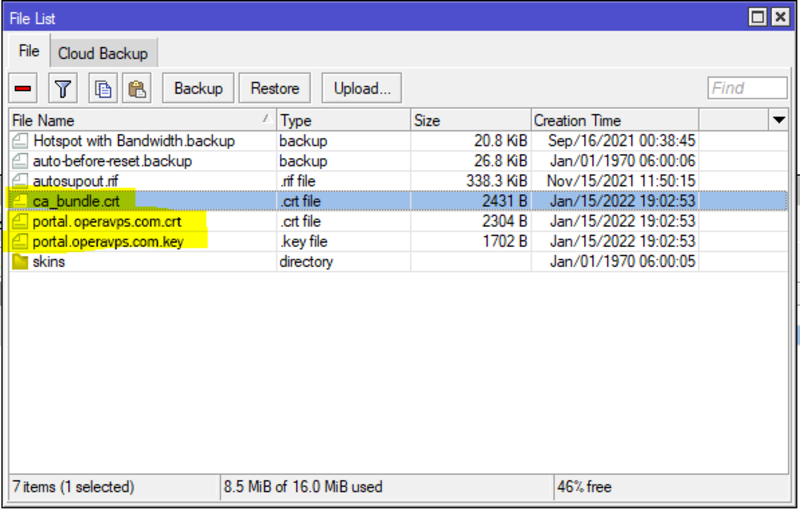
- Drag and drop each file into the File List window at this point.
The File List window will display every file that was uploaded.
There are two steps remaining to import SSL certificate in MikroTik.
Step 2. Import SSL Certificate in RouterOS Certificate Store
In this step, you are ready to import the files into the RouterOS Certificate Store so that RouterOS Services can use the SSL Certificate after uploading it in the File List window.
Follow the below instructions to import an SSL certificate into the RouterOS Certificate Store.
- Go to the System > Certificates menu option in Winbox. A window for certificates will now open.
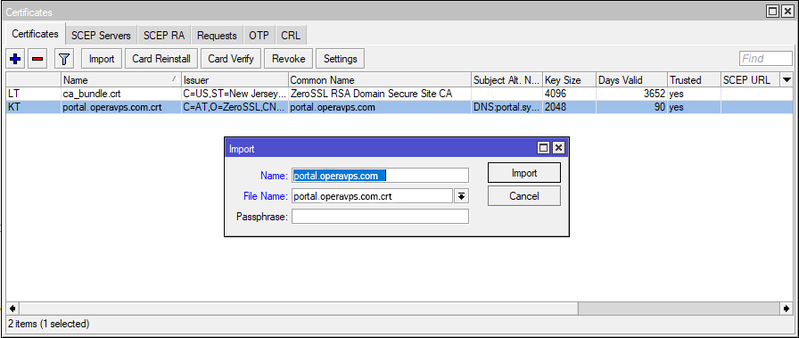
- Select Import from the menu. A window for import will open.
- Enter the desired ca_bundle name in the Name input field.
- From the drop-down menu for File Name, select the ca_bundle file.
- Click the Import button now.
- Import the private key and certificate files.
The following image will appear in your RouterOS Certificates window after importing private key and certificate files.
Step 3. Use Imported SSL Certificate for RouterOS Service
Once the SSL certificates are successfully imported into RouterOS, you can use the SSL Certificate for the RouterOS service HTTPS and finally import SSL Follow the instructions below to utilize an SSL certificate for an HTTPS server.
- Go to the IP > Services menu option in Winbox. A window titled IP Service List will now open.
- Double-click on www-ssl service after enabling it. A window for IP Service (www-ssl) will emerge.
- Select the imported certificate file (not ca_bundle file) from the Certificate dropdown option.
- Press the Apply and OK buttons.
You can now securely access RouterOS’s HTTPS Service. For any RouterOS service that requires an SSL certificate, you can utilize the imported certificate.
How to Import Certificates into MikroTik RouterOS Using CLI
For those users who prefer to work from the command line, this part has been ready to use. Using this solution, you can import the root CA certificate from the command line. Simply run the command below to import SSL certificate in MikroTik.
certificate import file-name=certname.crtSince the name of the certificate in this guide is certname.crt, the command must be:
certificate import file-name=ca.crtIf you password-protected your CA certificate, enter the right password to import it. The remaining steps are automatic.
One certificate should be imported now. Run the following command to check for installed certificates:
certificate printThe list of all installed certificates will be printed by the router.
FAQ
How to view the details of an SSL certificates?
Click on the padlock symbol located within the browser bar.
Which information are secured by an SSL certificate?
- Proprietary information.
- Credit card transactions or bank account information.
- Legal documents and contracts.
- Personally identifiable information.
- Medical records.
- Login credentials.
Why a private key is not used for the root CA?
Never use a private key for the root CA certificate because it is sensitive, and you should not share it. Also, if you work with a third-party CA root certificate, then you will not be able to access it.
Conclusion
In this article, you learned How to Import SSL Certificate in MikroTik. Reading this guide helps you upload and import SSL certificates in MikroTik RouterOS. Two different solutions were explained to help both users who like to work with GUI and CLI. If you follow the mentioned instructions and commands, then you can smoothly import SSL certificate in MikroTik without any errors but do not hesitate to contact us if you encounter any problems to use SSL certificate in MikroTik. Our technical support team will try their best to solve your problems.