How can I Install 7Zip in Ubuntu, Debian, Centos & Fedora
As a Linux user, you might face issues in sending large files or compressing/decompressing them. While 7Zip is used from a Windows GUI, Linux users can also benefit from this cross-platform file archiver. 7Zip is a free and open-source compression program that is available on Linux with a powerful command line version. Install 7Zip in Linux is possible through different methods and this article will explain them all in detail. By utilizing practical examples, you will also acquire knowledge of the utilization of 7Zip in Ubuntu, Debian, CentOS, and Fedora.
Almost all operating systems can open ZIP files, but in order to work with 7Z files, users must install 7-Zip or another third-party program that supports them. But it’s still a reliable compression format. After buying Linux VPS, you will need to compress and extract files or folders to do your daily tasks. This guide shows you how to install and use 7zip on Linux and take advantage of its capabilities.
What is 7Zip and How it Works?
7-Zip is an application that is used to put collections of files within compressed containers known as “archives” It is free and open-source and was created by Igor Pavlov and debuted in 1999. Although it has its own archive format called 7z, 7-Zip can read and write a variety of different formats. Similar to other compressed formats like ZIP and RAR, 7Z files are archives made using the 7-Zip compression software. 7Zs are an easy format for uploading and downloading files from the internet due to their excellent compression ratio and encryption capabilities.
7Zip supports a variety of different archive formats for packing and unpacking, including XZ, BZIP2, GZIP, TAR, ZIP, and WIM; for extracting only, AR, RAR, MBR, EXT, NTFS, FAT, GPT, HFS, ISO, RPM, LZMA, UEFI, Z, and many others. An archived file made with the help of 7-Zip, a free, open-source file compression program, is saved with the 7Z file extension. While 7Z and other archived file formats like ZIP, TAR.GZ, RAR, and ISO are comparable, they use a greater compression ratio and AES-256 encryption. Due to the high compression rate they use when archiving, 7Z files help clear up space on your hard drive and facilitate the sending and downloading of files over the internet.
Reducing the size of files to save space on your computer, Creating smaller versions of massive files, Adding a password to your files to safeguard them, and Creating self-extracting archives that don’t require any specific software to open are the most brilliant features of the 7Zip tool.
Stay with us to learn install 7Zip in Linux in the following of this tutorial.
Two Methods to Install 7Zip in Linux Ubuntu, Debian, CentOS and Fedora
Let’s go through this tutorial and review two ways to Install 7Zip in Linux. Using the methods, you can install and use the 7Zip program in Ubuntu, Debian, CentOS, and Fedora. Compress & Extract File in Linux is also possible using Linux commands. This guide teaches you how you can install and use the 7Zip compression tool to do this.
Using the Command line and Package manager methods, you can install 7Zip in Linux. If you prefer any of them, skip the other one to save your time.
Install 7Zip in Linux Using Command Line
First, let’s see how to install 7Zip in Linux using the command line. So, you need to open up a terminal window (Ctrl + T) and run the related command of your current distribution to download and install the 7zip package on your system.
Install 7Zip On Ubuntu and Debian:
Run the command below on your Debian-based Linux distribution to install 7Zip on it:
sudo apt update
sudo apt-get install p7zip-full
Install 7-Zip On CentOS and Fedora:
If you are using RPM-based distribution, type:
sudo dnf install p7zipP7zip and p7zip-plugins are two packages related to 7zip that are included in Red Hat-based Linux distributions. The installation of both packages is advised. On CentOS/RHEL versions, you must enable the EPEL repository in order to install these two packages. No new repositories need to be set up for Fedora.
$ sudo yum install p7zip p7zip-pluginsWhen you are finished, you can use the following command to check whether the package is installed:
$ 7zInstall 7Zip Using Package Manager
If you prefer to use the package manager method to install 7Zip in Linux, the package manager can be used through the applications menu. You just need to search “7zip” in the software center or package manager. The installation procedure can then be started by clicking the install button.
Practical Examples to Use 7Zip in Ubuntu, Debian, CentOS & Fedora
So far, you learned how to install 7Zip in Linux. Using any one of the above methods, you must have 7Zip installed on your system now. In this part, you will learn How to Use 7Zip in Linux.
7Zip Syntax
7z <command> [<switch>...] <base_archive_name> [<arguments>...] [<@listfiles...>]7Zip Commands
| Option | Usage |
| a | Add files to archive |
| b | Benchmark |
| d | Delete files from archive |
| e | Extract files from archive (without using directory names) |
| l | List contents of the archive |
| t | Test integrity of the archive |
| x | Extract files with full paths |
| U | Update files to archive |
Compress Files Using 7Zip in Linux
When using the 7zip program to compress a file or directory, the ‘a‘ option is used together with the names of the compressed and uncompressed files.
Run the command below to compress a file using the 7zip tool:
7z a compressed_file.7z file_to_compressReplace “file_to_compress” with the name of the file or directory you wish to compress, and “compressed_file.7z” with the name you wish to give the compressed file.
Use the command below to compress a directory called “home” into a file named “home.7z”
7z a home.7z home/In this way, the new file named ”home.7z” will be created which contains a compressed version of the ”home” directory.
Extract Files Using 7Zip in Linux
Using the 7zip program, you can extract files or directories by using the ‘x‘ option with the 7zip command and the file’s name. To do this, run the following command and extract your considered file:
7z x compressed_file.7zThe name of the compressed file you want to extract should be substituted for “compressed_file.7z“. For instance, we can use the command below to extract the “home.7z” file we previously prepared.
7z x home.7zThe ”home.7z” file must be extracted in the current directory.
Compress Multiple Files/Directories
To compress multiple files or directories, separate them with spaces:
7z a compressed_files.7z file1.txt file2.txt directory1/ directory2/A new file called “compressed_files.7z,” which contains a compressed version of the files “file1.txt,” “file2.txt,” “directory1/,” and “directory2/,” will be produced after the command has been run.
Extract Files to a Specific Directory
To extract the content of a compressed file to a specific directory, run the command as shown below:
7z x compressed_file.7z -o /media/In this way, the “compressed_file.7z” file in the “media” folder will be extracted.
Extract Archive in the Currently Active Working Directory
To extract an .7z archive file, use “e” option like the below example:
$ 7z e example.7zSelect an Archive Format
Use the -t (format name) option to choose an archive format, from which you can choose zip, gzip, bzip2, or tar (the default is 7z):
$ 7z a -tzip example.zip example_debPrint an Archive Files
Use the “l” (list) function to view a list of the files in an archive. This function displays the type of archive format, method, items in the archive, and other information.
$ 7z l example.7zCheck the Integrity of an Archive File
Use the “t” (test) function as demonstrated to check the integrity of an archive file.
$ 7z t example.7zBackup a Directory with 7Z in Linux
You can use the 7za program to back up directories since it keeps track of a file’s owner and group. Unlike 7z, the -si option allows reading from stdin.
$ tar -cf - example_files | 7za a -si example_files.tar.7zRestore a Backup
Using -so option enables you to restore a backup by sending output to stdout.
$ 7za x -so example_files.tar.7z | tar xf -Adjust Compression Level
To set a compression level, you can use the -mx option:
$ tar -cf - example_files | 7za a -si -mx=9 example_files.tar.7zUpdate & Remove Files
Use the “u” and “d” options, respectively, to add new files to an archive file or remove existing files from an archive file.
$ 7z u <archive-filename> <list-of-files-to-update>
$ 7z d <archive-filename> <list-of-files-to-delete>
Set a Password to Files
Use the -p option to set a password for an archive file:
$ 7za a -p{password_here} example_secrets.tar.7zCreate Archive File [GUI method]
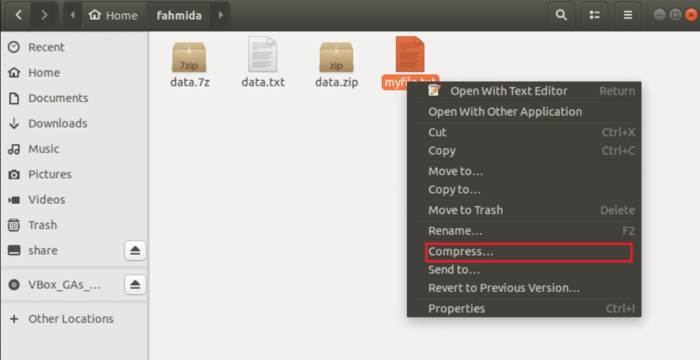
In this example, you will learn how to create an archive file and folders without using Commands or Terminal. To do this, go to the file location, choose the file, and then use the right-click to bring up a pop-up menu. To generate an archive file, select the compress option from the menu.
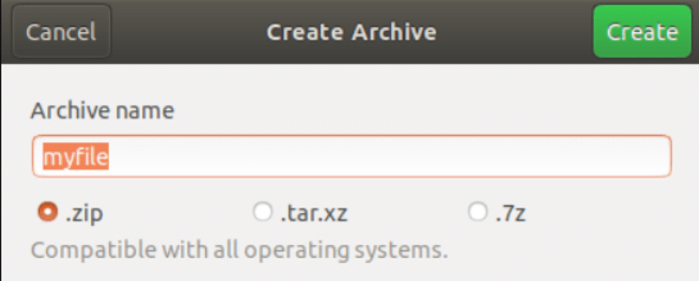
The dialog box provides three archive options:.zip,.tar.xz, and.7z. .zip is chosen in this case to generate a compressed file with the name myfile.zip.
That’s it! You have successfully installed 7Zip in your Linux distribution. After reviewing all the above examples, you must know how to use 7Zip in Linux. However, there are also some related Linux commands if you need to Unzip files in Linux.
Conclusion
In this article, you learned How to Install 7Zip in Linux. Now, you know what is 7Zip and How to use it on Ubuntu, Debian, CentOS, and Fedora. The 7-zip archiver is an effective tool for compressing and decompressing your important files and folders. Using this archiver, you can transfer massive amounts of data with ease. With the help of the practical examples in this guide, you must be able to install and use 7Zip in Linux.
If you follow the above steps properly then you can smoothly install 7Zip in Linux without errors but do not hesitate to contact us if you encounter any problems. Our technical support team will try their best to solve your problems.
Related Article : What is Debian OS