Install and Configure SMTP Server with Postfix on Ubuntu
SMTP (Simple Mail Transfer Protocol) uses a program to send, receive, and relay outgoing emails between senders and receivers on mail servers. In this article, you will learn How to Install and Configure SMTP server with Postfix on Ubuntu Email communication would not be possible without it since SMTP chooses which servers will receive your relay messages. This guide also works for users who are preparing to install Postfix Ubuntu 22.04. A mail server is a broad word to describe a system that collects, processes, and serves email. Every email message travels through the mail server before being delivered, just like a mail carrier.
With the absence of servers, you could only send emails to recipients whose addresses matched your domain, such as Gmail.com to Gmail.com. An SMTP email server will have an address/addresses that your mail client or application can establish because it deals with sending emails.
Email is sent and received using Postfix, a mail transfer agent (MTA). It can be set up to only allow local applications to utilize it to send emails. This is helpful when a third-party email service provider won’t permit you to send email notifications frequently from your apps or when you have a lot of outgoing traffic. It retains the necessary functionality while being a more lightweight option for maintaining a full-fledged SMTP server.
Prerequisites to Install SMTP Server on Ubuntu
To let this tutorial works correctly, provide the options below.
- A system running Ubuntu.
- A non-root user with
sudoprivileges.
What is SMTP Server and How does it Work?
Mail servers utilize the Simple Mail Transfer Protocol (SMTP) application to send, receive, and relay outgoing email messages between senders and recipients. A technical protocol called Simple Mail Transfer Protocol (SMTP) is used to send an email over a network. SMTP, like other networking protocols, enables data interchange between PCs and servers regardless of the hardware or software running on top of them. Similar to how standardizing envelope addressing enables the postal service to function, standardizing email transmission through SMTP enables widespread email delivery.
Not a mail retrieval protocol, SMTP is a mail delivery protocol. The recipient must still pick up the letter from the mailbox after the postal service has delivered it. Similarly to this, SMTP sends emails to the mail servers of email providers, but different protocols are used to retrieve those emails from the mail servers so that recipients may view them.
Every networking protocol has a set procedure for data exchange. A method for transmitting data between an email client and a mail server Ubuntu is described by SMTP. The computer or web application a user uses to access and send emails is called an email client. Users do not communicate directly with mail servers; instead, they are specialized computers for sending, receiving, and forwarding emails.
Why should you use an SMTP Server?
Previously, you understood how the Ubuntu mail server works and reviewed the Top 15 Linux Mail Servers. Sending emails securely and promptly to your receiver is essential when conversing via email. Unfortunately, your email won’t reach its intended recipient if there isn’t an SMTP server. The email changes into a string of code when you click Send, which is then sent to the SMTP server, which interprets the code to pass the message. The message wouldn’t translate if the SMTP server didn’t process it. The SMTP server also confirms that the email is being sent from an operational account. To protect your mailbox from spam email, the email server verifies that an active or operational email account transmitted the outgoing message.
The SMTP protocol assures that if an email cannot be delivered, it will bounce back to the sender and inform them that either their email address is invalid or that the recipient’s email server has rejected the email for some reason As a small, medium, or large enterprise, you need to have your own Email server So, stay with us to review all the required steps to Install and Configure SMTP Server with Postfix on Ubuntu.
Install and Configure SMTP Server with Postfix on Ubuntu 20.04 & 22.04
Having your own email servers makes it possible for you to independently establish or set your policies in order to achieve your goals. These benefits make sure that you can handle your servers more effectively and neatly. Let’s go through this guide and learn how to set up your own SMTP server on Ubuntu 20.04 and 22.04.
Step 1. Install Postfix
As always, before starting the installation process, update your server by running the following command:
sudo apt updateTo install Postfix, type:
sudo apt install postfixIn the case of a successful install, the below window will be shown automatically.
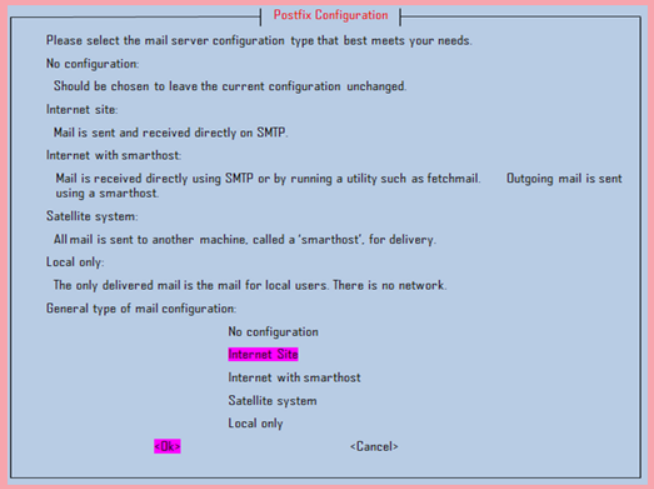
Internet Site is the presumptive selection. For your use case, that is the suggested option, so press TAB, then ENTER. If you can see the description text, tap OK, then enter by pressing TAB.
In this way, the install smtp server ubuntu is finished. Let’s start the configuration steps.
Step 2. Configure Postfix
To send and receive emails from the exact running server, you need to configure Postfix. To do this, the server will be the localhost and Postfix must be set up to listen exclusively on the loopback interface. Servers utilize this interface as a virtual network to communicate among themselves.
Edit the main Postfix configuration file (main.cf), located in etc/postfix, to make the necessary changes. Before making any changes, though, make a backup of the file. Perhaps you should use the original.
sudo cp/etc/postfix/main.cf/etc/postfix/main.cf.backupNow, run the command below to access the file.
sudo nano/etc/postfix/main.cfThen, find the following lines:
/etc/postfix/main.cf
. . .
mailbox_size_limit = 0
recipient_delimiter = +
inet_interfaces = all
. . .
To continue, set the value of the inet_interfaces setting to loopback-only:
/etc/postfix/main.cf
. . .
mailbox_size_limit = 0
recipient_delimiter = +
inet_interfaces = loopback-only
. . .
Save and close the file when you are done. Now you can apply changes by starting the Postfix server. So, run the following command to enable it:
sudo systemctl enable postfix
sudo systemctl start postfix
Step 3. Test the SMTP Server
Now that you have successfully installed and configured the Ubuntu SMTP server, it makes sense to test whether Postfix is functioning correctly. To do this, you can use telnet to get the confirmation.
sudo telnet Your IPIf you see the localhost is connected, use the following command to install the mail-sending packages of Postfix.
sudo apt install bsd-mailxWhen the installation is finished, run the command below to use the tool which enables you to finish up the setup SMTP server Ubuntu process.
sudo mailx -r test@operavps -s ‘’SUBJECT’’ [YOUR-EMAIL-ADDRESS]Replace your actual email address to have a real test.
Step 4. Configure Firewall
Since the firewall might restrict Postfix, use the commands below to allow the Postfix functions in the firewall.
sudo ufw allow ‘’Postfix’’
sudo ufw allow ‘’Postfix SMTPS’’
sudo ufw allow ‘’Postfix Submission’’
You’re all done and now a Postfix-powered send-only email server is ready to use.’
Step 5. Enable SMTP Encryption
In this step, you are ready to enable SMTP encryption. To do this, you can request for a free TLS certificate from Let’s Encrypt for your domain. Finally, you will configure Postfix to use it when sending emails.
Since Ubuntu includes Certbot in their default package repositories, run:
sudo apt install certbotType Y and hit enter to confirm when prompted. You installed ufw, the simple firewall, as part of the preliminary server setup described in the prerequisites. In order for domain verification to be accomplished, you must configure it to accept HTTP port 80. To enable it, run the following command:
sudo ufw allow 80Once the output says the port is open, you are ready to get a certificate by running the command below:
sudo certbot certonly --standalone --rsa-key-size 4096 --agree-tos --preferred-challenges http -d your_domainDo not forget to replace your-domain with your own one before running the command. When you are prompted, enter your email address.
So far, your certificate and private key file were saved under /etc/letsencrypt/live/your_domain. So, you have your certificate. Open main.cf for editing:
sudo nano /etc/postfix/main.cfThen, find the following part:
/etc/postfix/main.cf
# TLS parameters
smtpd_tls_cert_file=/etc/ssl/certs/ssl-cert-snakeoil.pem
smtpd_tls_key_file=/etc/ssl/private/ssl-cert-snakeoil.key
smtpd_tls_security_level=may

smtp_tls_CApath=/etc/ssl/certs
smtp_tls_security_level=may
smtp_tls_session_cache_database = btree:${data_directory}/smtp_scache
To update your TLS settings for Postfix, change it as follows and replace your-domain with your domain.
/etc/postfix/main.cf
# TLS parameters
smtpd_tls_cert_file=/etc/letsencrypt/live/your_domain/fullchain.pem
smtpd_tls_key_file=/etc/letsencrypt/live/your_domain/privkey.pem
smtpd_tls_security_level=may

smtp_tls_CApath=/etc/ssl/certs
smtp_tls_security_level=may
smtp_tls_session_cache_database = btree:${data_directory}/smtp_scache
Save and close the file when you are finished. To apply the changes you made, use the command below to restart Postfix.
sudo systemctl restart postfixCongratulations. Here, you finished learning how to configure SMTP server in Ubuntu step by step.
FAQ
How to show the emails are sent from the main domain when the domain is a subdomain in fact?
To do this, add the following line to the end of main.cf during the configuration:
/etc/postfix/main.cf
...masquerade_domains = your_main_domainConclusion
In this article, you learned How to Install and Configure SMTP Server with Postfix on Ubuntu. If you follow the above steps properly then you can smoothly install and configure your SMTP server without any errors. Since there are no outages with SMTP, emails get to your inbox rather than your spam bin, and the dashboard features an analytics area, managing your email servers doesn’t require a lot of time or resources. If you need to manage bulk emails, setting up an SMTP server would be useful, easy, and recommended.
If you encounter any problems, please do not hesitate to contact us. Our technical support team will try their best to solve your problems.
Hello
I tried following this article, but it didn't work. I went through your configuration steps you directed in /etc/postfix/main.cf, but when I used telnet to test it, it didn't connect. Additionally, I attempted to write your firewall rules, but when I tried, it said: "need to and from clause." This happened, when I tried to allow ''SMTPS'', and ''Postfix Submission''. I am not sure what went wrong
To test the connection to port 465 (SMTPS) with telnet, you need to use the -z ssl option, which enables SSL encryption to initiate a secure connection to the mail server on port 465. To write firewall rules for SMTPS and Postfix submission, you need to specify the source and destination addresses and ports, as well as the action to take. You can also use ip6tables for IPv6 firewall rules, with similar syntax. This should assist you in resolving your issue. Please ask me any further questions you may have.