How to Install V2ray on Linux, Windows, Mac, Android, iOS
As an open-source network tool, V2Ray VPN helps increase online security over the Internet.
V2Ray supports operating systems such as Linux, Windows, Mac, Android, and iOS.
V2Ray installation is the same on the server and the client, but usually the VPS uses Linux and the PC uses Windows.
Install V2Ray and configure it on all named operating systems is explained here:
Steps to Install and Connect V2Ray on Linux
To install and configure V2Ray on Linux, you will need to have an already running Linux VPS and use a non-root user with sudo privileges.
This guide helps you in the challenging process of installing V2Ray:
Although V2Ray automatically adjusts for time zones, the time must be precise.
So, before starting the installation, consider that Time is a component of V2Ray’s verification mechanism.
An inaccurate time will prevent you from connecting to the server and cause it to believe that you are attempting to make an illegal request, even if your setting is flawless.
Therefore, view the time on your Linux VPS by running the command below:
$ date -RIf the time shown in the output is not accurate, type:
$ sudo date --setV2Ray is installed on the Linux operating system via 3 methods:
- Script installation.
- Manual installation.
- Compilation.
Here, we explain the first method, script installation:
Step 1: Install Dependencies
According to the Linux distro you are using, V2Ray installation requires installing dependencies:
$ apt update

$ apt install curlCentOS/RedHat :
$ yum makecache

$ yum install curl$ dnf makecache
$ dnf install curlopenSUSE/SUSE:
$ zypper refresh

$ zypper install curl
Step 2: Download the Installation Script
Run the command below to download the script of the main program installation:
$ curl -O https://raw.githubusercontent.com/v2fly/fhs-install-v2ray/master/install-release.shStep 3: Install V2Ray on Linux
To install v2ray-core, use the command below:
$ bash install-release.shAfter a successful installation, run the following command to start V2Ray on Linux:
$ systemctl start v2raySince V2Ray will not launch automatically after the first installation is finished, you must run the above startup command manually.
Run the command below to start V2Ray automatically at boot:
$ systemctl enable v2rayTo check whether V2Ray is running, type:
$ systemctl status v2rayAn output similar to the one below means that the startup is successful:
● v2ray.service - V2Ray Service
   Loaded: loaded (/etc/systemd/system/v2ray.service; disabled; vendor preset: enabled)
   Active: active (running) since TUE 2024-04-16 21:17:25 CST; 35min ago
 Main PID: 1984 (v2ray)
    Tasks: 6 (limit: 2359)
   Memory: 6.9M
   CGroup: /system.slice/v2ray.service
           └─1984 /usr/local/bin/v2ray -confdir /usr/local/etc/v2ray/

Apr 16 22:17:25 debian v2ray[1984]: v2ctl> Read config:  /usr/local/etc/v2ray/01_api.json
Apr 16 22:17:25 debian v2ray[1984]: v2ctl> Read config:  /usr/local/etc/v2ray/02_dns.json
Apr 16 22:17:25 debian v2ray[1984]: v2ctl> Read config:  /usr/local/etc/v2ray/03_routing.json
Apr 16 22:17:25 debian v2ray[1984]: v2ctl> Read config:  /usr/local/etc/v2ray/04_policy.json
Apr 16 22:17:25 debian v2ray[1984]: v2ctl> Read config:  /usr/local/etc/v2ray/05_inbounds.json
Apr 16 22:17:25 debian v2ray[1984]: v2ctl> Read config:  /usr/local/etc/v2ray/06_outbounds.json
Apr 16 22:17:25 debian v2ray[1984]: v2ctl> Read config:  /usr/local/etc/v2ray/07_transport.json
Apr 16 22:17:25 debian v2ray[1984]: v2ctl> Read config:  /usr/local/etc/v2ray/08_stats.json
Apr 16 22:17:25 debian v2ray[1984]: v2ctl> Read config:  /usr/local/etc/v2ray/09_reverse.json
Apr 16 22:17:25 debian v2ray[1984]: 2024/04/16 22:17:25 [Warning] v2ray.com/core: V2Ray 4.27.0 start
lines 1-19/19 (END)
However, since V2Ray hasn’t been configured yet, let’s turn it off:
$ systemctl stop v2rayStep 4: Update V2Ray (Optional)
You can update it on VPS by running the installation script again.
During the upgrade process, V2Ray will automatically restart, and the configuration file won’t change.
$ bash install-release.shNote: Ubuntu 20.04 is the best Linux distribution to set up V2Ray on it. If you are using Ubuntu, refer to the steps of Installing V2Ray server on Ubuntu 20.04.
Install V2Ray on Windows [Step to step]
To set up V2Ray on Windows and connect to the client, your machine needs to have running Windows VPS. Then, follow the below steps:
Step 1. Download V2Ray for Windows
To Install V2Ray on Windows, go to the Download page of V2Ray on GitHub and select the latest version.
Note: To download the Windows compressed package of V2Ray:
- If it is a 32-bit system, download v2ray-windows-32.zip.
- If it is a 64-bit system, download v2ray-windows-64.zip

Step 2: Extract V2Ray File
When you are finished, extract the file you have downloaded to your considered folder.
Step 3: Change V2Ray Language to English
To start configuring and using V2Ray, you need to change its language. So, select the V2RayN file and run it on your system:
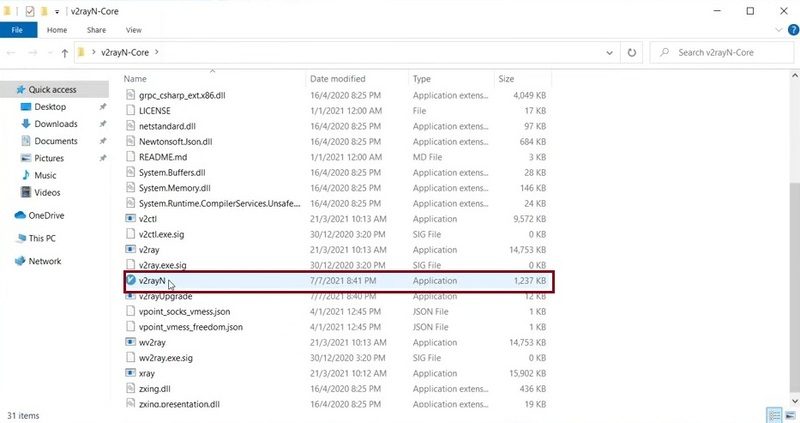
Once you see the below window, change the language to English and open V2Ray again:
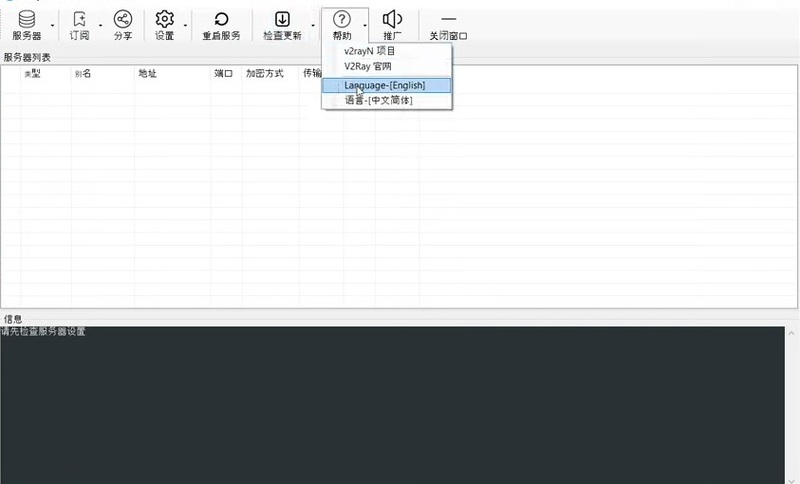
Step 4: Configure V2Ray on Windows
If you pass the previous step successfully, the English menu is what you see after opening the V2Ray file.
There, click on ”Check for Updates” tab and then select ”Update XrayCore” as you see below, and select Yes when you are asked to Download V2Ray to complete download V2ray/xray Core.
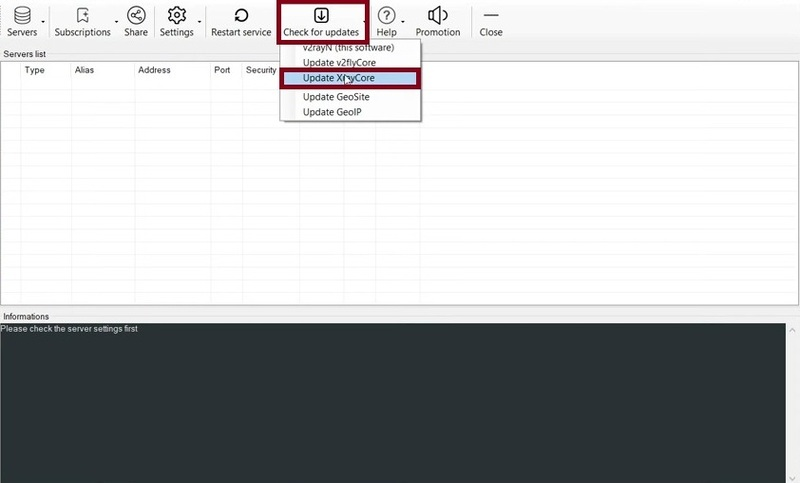
Once you see the ”Update Core Successfully” message, you are done.
Step 5: Import V2Ray Link
To complete this step:
- Copy your V2Ray config file link.
- On the “Servers” tab.
- Click “Import bulk URL from clipboard”
Then, you must view the “ 1 servers have been imported from clipboard’’ message.
Once the selected server has been added, click on it to establish a connection, and then hit the Enter key on your keyboard to start it.
The color of the server name will change to blue when the server is turned on.
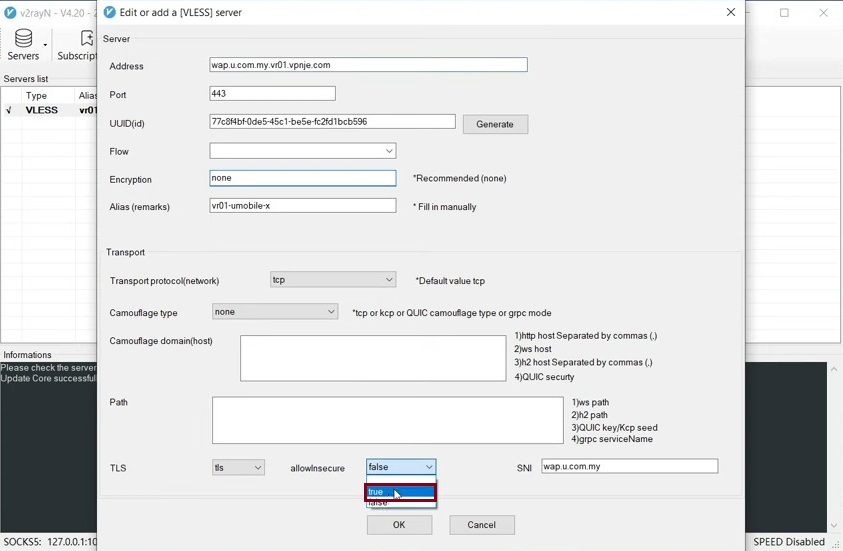
Click right on the imported server to change the TLS from False to True and press OK.
Step 6: Make Sure Your IP is Changed
To start using the internet via the V2rayN server, on the Taskbar, click on the V2Ray icon.
Then, select “Set system proxy” as you see below:
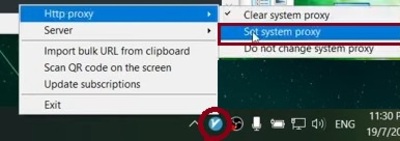
Again, do the same and click the first option: “Clear system Proxy“.
When you are finished, open your favorite browser and search for “My IP” to view your current IP address.
Then, select ”Set system proxy” again.
Finally, open a new private window to check your IP and compare it with the previous one to ensure your IP address is changed and the V2Ray client is successfully configured.
Methods to Install V2Ray on macOS
To set up V2Ray on macOS, you will need to use Homebrew or install it Manually.
Install V2Ray on macOS using Homebrew:
To install V2Ray on macOS using the first method, install Homebrew and check it is working properly.
Step 1: Install V2Ray
When you are done, run the command below to addV2Ray tap on macOS:
brew tap v2raya/v2rayaTo install V2Ray on macOS, type:
brew install v2raya/v2raya/v2rayaStep 2: V2Ray Startup on macOS
After a successful installation, run the following command to start the service:
sudo mkdir /usr/local/bin/Install V2Ray on macOS Manually:
To install V2Ray on macOS manually, follow the below steps:
Step 1: Create directory [If does not exist]
Check if the required directories exist or not:
To view the Binary directory, run:
sudo mkdir /usr/local/bin/Use the command below to check Data files directory:
sudo mkdir -p /usr/local/share/v2ray/To check the existence of the Service file directory, type:
mkdir ~/Library/LaunchAgents/Step 2: Download V2Ray
You can download the binaries from GitHub Releases. then, rename to v2ray and save it to /usr/local/bin/.
For x86_64:
sudo curl -L https://github.com/v2rayA/v2rayA/releases/download/v1.5.7/v2raya_darwin_x64_1.5.7 -o /usr/local/bin/v2rayaFor arm64:
sudo curl -L https://github.com/v2rayA/v2rayA/releases/download/v1.5.7/v2raya_darwin_arm64_1.5.7 -o /usr/local/bin/v2rayaStep 3: Download V2Ray Core / Xray Core
Since the V2Ray core is necessary for v2rayA to function, the kernel must be installed.
So, in this step. you need to install V2Ray and Xray.
When decompressing is completed, use the command below to move the files in it to the corresponding directory:
sudo mv v2ray /usr/local/bin/
sudo mv *dat /usr/local/share/v2ray/
Step 4: Grant Executable Permissions
To give v2rayA and v2ray executable permissions, run:
sudo chmod 755 /usr/local/bin/v2raya
sudo chmod 755 /usr/local/bin/v2ray
sudo chmod 755 /usr/local/bin/v2ctl
if you come across macOS security restrictions, type:
sudo xattr -d -r com.apple.quarantine /usr/local/bin/*Step 5: Create service files
It is time to create a new service file and save it to ~/Library/LaunchAgents/
For example:
nano ~/Library/LaunchAgents/org.v2raya.v2raya.plistStep 6: Startup v2Ray on macOS
To start up V2Ray on macOS manually, run:
launchctl load ~/Library/LaunchAgents/org.v2raya.v2raya.plistTo terminate the v2rayA service, swap out the load command for the unload command above. The web pages provide access to the logs.
How to Install V2Ray on Android
To build a network on Android devices, you can use V2Ray and enhance the security of network connections. Follow the below steps for installing and connecting to V2Ray on Android:
Step 1: Download V2Ray
To download V2RayNG, you can use one of the following ways:
- Download V2Ray from Google Play Store.
- Download V2RayNG via direct link.
Step 2: Configure V2Ray on Android
To open the server configuration screen, open the V2Ray app you have downloaded.
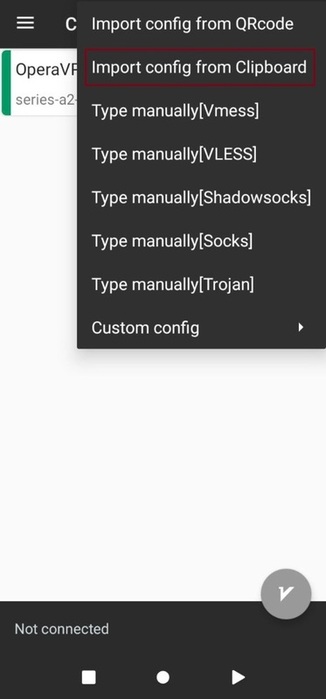
Click the ”+” button, which is in the top right corner of the screen.
According to your preference, you can:
- Import config from the QRcode to scan the QR code from your V2Ray server.
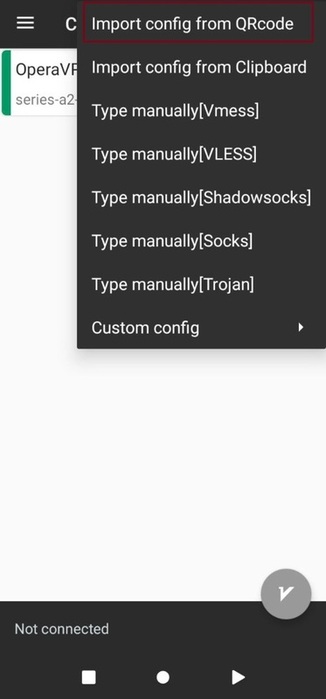
OR
- Import config from Clipboard to paste the configuration.
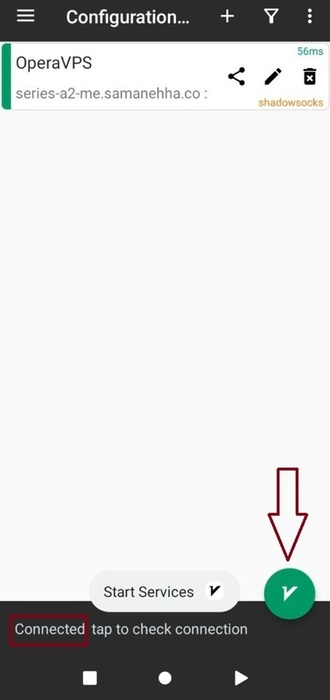
Step 3: Connect to V2Ray on Android
Once the config file is imported, click on the server in your list to be connected.
Then tap the small gray “V” button in the lower right corner.
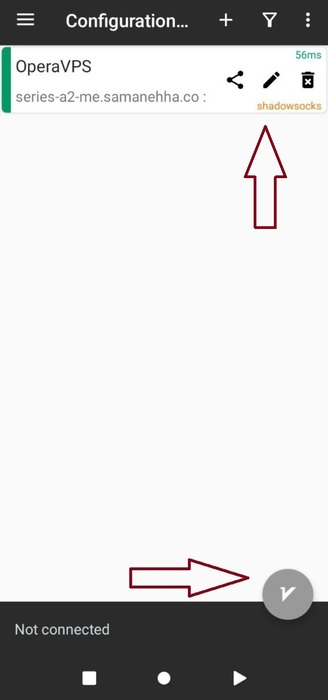
After a successful process, you can view the “connected” message.
How to Download and Connect V2Ray on iOS
There are several third-party apps you can use to download and connect to V2Ray servers.
As an example, we explain how to use ShadowRocket and import your VPN profiles. Follow the below steps:
Step 1: Download and Install ShadowRocket
Open the App Store on your iOS device and download ShadowRocket.
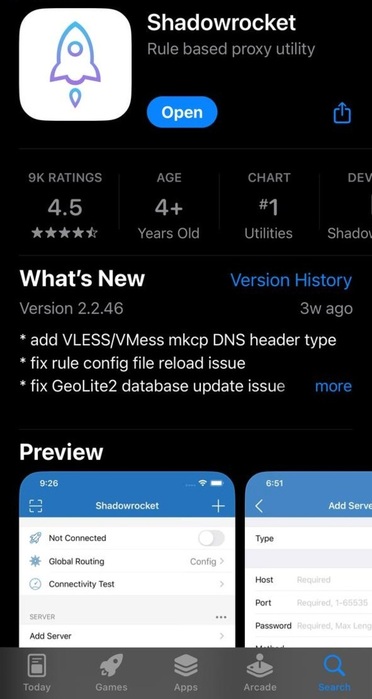
Once the software client is successfully downloaded, you are ready to configure the V2Ray client on your iOS device.
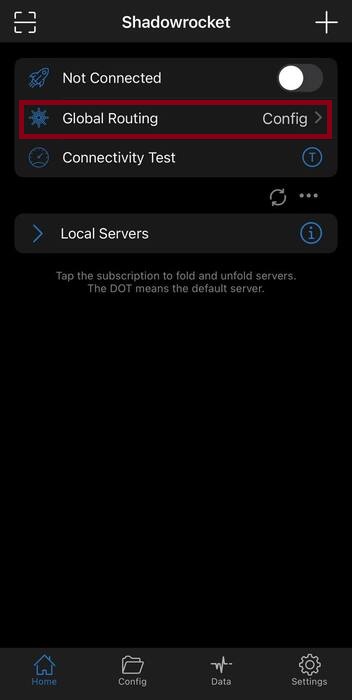
Step 2: Configure V2Ray on iOS
In this example, you will learn how to configure ShadowRocket on iOS. Other apps would require the same configuration process.
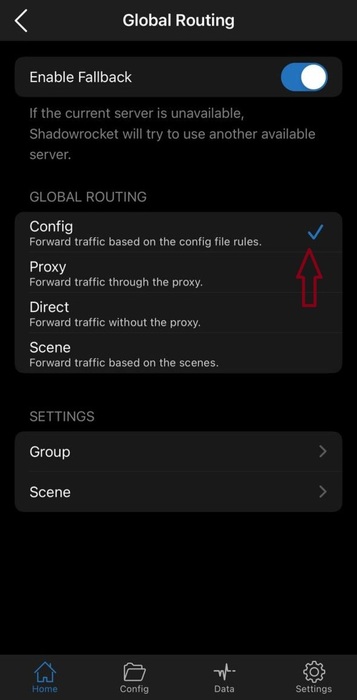
Once you tap ”Global Routing”, you will see four options which are switching modes. Each one has its meaning and function:
- Proxy: All data traffic via our server.
- Config: To bypass mainland IP by default.
- Direct: No data traffic goes through our server.
- Scene: Connection rules can be set for each Wi-Fi or cellular.
Select config in switching mode.
Tick ‘Config’ in the popup window.
Step 2: Server Settings
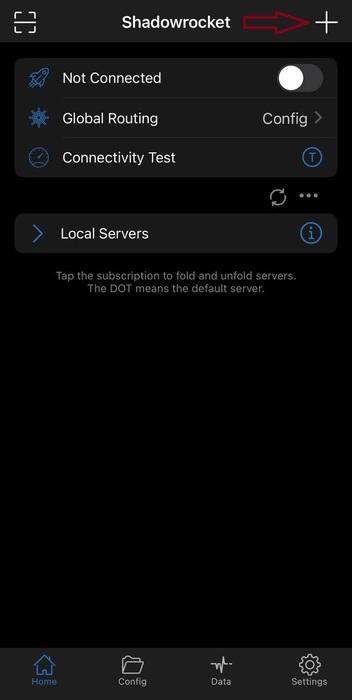
Click the ”home” button, which is in the bottom left corner, to go back to the homepage.
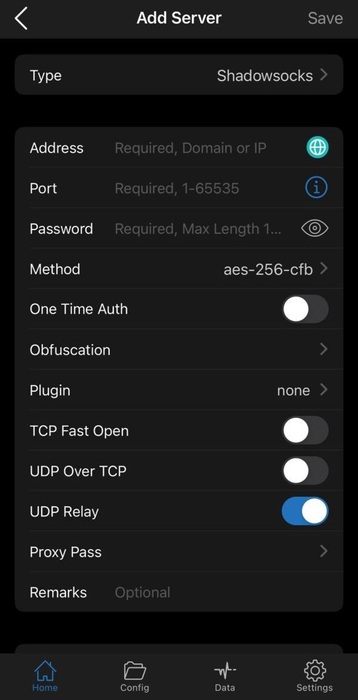
There, click the ”+” in the top right corner to Add Service nodes.
Click “Type” in the pop-up box, select “Subscribe” from the drop-down menu, copy and paste the URL information for your plan’s configuration into the “URL” field, then click “Done” in the upper right corner.
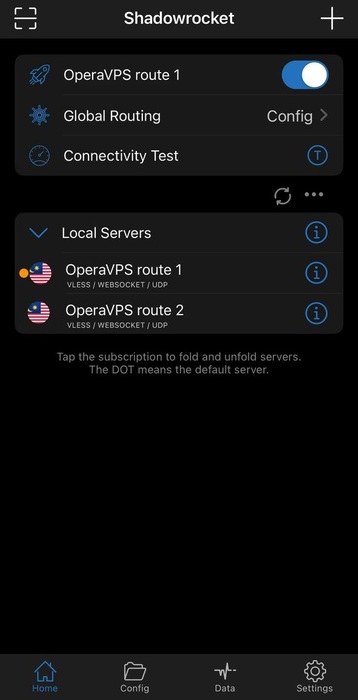
Your node configuration should now appear in the popup window as follows.
Tap the node server you wish to connect to, and you should see a yellow dot appear in front of the node name, indicating that the node is now in use.
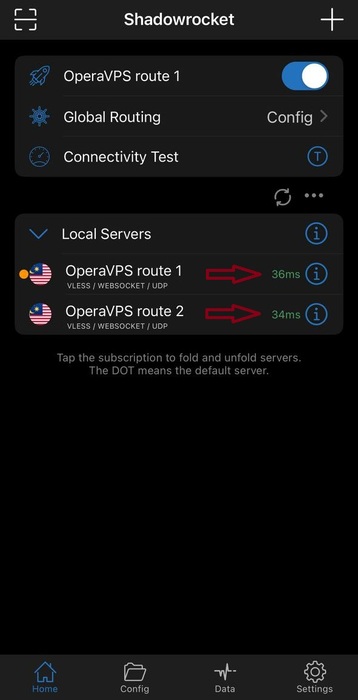
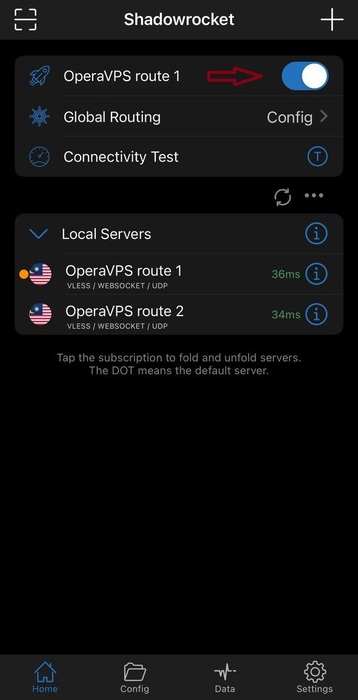
Step 3: Connectivity Test
You can first do a “Ping Test” to determine the response time of the remote server connection to confirm that the service nodes are operating as intended.
To view the response time on each node, simply hit the “Connectivity Test” button.
Step 4: Connect to V2Ray on iOS
As the final step. you just need to switch on the ”connection” button to start using V2Ray on iOS.
Why V2Ray is still used in 2024?
V2Ray is an open-source VPN that is used to create a private network.
According to its primary goals and features, it is one of the best choices for Internet privacy and information protection in 2024:
- Free and Open source.
- Bypassing Censorship and Restrictions.
- Increasing online security and privacy.
- Connecting to the Internet with high speed.
- Supporting various operating systems.
- Supporting Multi Protocols.
- Providing customization and Configuration Options.
- Compatibility with HTTP(S) Proxy.
That’s it! You are so ready to route your network traffic through V2Ray’s secure and fast proxies.