Configure PPTP VPN on Windows Linux and Mikrotik
PPTP VPN is a fast network protocol that guarantees a stable conversation over the Internet, especially for gaming and streaming usages. Using PPTP VPN is a simple option (not safe) to change your IP address.
Configure PPTP VPN establishes a secure Point-to-Point Tunneling Protocol connection to protect data and enable remote access to private networks across Windows, Linux, and Mikrotik devices.
🤖AI Overview:
Configure PPTP VPN by setting up a PPTP connection that encrypts internet traffic for secure remote access to private networks. This involves installing client software, entering server and authentication details, and managing VPN settings on Windows, Linux, or Mikrotik platforms. Though easy to configure, PPTP offers basic security and is best for low-risk scenarios.
Steps to Configure PPTP VPN on Windows Server
On a Windows VPS, the main instructions to set up a PPTP VPN on Windows Server 2016, 2012 R2, and older versions are the same as Windows 2019.
To Set up PPTP VPN on Windows Server, go to Server Manager and follow the below steps:
- Install Routing and Remote Access Server Role.
- Configure Routing and Remote Access Service.
- Define Network Interface and IP pool.
- Configure User Access.
- Configure Windows Firewall.
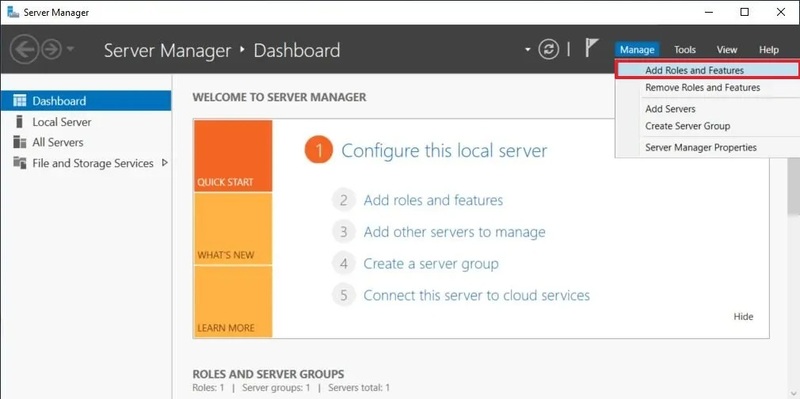
Step 1: Add VPN Roles and Features
To set up a PPTP VPN on a Windows Server 2019, start by adding the Routing and Remote Access role.
To do this:
- Open Start.
- Search for Server Manager and click on it.
- Click the Manage menu, select the Add Roles and Features option, and click the Next button.
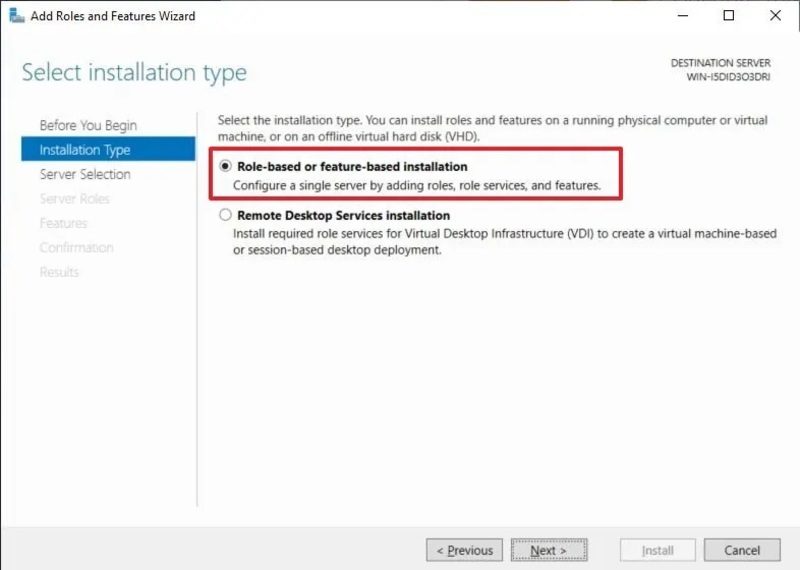
- Select the Role-based or feature-based installation option on the windows below and click the Next button.
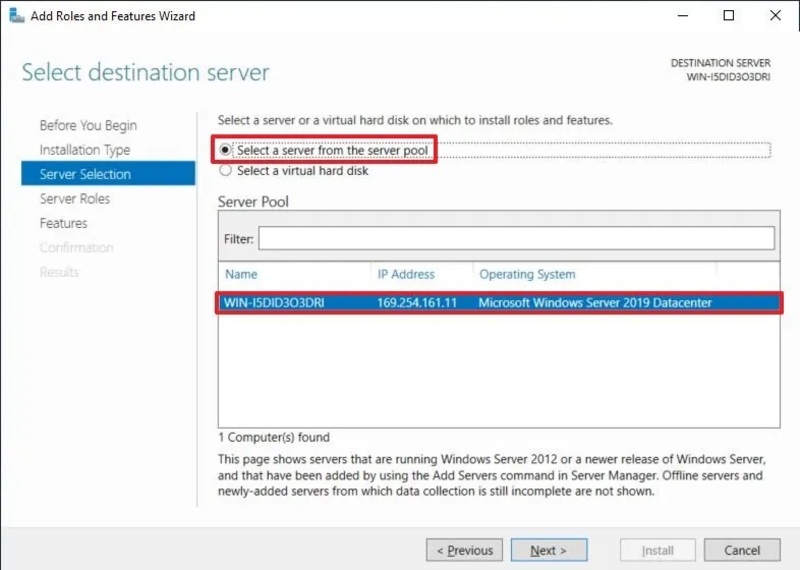
- Choose the Select a server from the server pool option, select a name for the server, and click the Next button.
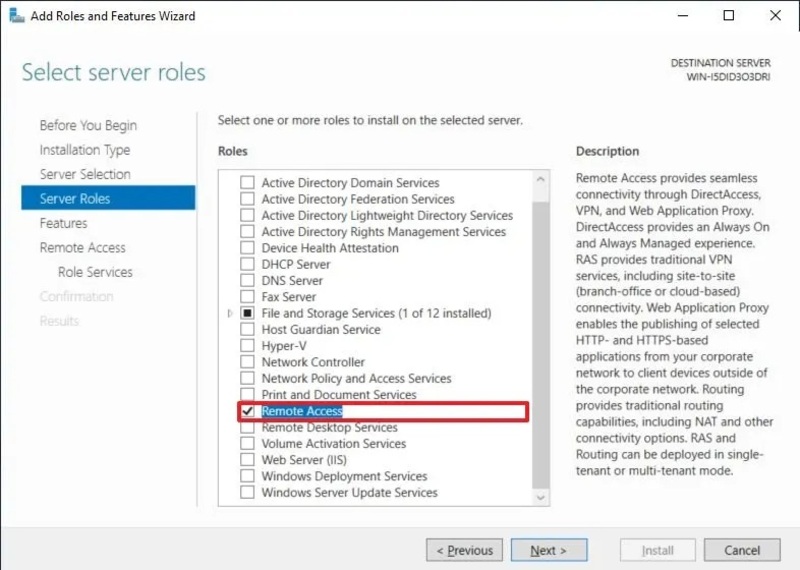
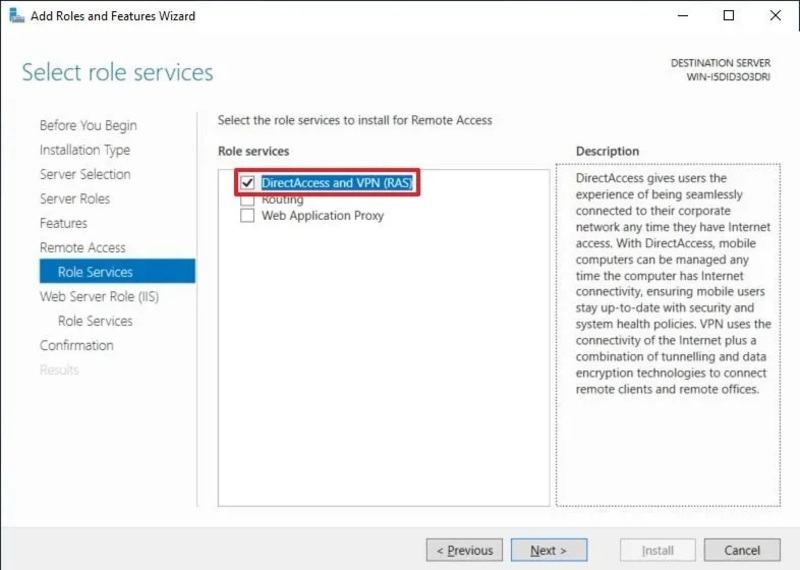
- Tick the Remote Access option and click the Next button 3 times.
- Tick the DirectAccess and VPN (RAS) option and select the Add Features button.
- Click the Next button 3 times.
- On the below Windows, click the Install button and then the close button.

Step 2: Configure PPTP VPN server on Windows Server
- Open Start.
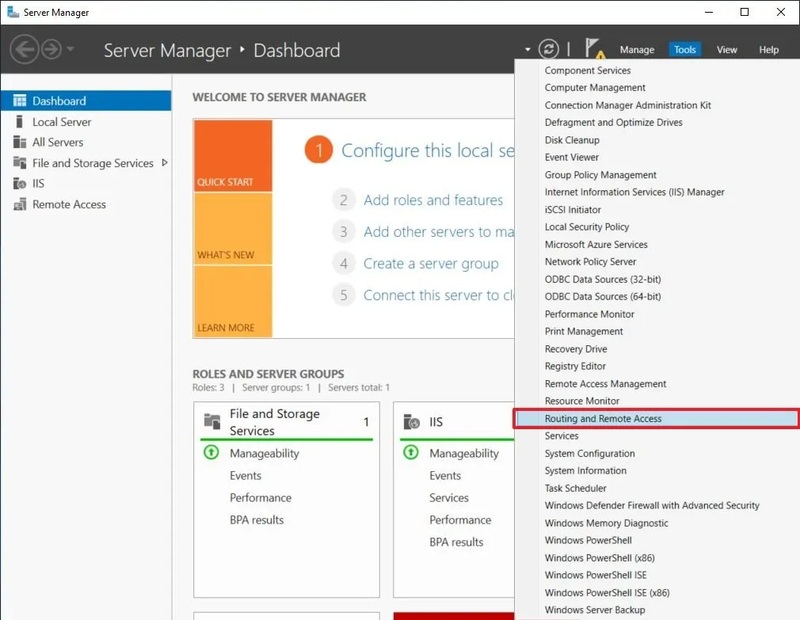
- Search for Server Manager and click on it.
- Click the Manage menu to select Routing and Remote Access option.
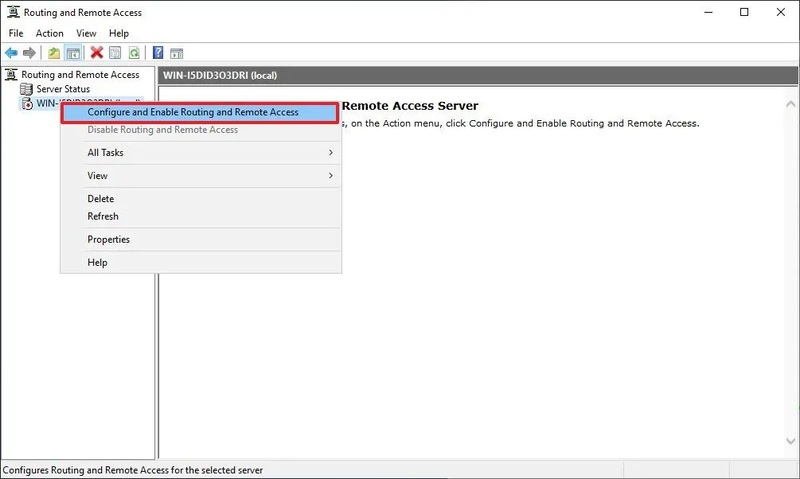
- To select the Configure and Enable Routing and Remote Access option, right-click the server names shown below:
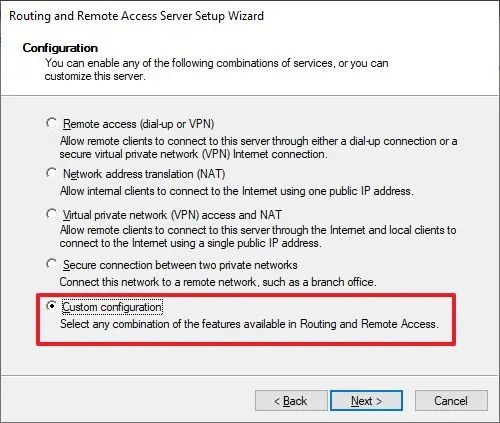
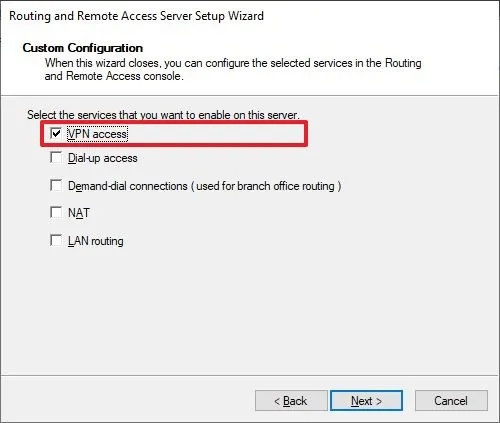
- On the below windows, choose the Custom configuration option and click the Next button.
- On the below windows, choose the VPN access option, click the Next button, and then the Finish button.
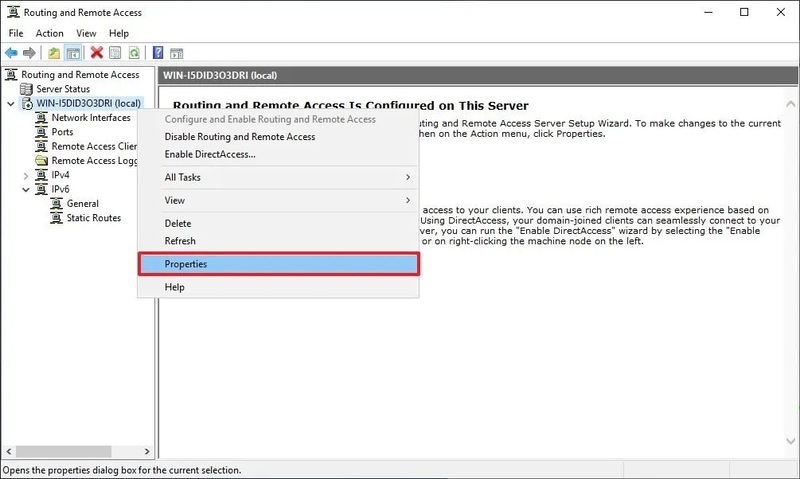
- Click the Start service button and right-click the server name to select the Properties option.
- On the below windows, select IPv4 tab.
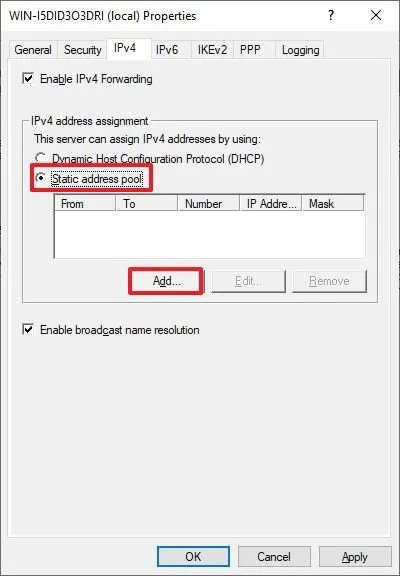
- You are recommended to check the Static address pool option under the ‘’IPv4 address assignment’’ section.
- Click the Add button to specify a start IP address and an end IP address.
- When you are finished, click on OK, Apply, and again on OK button.

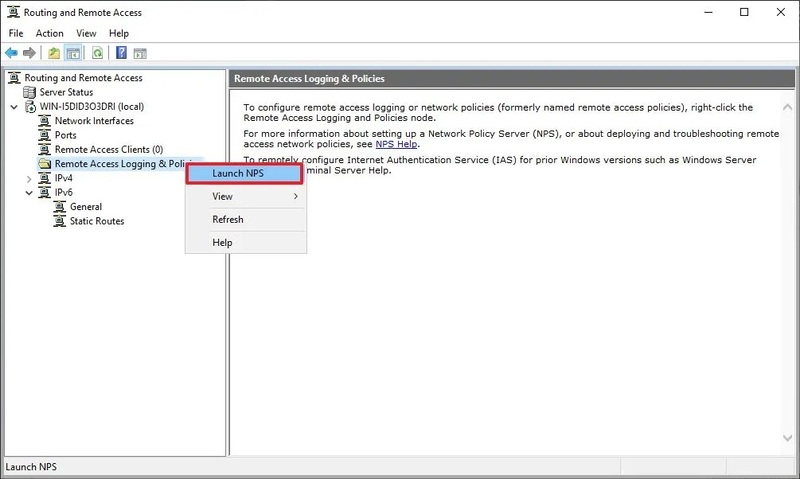
- On the below window, right-click ”Remote Access Logging & Policies” and select the Launch NPS option.
- On the below window, select the Network Policies option.
- Double-click the Connections to Microsoft Routing and Remote Access server policy.
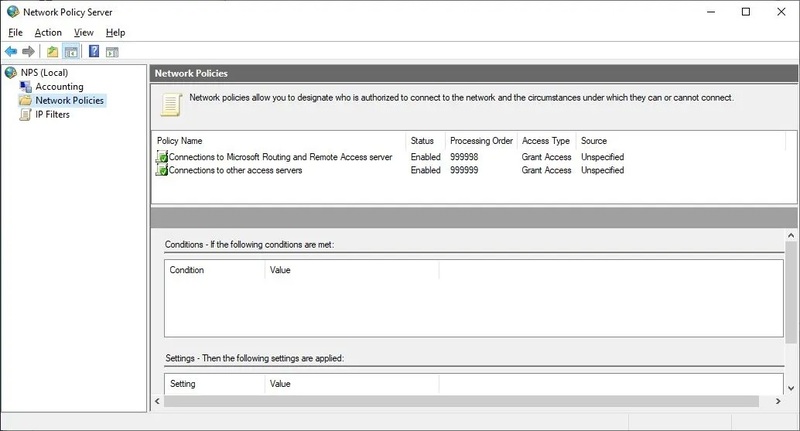
- On the below window, select the Grant access. Grant access if the connection request matches this policy option.

- When you are done, Close the Network Policy Server console by clicking the Apply button and then OK button.
Your new VPN server is now created on Windows Server.
Now, you are ready to connect to the PPTP VPN client on your server.
Before that, let’s see how to allow users to be connected and also allow firewall to the connections.
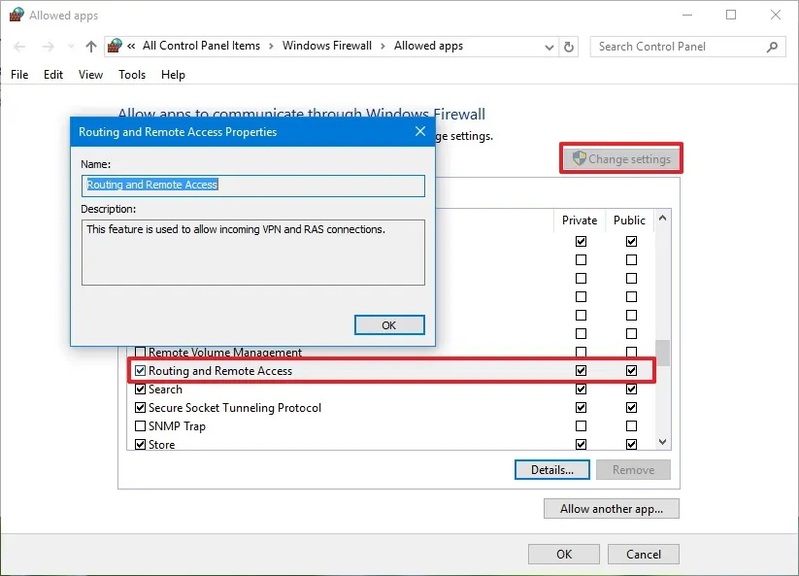
Step 3: Configure Firewall to allow VPN connections on Windows Server
In this step, you will allow VPN connections through the firewall to complete the configuration and receive connections remotely from other computers.
- Open Start and search for Allow an app through Windows Firewall and open it.
- Click the Change settings button.
- Check if the Routing and Remote Access is allowed on Private and Public.
- Click the OK button.
Step 4: Configure VPN to allow users access on Windows Server
To let a user access the network using a VPN connection, follow the below steps:
- Open Start.
- Search for Server Manager and click on it.
- Select the Active Directory Users and Computers option.
- Click on Users and double-click the user you prefer to allow remote access.
- Click the Dial-in tab.
- Under the ”Network Access Permission” section, select the Allow access option.
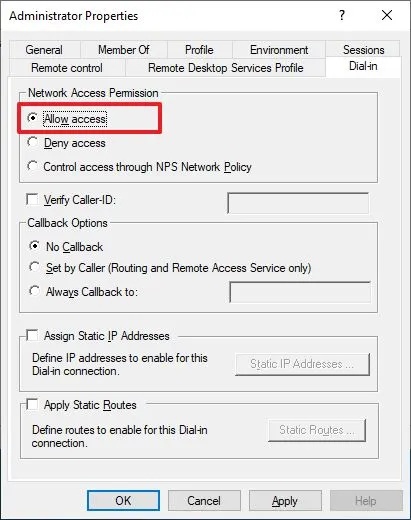
- Click the Apply button and the OK button.
Additional Note:
- To add other users, repeat the paths of this step.
- To make configuring VPN access for users easier, you may also create groups if you need to configure access for many users.
- To connect through the Internet to the VPN, you need to set up port forwarding on the router to enable VPN access and allow VPN connections.
How to Configure PPTP VPN on Linux
After buying Linux VPS, you are ready to set up a PPTP VPN on it and access your network remotely.
To Configure PPTP VPN on Linux, follow the below steps:
- Install PPTPD on the Linux distribution you are using.
- Edit IP Settings.
- Choose a new Username & Password.
- Enable Network Forwarding.
- Configure Routing and Firewall.
SSH to connect to your Linux command line and follow the below steps to configure PPTP VPN on a Linux server easily.
Step 1: Install PPTPD on Linux distros
On CentOS 6 and CentOS 7:
yum install -y  ppp perl nano iptables

cd /usr/local/src

wget http://poptop.sourceforge.net/yum/stable/packages/pptpd-1.4.0-1.el6.x86_64.rpm

rpm -Uhv pptpd-1.4.0-1.el6.x86_64.rpm
On Ubuntu:
apt-get update

apt-get install -y  pptpd
Step 2: Change IP Settings
Open your considered text editor and run:
remoteip 192.168.0.101-200 # Replace with your VPS IPStep 3: Add Username and Password
To add your preferred username and password, run:
usernameForuser1 * setpassword1here *Step 4. Enable network Forwarding
Use the command below to enable network forwarding in /etc/sysctl.conf:
echo "net.ipv4.ip_forward = 1" >> /etc/sysctl.confTo apply the recent changes, type:
sysctl -pStep 5. Set up Routing and Firewall
Run the below commands to configure routing and firewall:
iptables -A INPUT -i eth0 -p tcp --dport 1723 -j ACCEPT

iptables -A INPUT -i eth0 -p gre -j ACCEPT

iptables -t nat -A POSTROUTING -o eth0 -j MASQUERADE

iptables -A FORWARD -i ppp+ -o eth0 -j ACCEPT

iptables -A FORWARD -i eth0 -o ppp+ -j ACCEPT
On CentOS 6 and CentOS 7:
service iptables save

service iptables restart
Step 6. Start PPTP VPN Server on Linux
When configuring PPTP VPN is done, you can use the commands below to start it on your Linux distribution:
On CentOS:
service pptpd restartTo start automatically upon reboot:
chkconfig pptpd onOn Ubuntu:
systemctl restart pptpdTo start automatically upon reboot:
systemctl enable pptpdAfter a successful configuration, you will be connected to the PPTP VPN server through its IP address and the username and password you have chosen.
Set up PPTP VPN on Mikrotik Router
Mikrotik PPTP VPN Configuration requires the steps below:
- Add IP Pool.
- Create PPP profile.
- Access grant for users and devices to VPN.
- Enable PPTP Server.
- Create rules in the firewall and NAT.
To configure Mikrotik as a PPTP VPN server, you need to have Mikrotik VPS running and follow the below steps.
You can use both command line and winbox to configure PPTP VPN on Mikrotik.
Step 1: Add Pool of IP-Addresses
In this step, an IP Pool is required:
- Go to IP>Pool, click on ‘’+’’, and enter a name and IP range of your choice.
- Click the OK button.
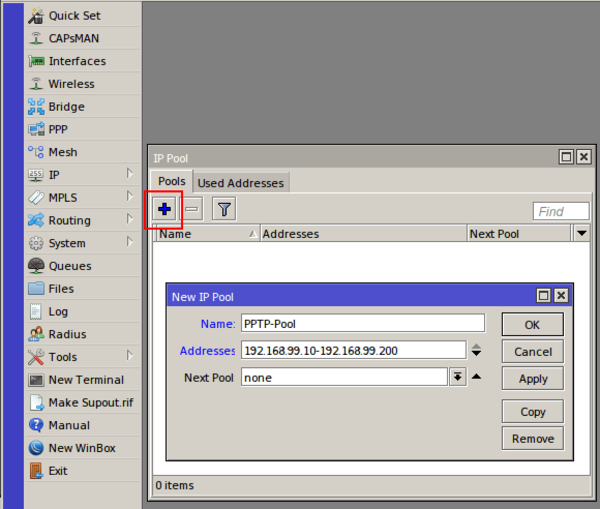
Once the IP pool is ready for the PPTP server, a PPP profile must be configured.
Step 2: Create Profile
- Click on ‘’PPP’’ and open the “Profiles” tab.
- Configure one of the defaults or create a new profile from scratch.
- To make a new profile, click on ”+”.
- Enter a name of your choice, Local Address, and Remote Address.
- Select the IP pool you created.
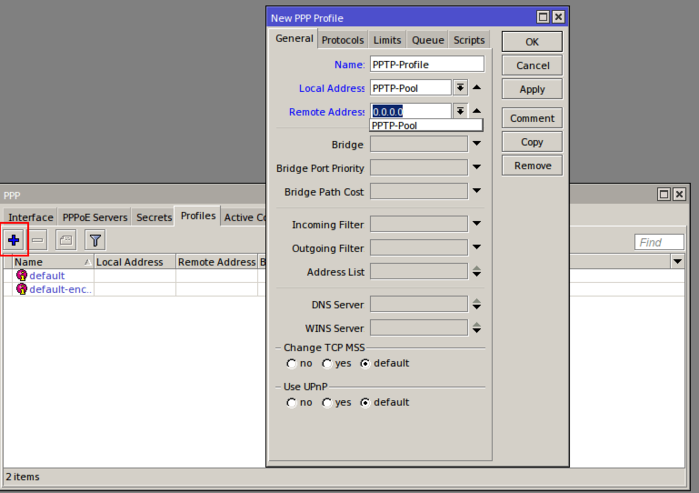
- Enter the addresses of the DNS servers that you will use.
- Go to the ‘’Protocols’’ tab and set ‘’Use Encryption’’ to yes.
- Go to ‘’Limits’’ tab and set ‘’Only One’’ to yes.
- Click the OK button.


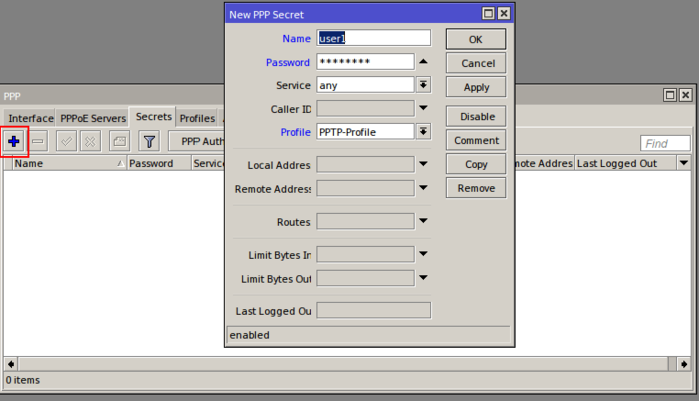
Step 3: Create a User/Computer for the VPN
To let users and computers access to VPN:
- Go to ‘’Secrets’’ tab and click on ‘’+’’
- Enter credentials of your choice and profile.
- Choose the PPP profile you created.
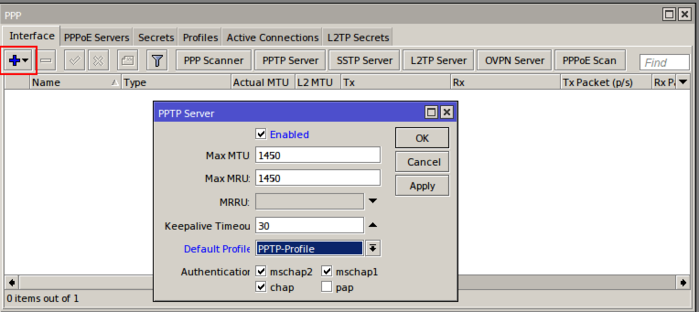
Step 4: Enable PPTP Server
- Go to the ‘’Interface’’ tab and click on ‘’PPTP Server’’
- Check ‘’Enable’’ and select the profile you made.
- Check all the authentication options.
- Click the OK button.
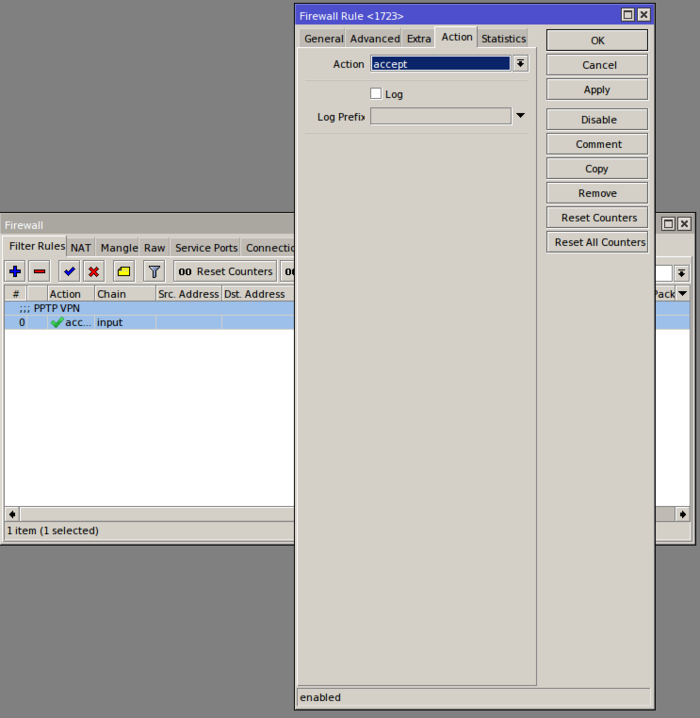
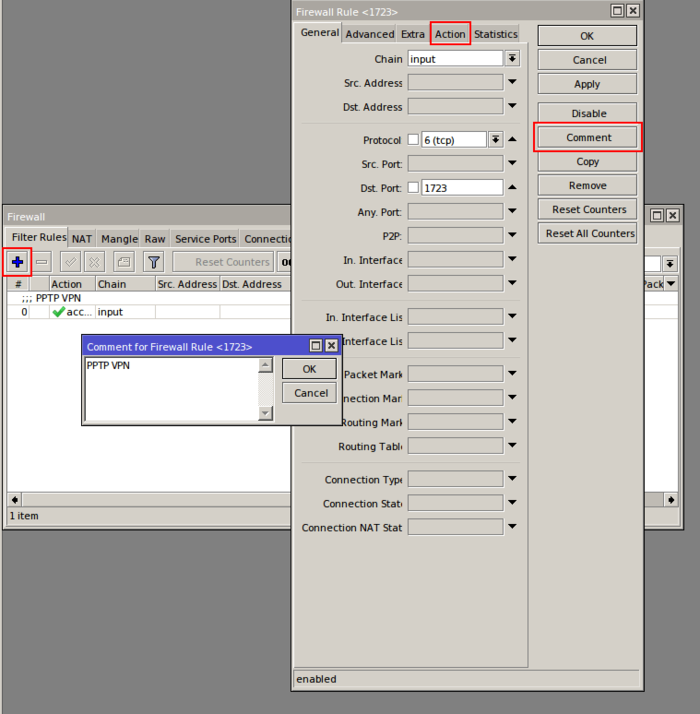
Step 5: Accept Incoming Connections in the Firewall
- Create rules in the firewall and NAT.
- Go to IP>Firewall.
- Click on ‘’+’’
Set:
- Chain: input.
- Protocols: tcp.
- DST. Port: 1723.
- Action: accept.
- Click on ‘’Action’’ tab.
- Click on ‘’Comment’’ tab.
- Input PPTP VPN and click OK.
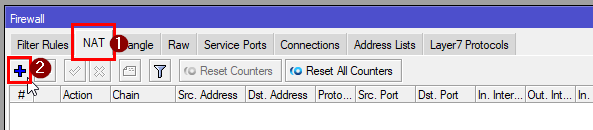
Step 6: Enable NAT in the Firewall for Internet Access
Make sure you put the rule at higher priority (above ‘’drop’’ rules)
- Go to ‘’NAT’’ tab and click ‘’+’’
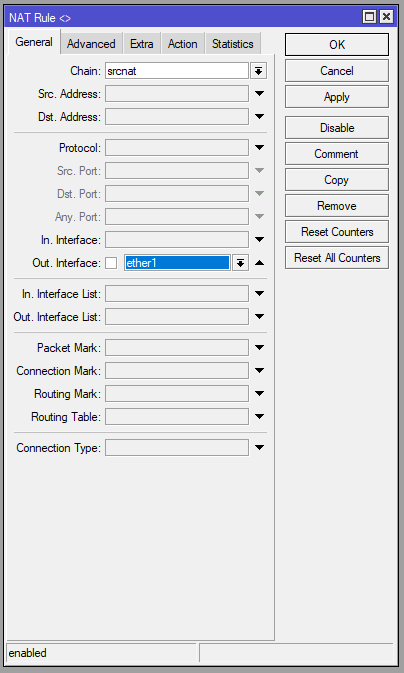
Set:
- Chain: srcnat.
- Out. Interface: ether1.
- Action: masquerade.
- Click the OK button.
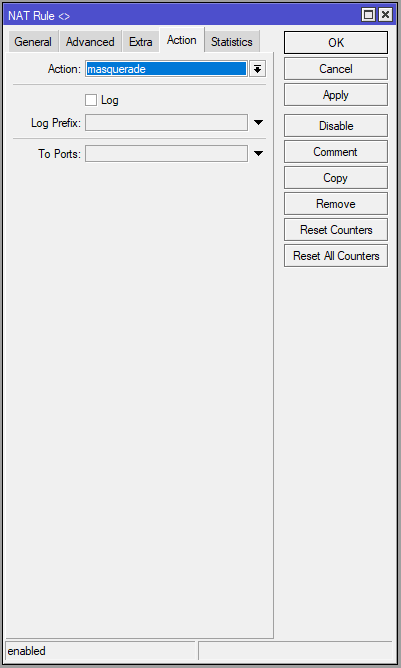
Now, you should have VPN connections to your server with Internet access.
Step 7: Setup binding interface (Optional)
This will enable you to apply particular policies on the interface/user and, if necessary, set the binding interface in firewall rules.
- Click on ‘’+’’ and select ‘’PPTP Server Binding’’
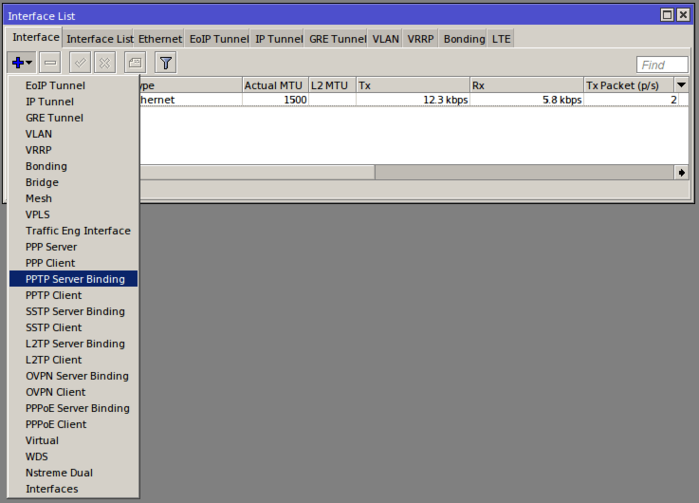
- Enter a name of your choice and the user you consider to control.
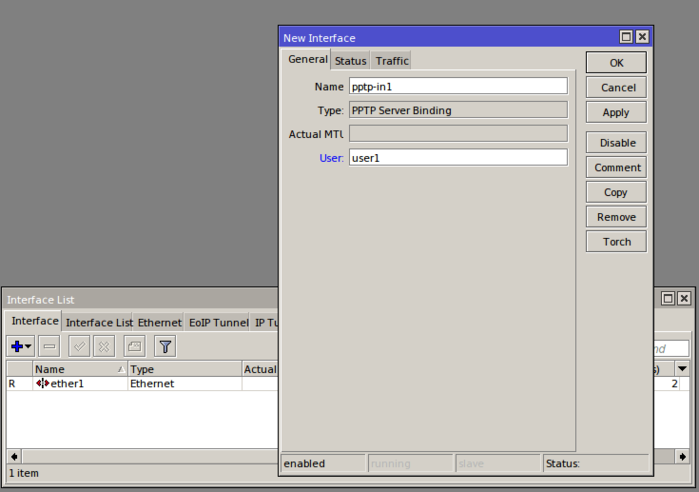
- Click the OK button.
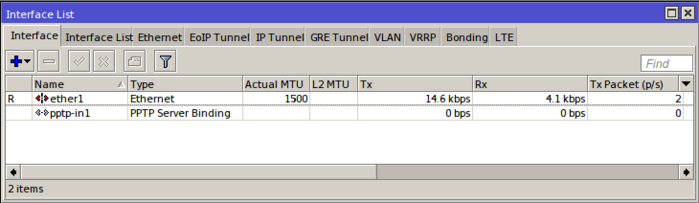
MikroTik Router is ready to serve PPTP VPN Connections.
Conclusion
Configuring a PPTP VPN server on a Linux machine is straightforward and suitable for users looking for a simple VPN solution.
This guide showed how to install and set up the PPTP daemon, configure server and authentication settings, enable IP forwarding, adjust firewall rules, and connect clients.
Despite its ease of use, always evaluate PPTP’s security limitations and consider your specific needs when deploying a VPN service.
By following these detailed steps, you can effectively configure PPTP VPN and provide remote secure access for users.
Since PPTP VPN is not secure, you are recommended to use it in cases the security is not essential. Such as:
- Hiding your IP address.
- Change your location.
- Unblocking streaming channels.
- Accessing gaming servers.
Otherwise, try to study other VPN protocols to choose the best one according to your preferences.
FAQ
2. How do I configure PPTP VPN on Windows?
Go to Network Settings, add a VPN connection, select PPTP, enter server address and credentials, then connect.
3. Can PPTP VPN be configured on Linux and Mikrotik?
Yes, both support PPTP configuration via network manager or router VPN settings respectively.
4. Is PPTP VPN secure for sensitive data?
PPTP uses basic encryption and is less secure compared to newer VPN protocols; use it cautiously.
5. What network ports are required for PPTP VPN?
TCP port 1723 and GRE protocol (47) should be open to allow PPTP VPN traffic.
6. Why might my PPTP VPN connection fail?
Common causes include incorrect credentials, firewall blocking, or server unavailability.
7. Are there better alternatives to PPTP VPN?
Yes, OpenVPN and IKEv2 offer stronger security and better performance.
8. Does using PPTP VPN reduce internet speed?
There may be a slight speed reduction due to encryption overhead, usually minimal on fast connections.
9. How do I troubleshoot PPTP VPN connection drops?
Check network stability, firewall settings, MTU size, and update network drivers.
10. Can I configure PPTP VPN on a router?
Many routers support PPTP VPN setup through their administrative interface.