How to Setup PPTP VPN Connection Easily
Setup PPTP VPN Connection involves configuring VPN server details and selecting PPTP as the VPN type on devices like Windows, Linux, macOS, Android, and iOS. This enables secure, private internet access through VPN servers.
🤖AI Overview:
Setup PPTP VPN Connection involves configuring a Point-to-Point Tunneling Protocol VPN on popular devices by entering VPN server information, selecting PPTP as the connection type, and saving the profile. Though PPTP offers faster connections, it is less secure than modern VPN protocols, so consider security implications before use.
Prerequisite to change VPN to PPTP on Windows
- Gathering PPTP VPN server information from the VPN provider (including server address/name, username, and password)
- Administrator Access to change network settings
- Internet Connection
- Ensuring PPTP Protocol Support by Windows version (Windows 7, Windows 8, Windows 10, and Windows 11 natively support PPTP.)
- Install the provider’s VPN client software if needed. (It is Optional, Windows has built-in support for PPTP VPN)
How to configure PPTP VPN client on Windows 10 & 11?
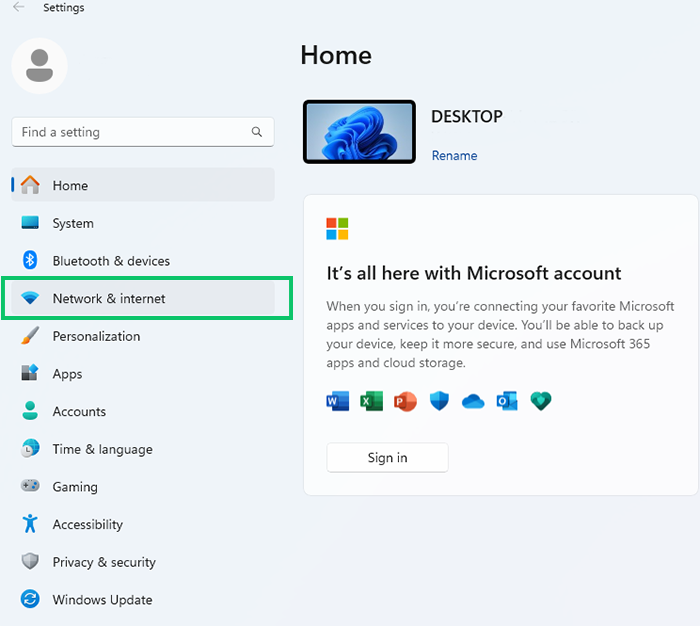
1. Open Network settings:
- Expand the “Start” menu and select the “Settings” app (the gear icon).
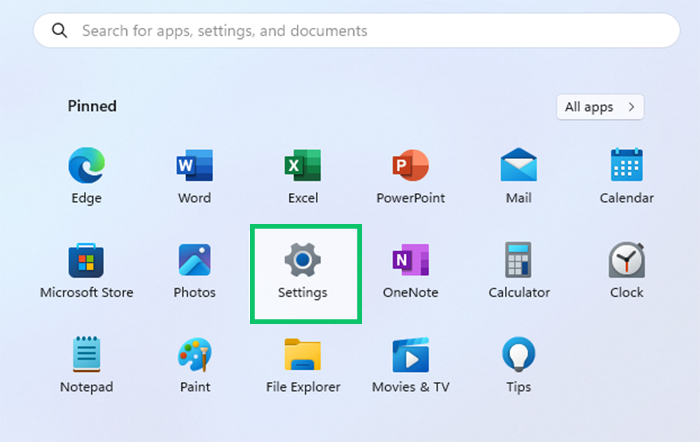
- Go to “Network & Internet” in the Settings window.
2. Add a PPTP VPN Connection:
Select “VPN” from the left-hand menu and click “Add a VPN connection“.
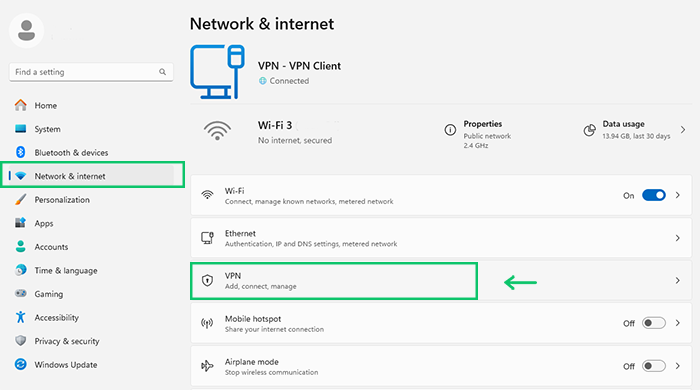

Note: To access VPN settings on Windows 7/8, Open the “Start” menu and search for “VPN settings“.
3. Configure VPN connection according to VPN server details:
- Choose a specific VPN connection name in the “Connection name” field.
- Enter the IP address or domain name of your VPN server provided by your VPN provider in the “Server name or address” field.
- Set “Point to Point Tunneling Protocol (PPTP)” as a VPN type.
- Scroll down and enter your VPN username and password in related (provided by your VPN provider).
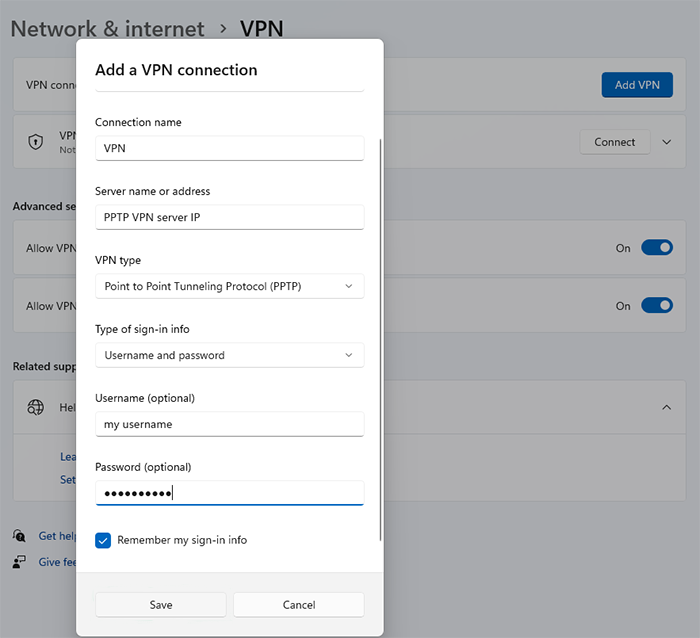
4. Save your username and password:
Check the checkbox next to the “Remember my sign-in info” to save your sign-in info. ( Optionally)
5. Configure additional settings:
Select “Advanced options” to configure the encryption level or additional settings. (Optional)

6. Save VPN connection configuration:
After entering all the necessary information, click the “Save” button to save the VPN connection configuration.
7. Configure the network adapter:
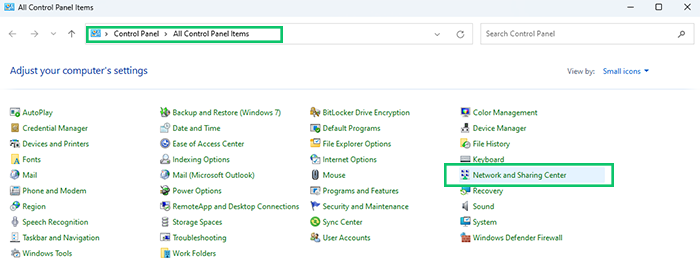
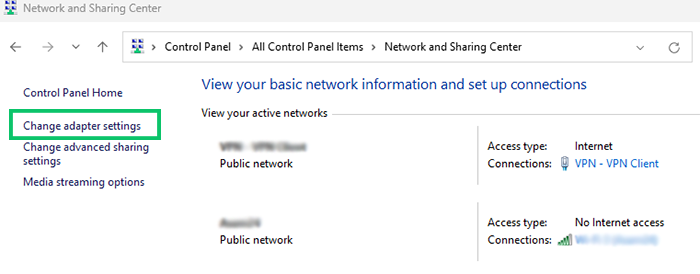
The newly added PPTP VPN connection is ready to connect, but to complete the VPN setup, you should configure the network adapter by Opening the Control Panel:
- Select the ” Start ” menu and type “Control Panel” in the search bar.
- Click on the ” Network and Sharing Centre” option.
- Select “Change adapter settings” from the left-hand menu.
- Find and Right-click on the PPTP VPN you configured newly and click on the “Properties” option from the drop-down menu.

- Do not change the default settings in the General tab, and check the correctness of your VPN server IP address.
- Select the Security tab, verify setting PPTP as the Type of VPN, and enable “Microsoft CHAP version 2 (MS-CHAP v2)” by checking the checkbox after allowing protocols. Click on “OK.”
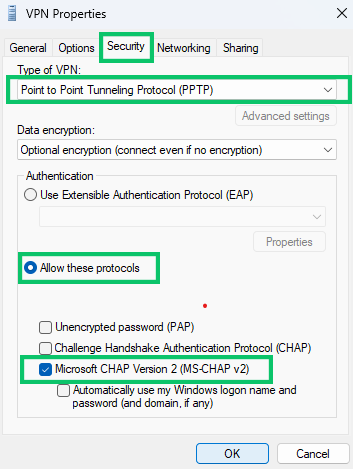
- Without making changes in the Networking and Sharing tab’s default settings, click “OK” to save your configuration.”
8. Connect to PPTP VPN on Windows:
Once you have set up a VPN connection, you can connect to the PPTP VPN server. There are 2 ways to connect to PPTP VPN in Windows:
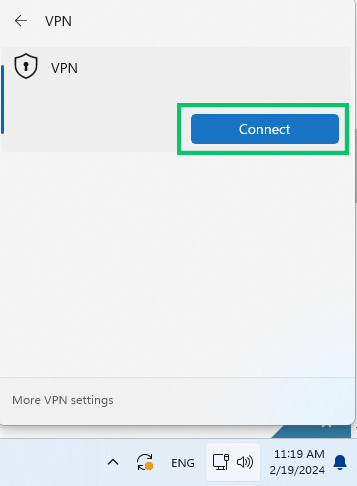
- Click on Settings > Network & Internet settings > VPN connection > Connect button > Enter your username and password (if prompted).

Displaying the “Connected” status under the VPN connection name indicates your VPN is active and you are connected to the private network in the unsecured public network.
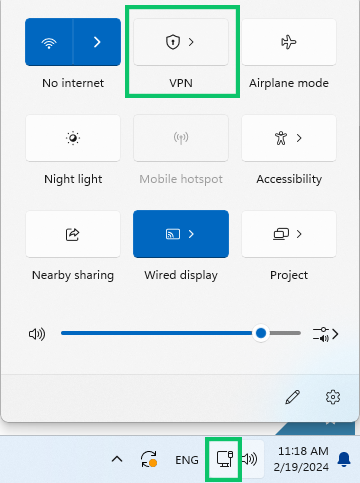
- Click the Network icon in the taskbar’s right corner, select VPN profile, and click the “Connect” button.
How to disconnect the PPTP VPN on Windows?
Select the “Network” icon from the taskbar, choose the desired VPN connection, and if it is active, you can see the disconnect button, so click on the “Disconnect” button.
How do I check my VPN status on Windows?
Through the Network icon from the taskbar, you can check your VPN status on Windows; if it displays connected, you can ensure that your VPN is active.
Prerequisites to configure PPTP VPN on Linux
- Have Root privileges to configure VPN software and network settings.
- Have Internet access.
- Check the Linux distribution compatibility with the PPTP protocol.
- Access to PPTP VPN server details, including server address, username, and password.
- Install necessary packages such as “pptp-linux” for Debian/Ubuntu, “pptpd” and “ppp” for RHEL/CentOS (if not already available).
- Ensure that your Linux system has a Network Manager.
How to set up a PPTP VPN in Linux?
Fortunately, most popular Linux distributions such as Debian, Ubuntu, CentOS, and Fedora support the PPTP protocol.
Additionally, you can set up a VPN with PPTP through the terminal and GUI in Linux distributions.
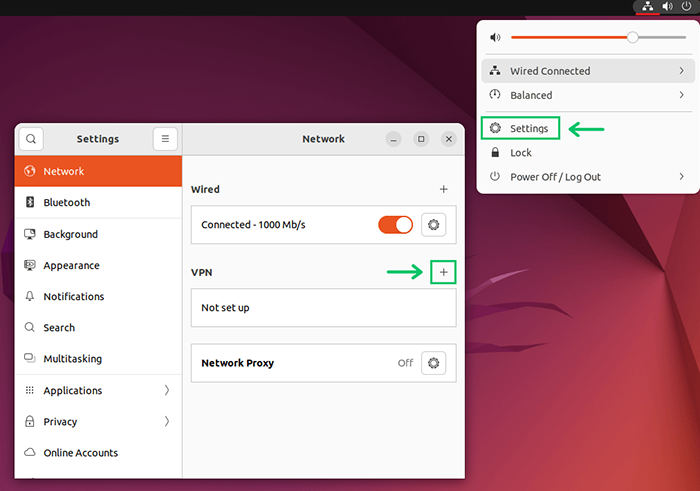
Method 1: Configuring PPTP VPN in Linux using Network Manager GUI
1. Click on the network icon from the system tray.
2. Select “VPN Connections“.
3. Click the “+” sign to add a new VPN connection.
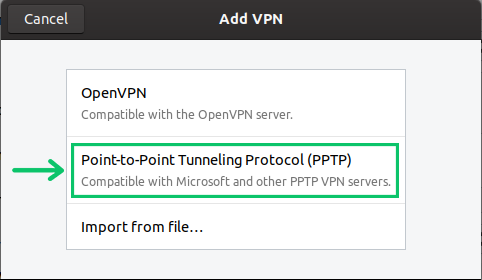
4. Select “Point-to-Point Tunneling Protocol” and click “Create.”
5. Specify a name for the VPN connection in the “Connection name” field.
6. Enter VPN connection details, including your Gateway IP address, username, and password, in the related fields.
7. Set advanced settings like authentication type and encryption by clicking the “Advanced…” button. (Optional).
8. If you want to configure advanced settings, set the security option to “128-bit (most secure)” in the PPTP advanced options window. Click on “OK.”
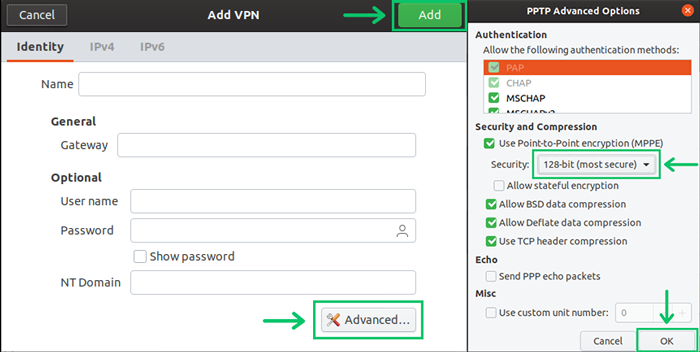
9. Click on “Add” to save your VPN connection configuration.
10. Once the VPN connection is set up, to connect to the PPTP VPN in Linux, return to the “Network settings,” go to “VPN Connections,” select your VPN profile, and switch the toggle button on.
The lock icon in the top-right of the screen indicates that you have successfully connected to the VPN.
Method2: Setting up PPTP VPN on Linux using Terminal
1. Install Required Packages:
Although necessary packages are pre-installed in most distributions by default, However, if not available, you may need to install them via following below instructions:
On Debian/Ubuntu:
Install command-line PPTP client (pptp-linux) and GUI management tool (network-manager-pptp) by using apt command:
sudo apt-get install pptp-linux network-manager-pptpOn RHEL/CentOS-based:
Install PPTP client by using yum command:
rpm -Uvh http://pptpclient.sourceforge.net/yum/stable/fc6/pptp-release-current.noarch.rpm
 yum --enablerepo=pptp-stable install pptpconfig
2. Edit or Create a VPN Configuration File:
-
Set user authentication for VPN connections
Edit the CHAP secrets file (/etc/ppp/chap-secrets) for authenticating VPN connections using the preferred text editor (e.g., vi) :
sudo vi /etc/ppp/chap-secretsEnter your authentication info based on the below syntax in the CHAP secrets file:
DOMAIN\\username PPTP vpnpassword *Save the changes you made and exit the editor.
-
Create a VPN config file
Create a VPN connection config file based on your tunnel configuration info, such as encryption, VPN server name, etc:
vi /etc/ppp/peers/ connection file nameThis command creates a VPN config file containing your VPN connection info.
Append the config file with the following template and replace values with your information:
pty " PPTP VPN server name --nolaunchpppd"
name PPTP username
remote server_address
password password
require-mppe-128
file /etc/ppp/options.pptp
ipparam connection file name-
Route all traffic through VPN
To route all traffic through VPN, create a file named vpn-traffic and add an entry to the routing table:
vi /etc/ppp/ip-up.d/vpn-traffic
#!/bin/bash
route add -net 10.0.0.0/8 dev ppp0
Save the file and exit the text editor.
To make the vpn-traffic file executable, run the following command:
chmod +x /etc/ppp/ip-up.d/vpn-traffic3. Establish the VPN Connection:
You can connect to the VPN by running the following command and entering your password when prompted:
sudo pppd call vpnnameHow to disconnect VPN in Linux?
The easiest way is to click on the “Network” icon in the top right corner of the screen, select “VPN connections“, select active VPN, and click on the “Disconnect” button.
You can also press Ctrl+C and run the following command to disable the VPN:
killall pppdHow do I know if my VPN is active Linux?
To check if your VPN is active in Linux, after connecting to your VPN, open the terminal and run following command:
ifconfigOr
curl ifconfig.meIf you see a tun device with your VPN server’s IP address in the previous command’s output, changing the IP Address indicates your VPN connection exists in Linux.
Prerequisite to enable PPTP VPN connection on macOS
- Access VPN server details, including a username and password, VPN server IP address, and domain name provided by your VPN provider.
- Have administrator access.
- Access a Stable Internet connection.
- Use the macOS Sierra version, which supports PPTP because PPTP VPN is no longer supported by the macOS Sierra (10.12) and later versions.
How to connect to PPTP VPN in macOS?
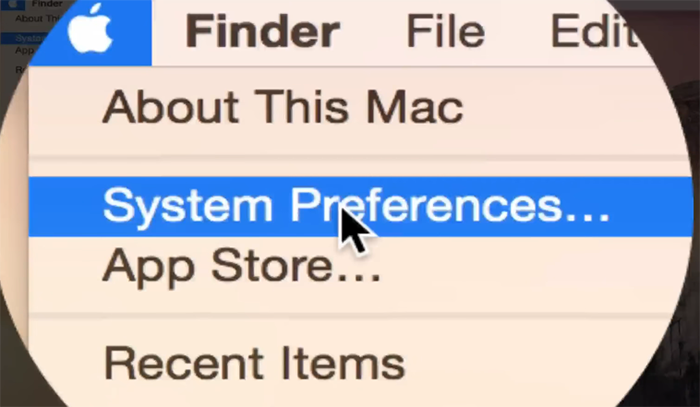
1. Click on the Apple logo in the top-left corner of your screen and select “System Preferences.”
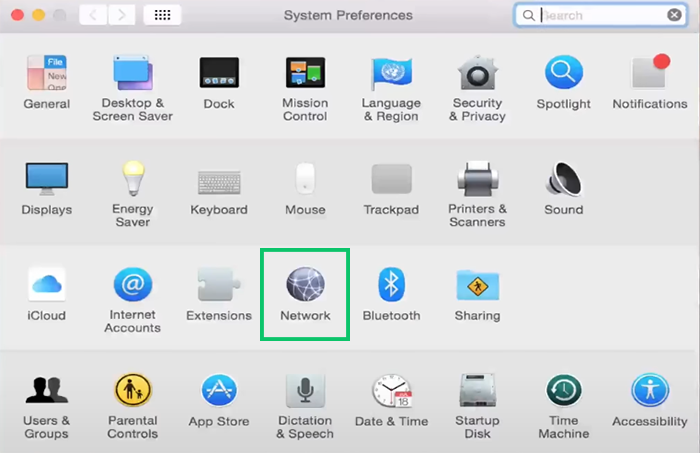
2. Go to “Network Settings” in the System Preferences.
3. Click the “+” button to add a new VPN connection at the bottom left of the network connections list.
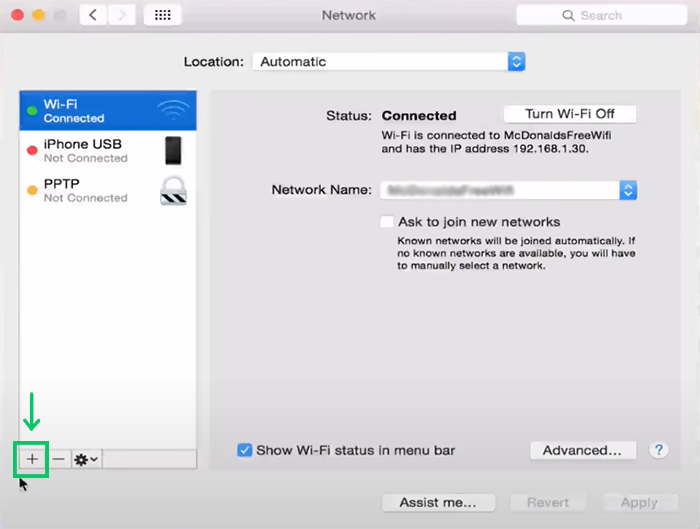
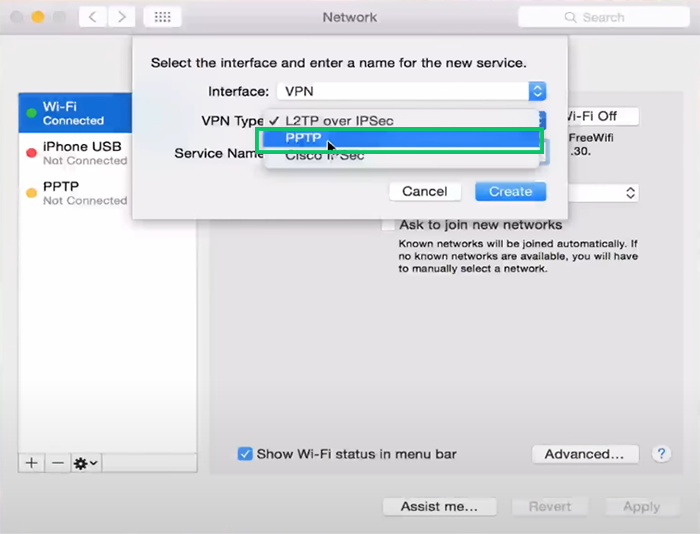
4. Choose the VPN option from the pop-up menu for the interface.
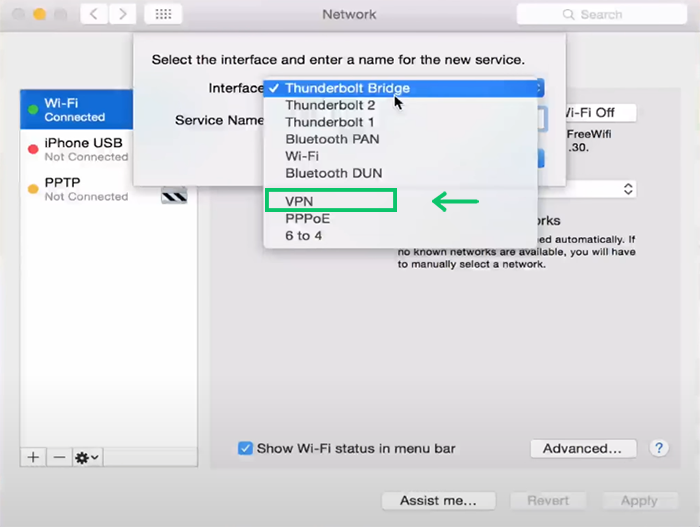
5. Select “PPTP” for the VPN type.
6. Select a unique name for the VPN service name.
7. Click the “Create” button.

8. Configure PPTP VPN connection according to VPN server details:
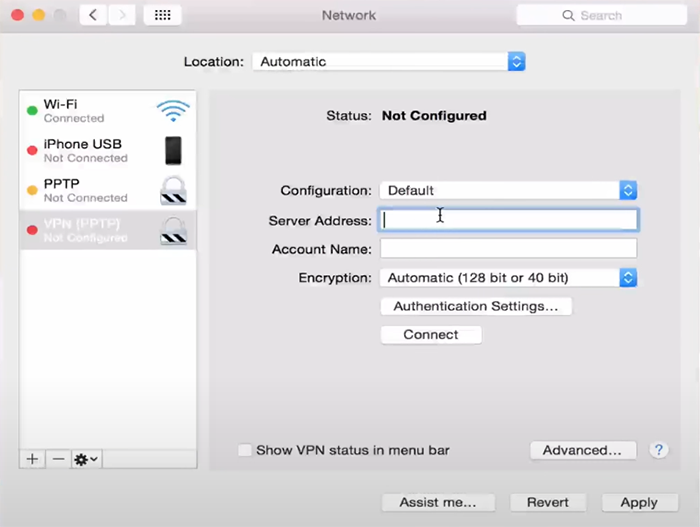
- Server address: Fill this field with the IP address or domain name of the VPN server.
- Account Name: Enter your VPN username.
- Encryption: Set the desired Encryption level, if available, for encryption strength. (“Maximum (128-bit only)” option is good).
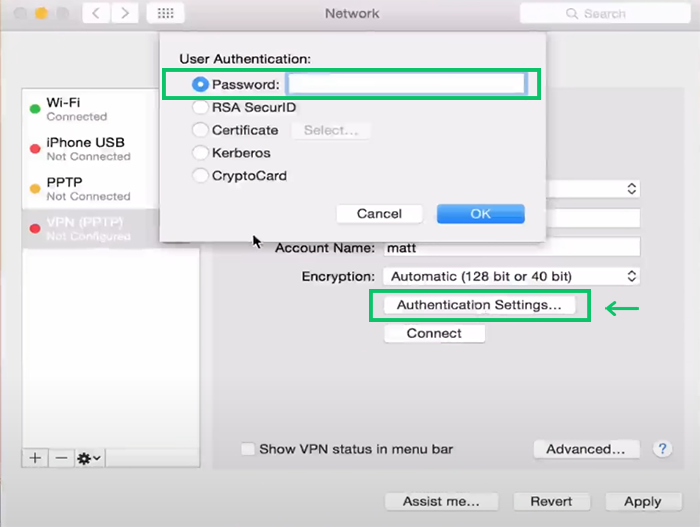
9. Click the “Authentication Settings” button and enter your VPN password.
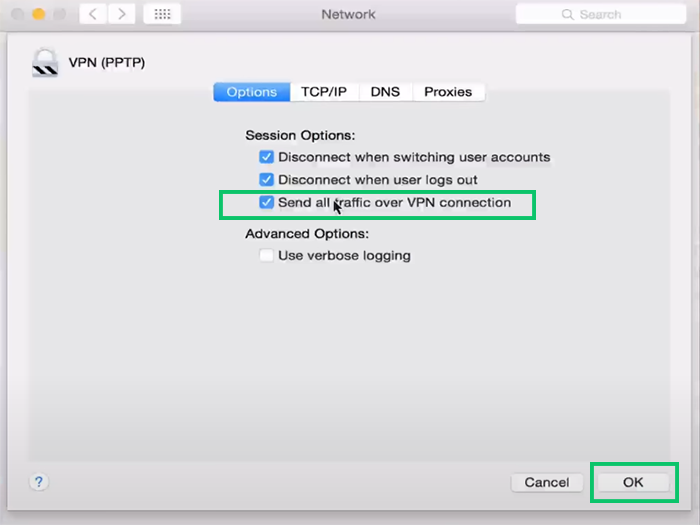
10. To set additional settings, click the “Advanced” button. Also, mark the check box next to the “Send all traffic over VPN connection” option.
11. Click the “Apply” button to save the PPTP VPN configuration.
12. Now, you are ready to connect to the PPTP VPN in your macOS system, so click the “Connect” button in the Network settings window.
Displaying the VPN icon in the menu bar at the top of your screen indicates you are connected to the VPN.
Note: you can set up a PPTP VPN connection on your macOS (10.11) and older versions by the instructions we provided because macOS Sierra (10.12) and later versions no longer support PPTP.
How do I know if my VPN is active Mac?
You should see a VPN status icon like a lock or globe symbol in your top menu bar if your VPN is active.
Why is PPTP not showing on Mac?
Apple has removed PPTP support in macOS Sierra (10.12) and later versions due to PPTP security reasons, so if you use macOS 10.12 or a later version, PPTP is not available.
How do I remove VPN settings from my mac?
Select Apple menu > System settings > Network > desired VPN profile > “-” button at the bottom of the list > Remove button.
Note: you may need to enter your username and password to delete the VPN profile.
Prerequisite to configure PPTP VPN connection on iOS
- Gather necessary information, including the VPN server IP address or domain name, username, and password from your VPN service provider.
- Get access to a Stable Internet Connection.
How to configure a PPTP VPN connection on iOS device?
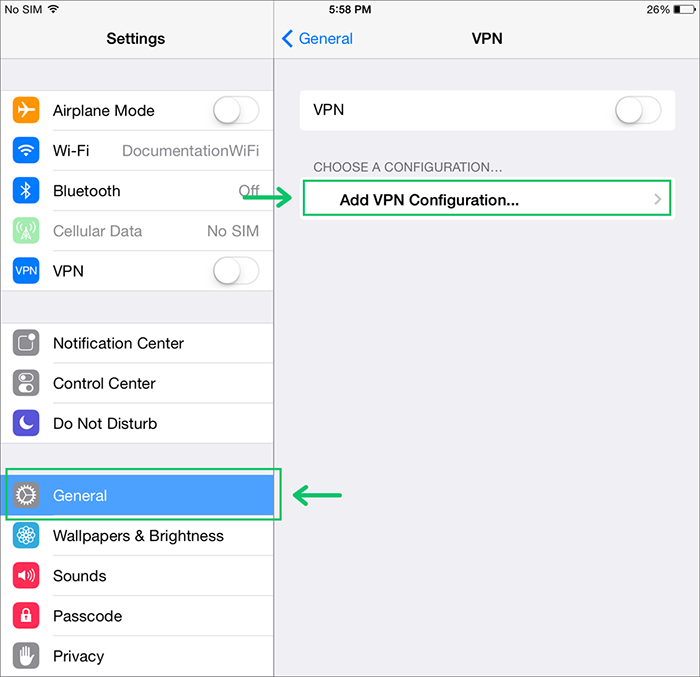
1. Open “Settings” on your iOS device.
2. In the settings menu, go to “General” > “VPN.”
3. Tap on “Add VPN Configuration.”
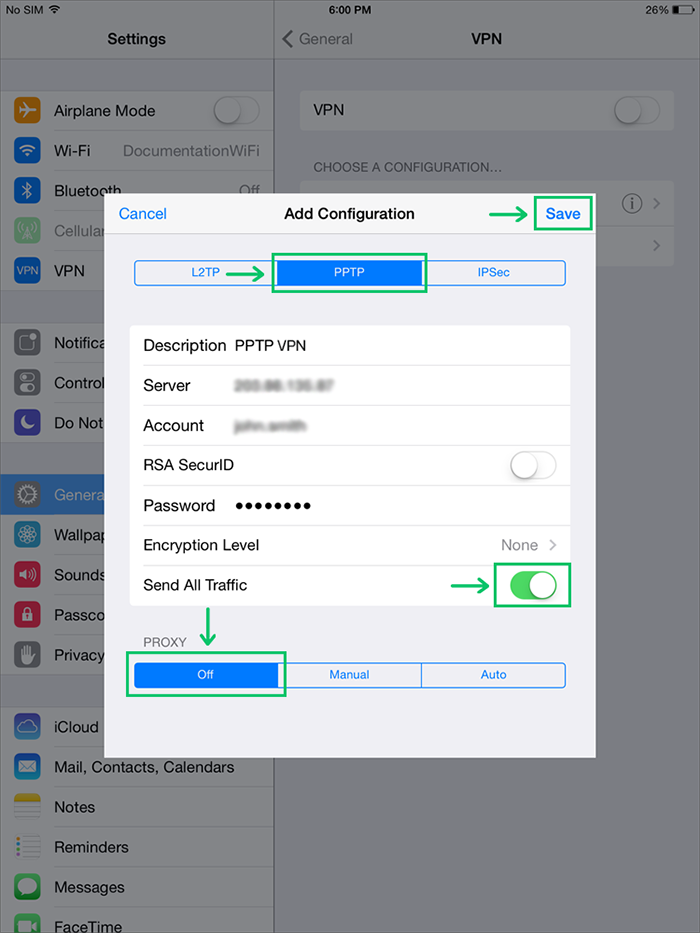
4. Select the “PPTP” tab from the top of the screen under the VPN configuration options.
5. Set a name for a VPN connection in the Description field.
6. Enter the IP address of the VPN server in the Server field.
7. Type the VPN username in the Account field.
8. Paste your VPN password in the Password field.
9. Set the appropriate Encryption level if provided. (Optional)
10. Enable “Send All Traffic” by toggle its switch to on.
11. Turn off the proxy from the options at the bottom of the screen.
12. Tap on “Save” to save settings.
13. To connect to PPTP VPN, select the VPN profile you newly created and toggle the switch next to “VPN.”
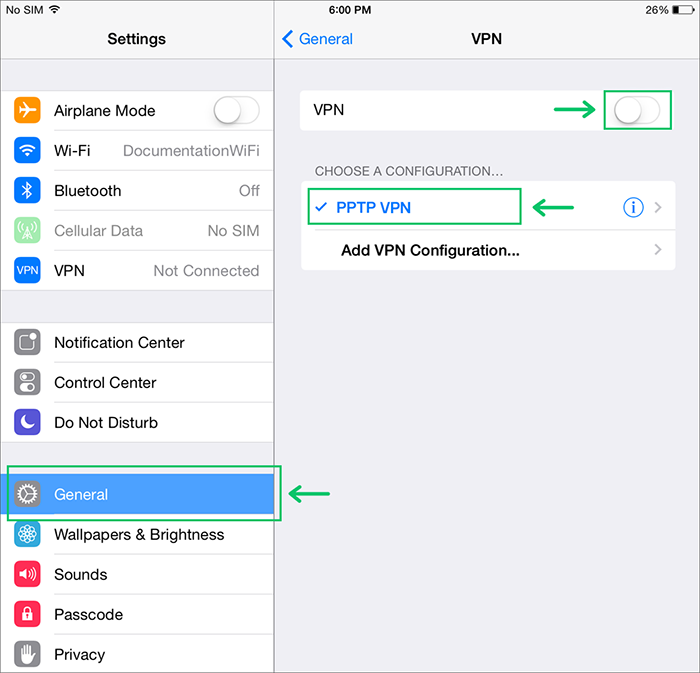
If the status displays “Connected,” you can ensure your VPN works.
Prerequisite to configure PPTP VPN connection on Andriod
- Having VPN account credentials and VPN server information.
- Having a stable internet connection.
How to setup PPTP VPN on Andriod device?
1. Open “Apps“> “Settings” on your Android device.
2. Tap on Networks& Connections settings. (Finding network settings depends on your Android version.)
3. Look for “VPN” or “VPN settings” and tap on it.
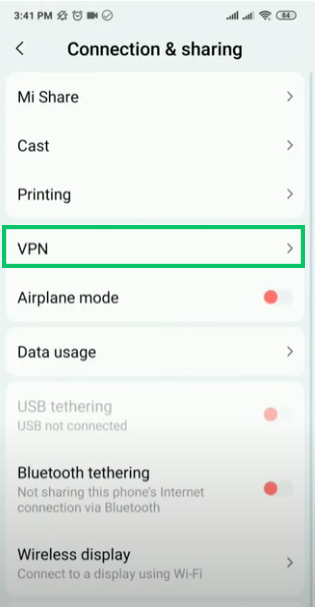
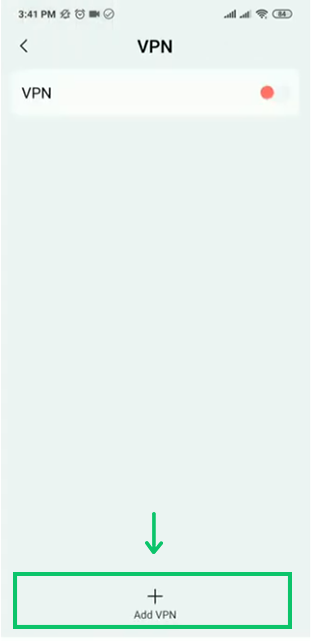
4. Tap “Add VPN network” within the VPN settings menu.
5. Enter VPN Configuration Details:
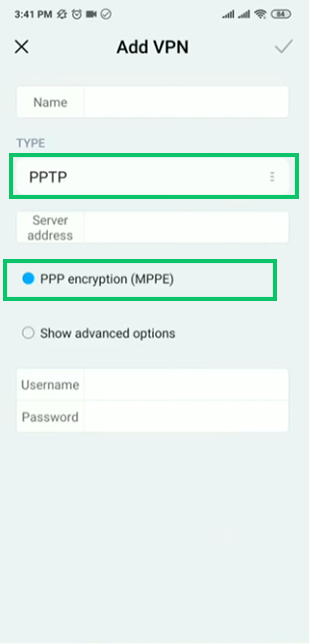
- Type: Set “PPTP” as the VPN type.
- Name: specify a name for your VPN connection.
- Server address: Enter the VPN server address provided by the VPN service provider.
- Enable the “PPP encryption (MPPE)” option. (if needed)
- Username: Type your VPN username.
- Password: Type your VPN password.
6. Check the checkbox next to “Remember the username and the password.”
7. Save VPN settings by tapping “Save” or “Done.”
8. To connect to the VPN, go back to the VPN settings menu, select your VPN profile, tap on connect if available, or Toggle the VPN switch to on.
Seeing the VPN icon on the top of the device’s screen indicates that you connect to the VPN successfully.
What can we do after setting up a PPTP VPN?
After setting up a PPTP VPN, you can browse the Internet anonymously and bypass censorship and geo-restrictions that might be blocked in your region.
Regarding security, PPTP is considered outdated and vulnerable due to its weak encryption.
Secure VPN is a valuable tool for enhancing online security and privacy, so to maximize PPTP security, adjusting encryption settings, keeping your VPN software updated, using strong passwords, and being cautious about public Wi-Fi are good practices.
Also, you can Configure PPTP VPN on Windows, Linux, Mikrotik if you consider using PPTP on different operating systems and servers.
Conclusion
Setting up a PPTP VPN connection is straightforward and compatible with many devices, making it a popular choice for users who need quick and easy VPN access. While it offers ease and fast speed, it is important to be aware of its security limitations. By following this comprehensive guide, you can efficiently setup a PPTP VPN connection and enhance your online experience with a reliable virtual private network.
Remember to evaluate your security needs carefully and consider stronger VPN protocols if your data protection demands are high. Use the steps and troubleshooting tips shared here to ensure a smooth and secure VPN setup process. This approach will help you optimize your VPN use while maintaining good security hygiene.
FAQ
2. What are the prerequisites for setting up a PPTP VPN connection on Windows?
You need the VPN server details (server address, username, and password), administrator access to change network settings, an active internet connection, and a Windows version that supports PPTP (such as Windows 10 or 11).
3. How can I connect and disconnect a PPTP VPN on Windows?
To connect, open Network & Internet settings, select your VPN profile, and click the Connect button entering your credentials if prompted. To disconnect, click the Network icon on the taskbar, select the active VPN connection, and press Disconnect.
4. How do I setup a PPTP VPN connection on Linux?
You can configure PPTP on Linux either through the Network Manager GUI by adding a VPN profile and entering server details or via terminal by installing necessary PPTP packages and running connection commands.
5. Is PPTP VPN supported on macOS and how do I setup the connection?
PPTP is supported only on macOS versions before Sierra (10.12). Newer macOS versions do not support PPTP due to security concerns.
6. How do I setup a PPTP VPN connection on iOS and Android devices?
On iOS before version 10, go to Settings to add a VPN configuration using PPTP. On Android, access VPN settings, add a new VPN with PPTP type, input configuration, save, and connect. Note newer OS versions may not support PPTP.
7. How can I check if my PPTP VPN connection is active?
Look for the VPN icon in the system tray or notification area on your device indicating an active connection.
8. Why is PPTP VPN considered less secure and what can I do to improve its security?
PPTP uses outdated encryption that is vulnerable to attacks. Use strong passwords, enable highest available encryption, keep software updated, and avoid public Wi-Fi when using PPTP.
10. Can I use a VPS or subscription to setup a PPTP VPN server?
Yes, set up on a VPS running Linux or Windows or subscribe to a VPN provider offering PPTP access.