How do I Connect to SoftEther VPN?
To connect to SoftEther VPN on different platforms such as Windows, Linux, Mac, FreeBSD, and Solaris, you need to use a SoftEther VPN Client.
It provides secure communication over a network. You can use OpenVPN or L2TP/IPSec on Windows, macOS, Android and ios to connect to a SoftEther VPN server.
SoftEher is faster than OpenVPN and is known as its alternative, which enables users to bypass internet restrictions easily.
Install and Configure SoftEther VPN Client on Windows
To connect to SoftEther VPN on Windows, you need to use a SoftEther client or use the OpenVPN or L2TP/IPsec protocols.
The following instructions can be used both on the Windows platform and Windows VPS.
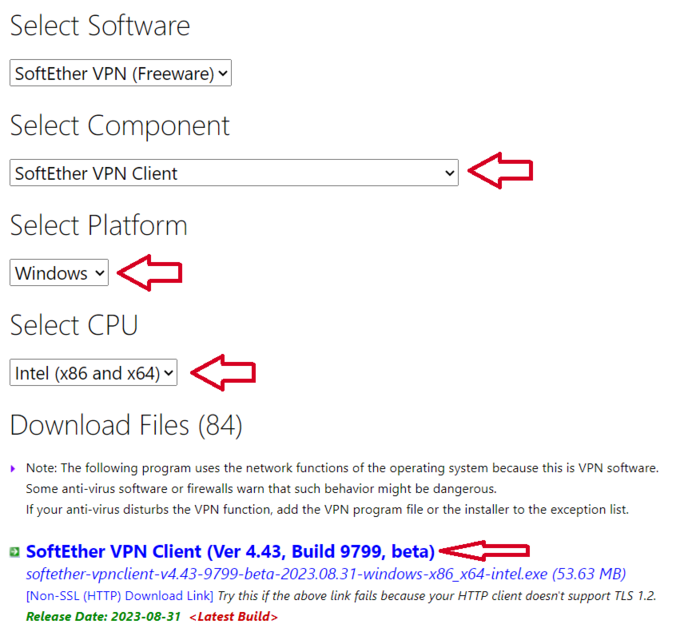
Step 1. Download SoftEther Software
Refer to SoftEther Download Center to have the software installed on Windows. Choose the required options as you see below:
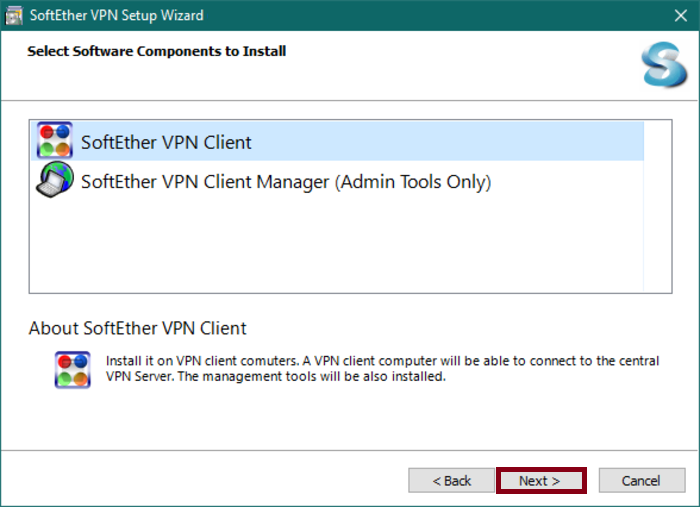
Step 2. Install SoftEther Software
To install SoftEther VPN on Windows, select and install the most recent version of the Client, just like you would any other Windows application.
Choose the SoftEther VPN Client option when prompted to install certain components.
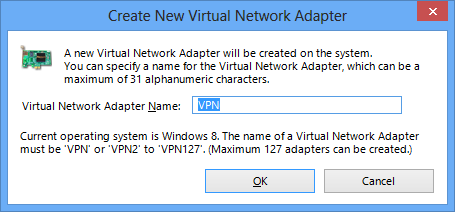
Step 3. Create a Virtual Network Adapter
When installing SoftEther is finished, double-click on Add VPN Connection.
Give the new adapter a name and select “Yes” when asked if you want to create a virtual network adapter.
Step 4. Configure SoftEther Client
To start configuring the SoftEther client on Windows, you must double-click on Add VPN connection again to enter the New VPN Connection Properties wizard.
To complete the SoftEther VPN setup, you need to set up the below-required settings and click OK when you are finished.
- Give the VPN connection a name.
- Type in the VPN server’s Host Name, Port Number, and Virtual Hub Name to create a connection.
- Type in your password and username.
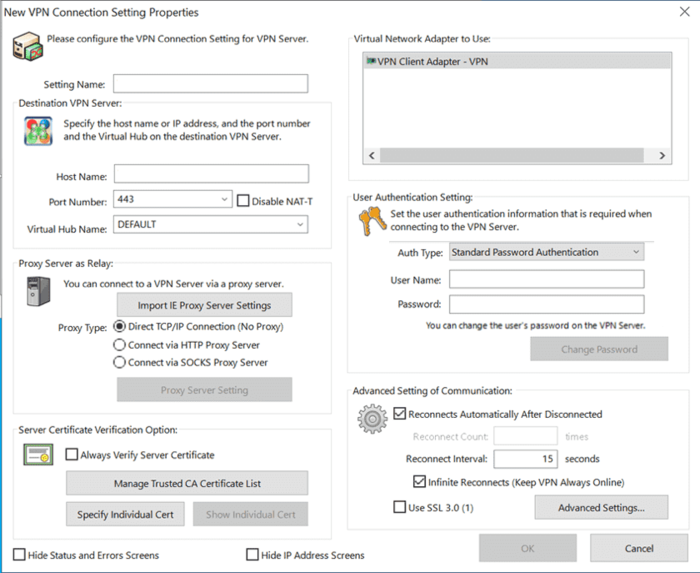
By using HTTPS port 443 to route the encrypted tunnel, SoftEther VPN effectively masks the VPN as an SSL connection.
Step 5. Connecting to SoftEther client
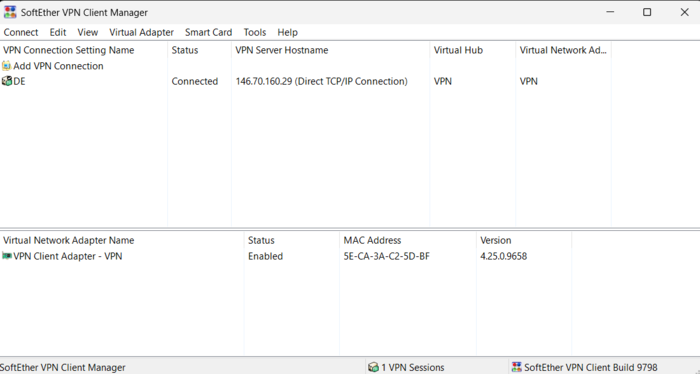
To start connecting to SoftEther client on Windows, double-click the newly created VPN connection.
Windows Defender can ask you to grant access across its firewall the first time you do this.
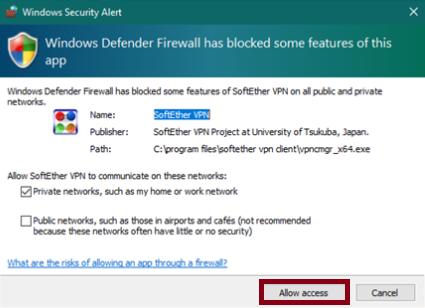
Note: Additionally, you should read and confirm the NAT traversal warning at least once.
Then, you are ready to connect SoftEther server and use it on Windows. Once you view the below screen, all is done.
Disconnect SoftEther VPN on Windows
You can uninstall SoftEther VPN on Windows using Settings and System Tray.
To disconnect from settings, follow the below steps:
- Go to Settings.
- Tap the Network & Internet icon.
- Click VPN on the left side menu.
- Find the VPN that is linked.
- Press the Disconnect button.
To use System Tray, follow the below path:
- In the system tray, look for the SoftEther VPN icon, which is often located in the lower-right part of your screen.
- Click and hold the icon.
- To end the VPN connection, select Disconnect or a comparable option.
How to Connect to SoftEther VPN on Linux
After buying Linux VPS, you can install your preferred VPN on it.Consider the below prerequisites before starting the installation process:
- Open a terminal and log in as root.
- To install SoftEther VPN on your Linux, consider giving the partition enough disk space so that the VPN Server can write log files to the same directory.
- You can utilize the SoftEther VPN Server in user mode or service mode. Installing SoftEther VPN Server in service mode is recommended.
- You are recommended to install SoftEther software on the
homedirectory or at/usr/local/.
After installing SoftEther on Linux, you can continue the below steps to connect to SofEther on Linux:
Step 1. Enable IP Forwarding
As you reviewed, how to Setup SoftEther VPN client was not complicated.
The account is now prepared to establish a connection with the SoftEther VPN server; however, you must first confirm that IP forwarding is enabled.
cat /proc/sys/net/ipv4/ip_forwardEither 1 or 0 will be returned as a result. If the value is 0, IP forwarding is disabled.
Use the following command to edit the sysctl.conf file and enable it:
nano /etc/sysctl.confLocate and uncomment the line “net.ipv4.ip_forward=1“. Press Ctrl-o or Ctrl-x to save the file now.
Step 2. Test Your New SoftEther VPN Client
You can now establish a VPN server connection with your account. Use this command to accomplish that:
AccountConnect <Ashley>You can now use the following command to verify that the account has connected successfully:
AccountListUse DHCP to ask the VPN server for an IP address. Put the virtual interface name before the “vpn_” prefix.
dhclient <virtual adapter name>You must view the IP address that the VPN server has provided you. This address is crucial for the following step, so keep it in mind.
Use the command below to view the name of your virtual interface and the IP address that has been assigned:
iconfig <name of your interface>Step 3. Configure Static Routing
To ensure that all traffic is routed through the VPN and not through your default network gateway, you must now set the static routes.
To see the routing table you are currently using, run:
netstat -rnOnce you have the IP address of your default gateway, use it to add a new route that points to the IP address of your VPN server.
Note: The IP address of your SoftEther VPN server is your VPN server IP and not the IP address that the server assigns you via DHCP.
ip route add <your VPN server IP>/32 via <your default gateway>Use the following command to delete the old default route:
ip route del default via <your default gateway IP>In this way, the IP address that the VPN server assigned via DHCP is now the default gateway.
Pinging an external IP, such as the Google DNS server, will now verify your connection:
ping -c4 8.8.8.8Lastly, verify that the connection to your SoftEther client is functioning properly by looking up your public IP address:
wget -qO- http://ipecho.net/plain ; echoEverything is operating as it should if the IP address that is received matches the IP of your VPN server.
Disconnect SoftEther VPN on Linux
Disconnecting from SoftEther VPN is possible by starting the VPN client configuration script again.
To do this, run the commands below:
./vpncmdAccountDisconnect <name of account>Release the DHCP lease from the virtual network interface and terminate the client configuration:
dhclient -r <name of virtual interface>Use the following command to stop the VPN client:
./vpnclient stopRemove the router from your VPN server by running the command below and editing your routing table.
ip route del <your VPN server IP>/32Then, create a default route using the local gateway on your network.
ip route add default via <your local gateway>How to Set Up SoftEther VPN on macOS
Connecting to SoftEther VPN on macOS is not easy and not recommended.
To connect to a SoftEther VPN server, you must set up a VPN client to communicate with the server. There are several options to connect from macOS:
- Install the SoftEther VPN GUI.
- SoftEther VPN software.
- The L2TP/IPsec protocol.
- Softerher OpenVPN.
Let’s start configuring the SoftEther VPN client on macOS using L2TP/IPsec protocol, which is required once for the first time:
- On the Mac screen, click the network icon in the upper-right corner. From the menu, select “Open Network Preferences…”
- On the network configuration screen, click the “+” button.

- Click the “Create” button after selecting “L2TP over IPsec” as the VPN type and “VPN” as the interface.
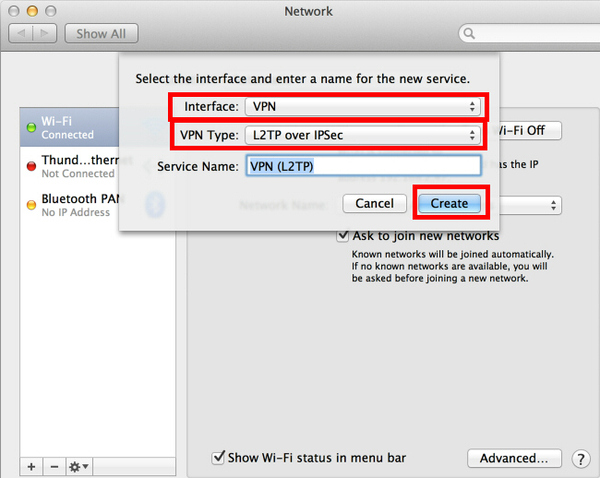
- In this way, the configuration screen will show up and a new L2TP VPN configuration will be made.
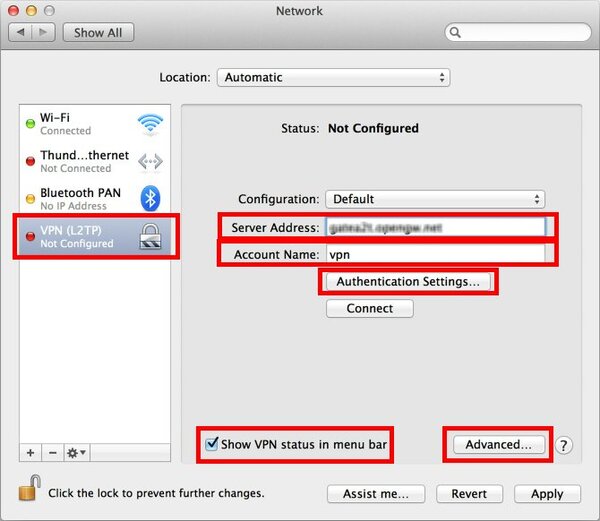
- The destination SoftEther VPN server’s hostname or IP address must be entered on this screen.
- Enter the username in the “Account Name” area, which is located next to the “Server Address” field, after you have selected the “Server Address.”
- Then, select the “Authentication Settings…” button.
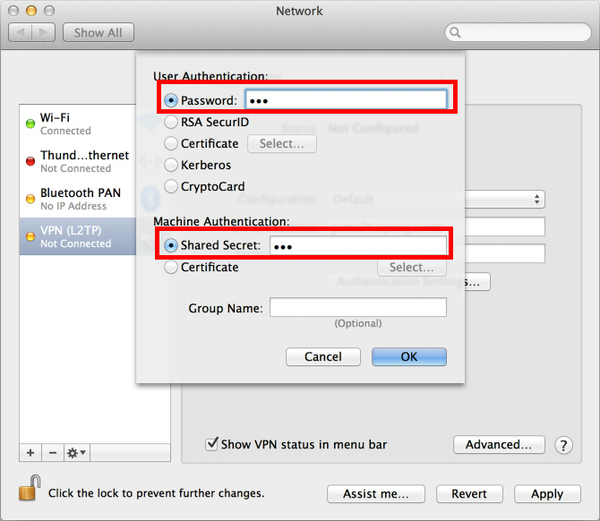
- There will be an authentication screen. Fill up the “Password” area with your password. Additionally, provide the pre-shared key in the “Shared Secret” section.
- Once you have entered them, press the “OK” button.
- Select “Advanced…” once the previous screen has been displayed, and make sure “Show VPN status in menu bar” is checked.
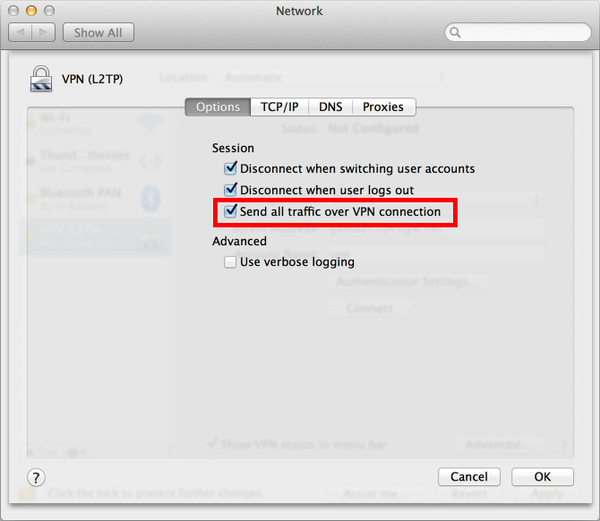
- You’ll see the advanced settings display. Click “OK” after making sure “Send all traffic over VPN connection” is checked.
- To initiate the VPN connection, click the “Connect” button on the settings screen.
- Alternatively, you can click the VPN icon in the menu bar to start a VPN connection.
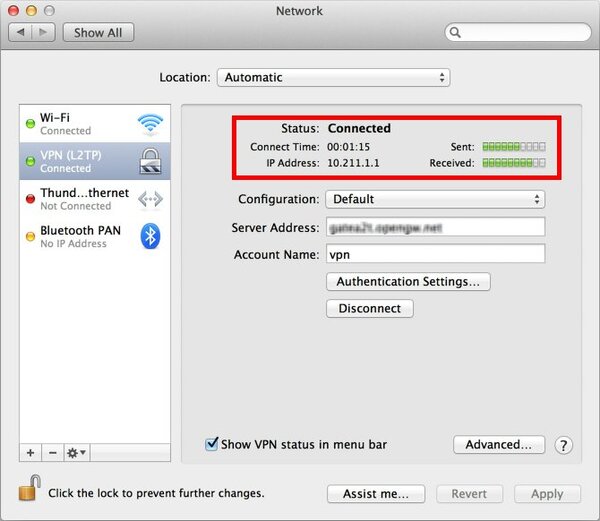
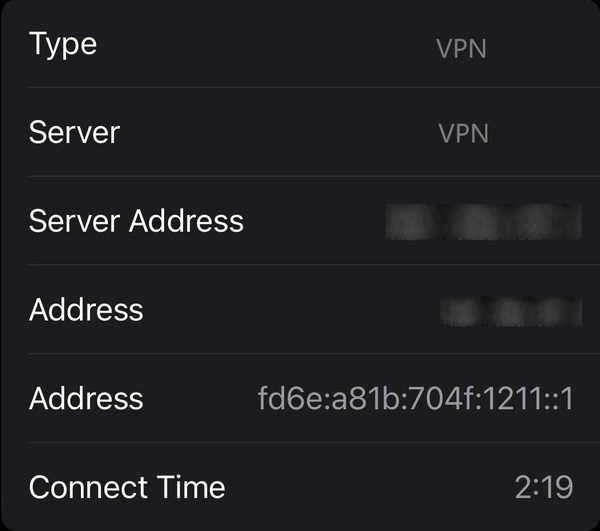
- The VPN connection setup screen will look like this after the connection has been made, with the “Status” reading “Connected”.
- The screen will show the duration of your connection as well as your private IP address on the VPN.
That’s it. All communications will be routed through the VPN Server when the VPN is set up.
Any local workstations and servers on the destination network are accessible to you.
How to Set up SoftEther VPN Client on Android
Although Android comes with a built-in VPN client, remote access was previously only possible with pricey hardware-based VPNs like Cisco, Juniper, or others.
SoftEther VPN works similarly to Cisco and is readily compatible with Android.
Let’s learn how to connect SoftEther VPN server using L2TP/IPsec VPN client which comes pre-installed on Android to configure VPN for Android phones:
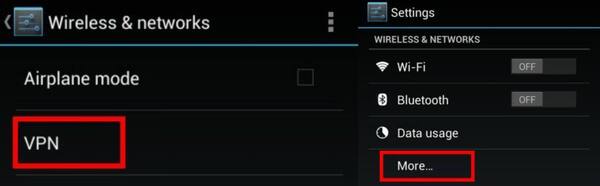
- To start an initial configuration on Android SoftEther VPN which is required just once, open the “Settings” app on your Android device.
- Select “VPN” from the “Wireless & Networks” category by opening “More…”
- To establish a new VPN connection setup, click the “Add VPN profile” option.
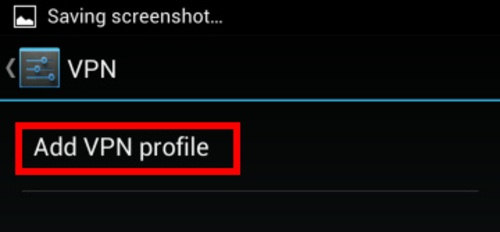
- There will be a new editing screen for the SoftEther VPN client for Android.
- Enter a string value in the “Name” column, then select “L2TP/IPSec PSK” under the “Type” field.
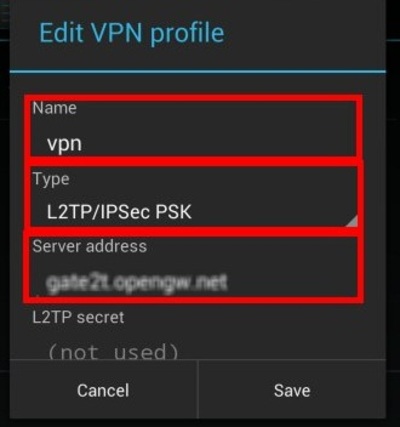
- The destination SoftEther VPN server’s hostname or IP address must be entered on this screen.
- On the Android screen, you must additionally input your username, password, and secret (pre-shared key).
- If necessary, tap the “Show advanced options” checkbox after swiping down the configuration screen.
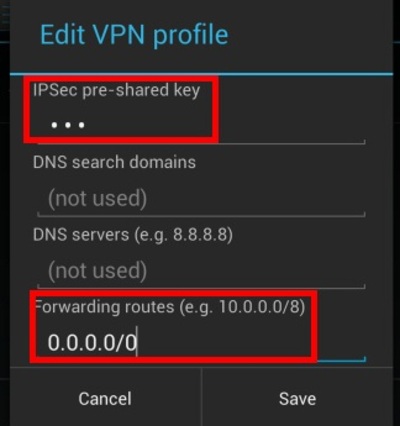
- Fill in the “IPSec pre-shared key” space.
- Enter the nine-letter string “0.0.0.0/0” in the “Forwarding routes” column.
- Verify that the “Forwarding routes” field has the right information entered.
- Otherwise, you cannot use a VPN to communicate.
- Once everything has been entered, click “Save” to save the VPN connection configuration.
- Now, you are ready to use the VPN connection setting you have just created to start a VPN connection.
- When you select an option from the VPN connection settings list and open it, the screen below will appear.
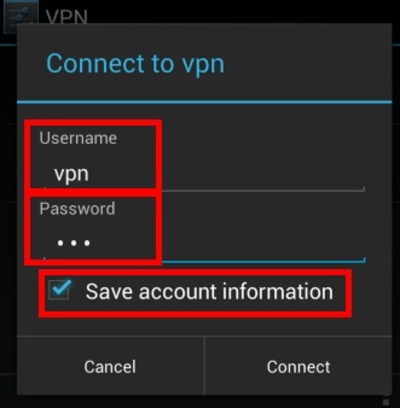
- You must enter the “Username” and “Password” fields when using Softether VPN gate for Android for the first time.
- Fill in the “Password” and “Username” fields, then select “Save account information”.
- To initiate the VPN connection, tap “Connect”.

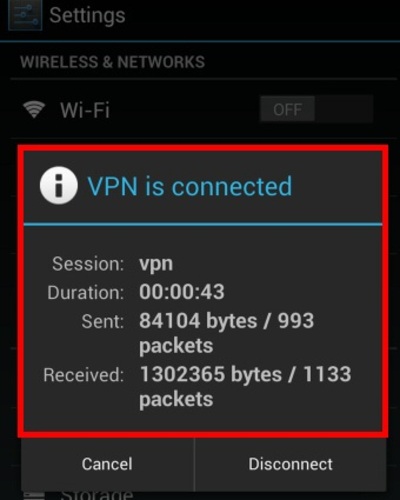
- You may view the status and connect time on the status screen as soon as the SoftEther VPN for Android is created.
- Additionally shown in a VPN is your private IP address.
Connect to SoftEther VPN Android is possible from now on and SoftEther L2TP/IPsec on Android is now ready to use.
After reading the next part, you will know how to set up VPN for iPhone and Android.
Connect to SoftEther VPN Client on IOS
Softether VPN supports iPhone mobile devices. In this part, configuring SoftEther VPN for iPhone will be discussed.
You can use the L2TP/IPsec VPN Client to connect to the SoftEther VPN Server, which comes preinstalled on iOS.
To use SofEther VPN IOS, you just need to do the configuration once only the first time:
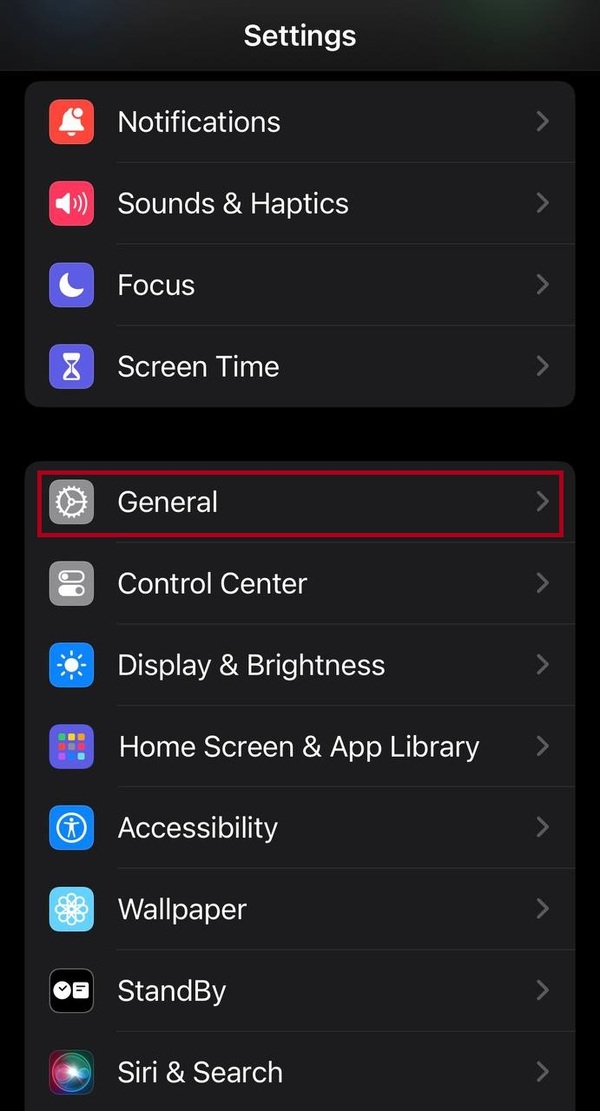
- Launch the “Settings” app from the iOS home screen.
- Open “VPN” in “General.
- Select “Add VPN Configuration…”
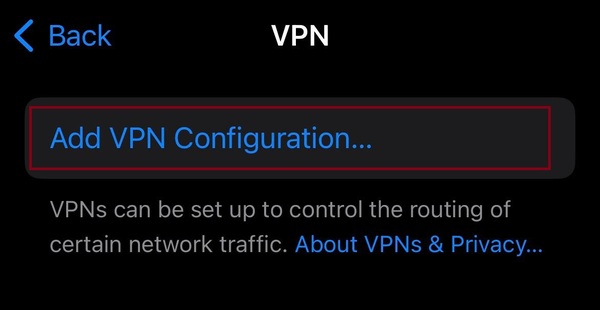
- The configuration screen will show up and a new L2TP VPN connection option will be created.
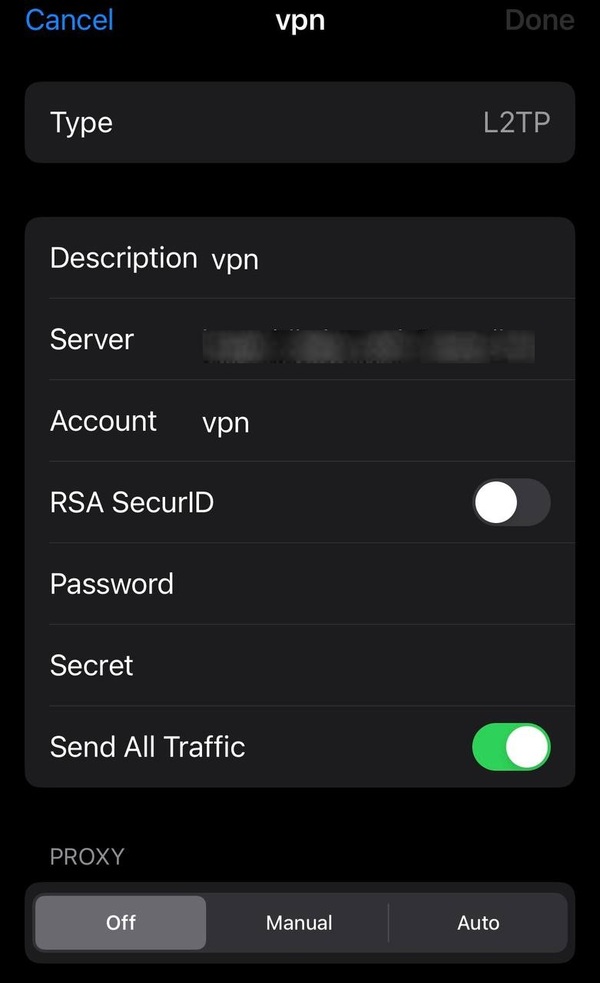
- The destination SoftEther VPN server’s hostname or IP address must be entered on this screen.
- On the iOS screen, you must additionally input your user name, password, and secret (pre-shared key).
- Using a configured VPN connection option, you can launch a VPN connection at any moment.
- To establish a VPN connection, tap the “OFF” button.
Disconnect a VPN on iPhone
- To disconnect the VPN connection temporarily, you can tap the ”ON” button to turn it off.
- To disconnect the VPN permanently, next to the VPN name, tap the “I” in a circle to select the Delete VPN at the bottom of the page.
What is the default port for SoftEther VPN?
5555 is the port that SoftEther VPN uses by default.
On the other hand, you can choose any TCP/IP port as the listener port on the destination VPN server for incoming connections.
Use port 443, which is typically connected to HTTPS access, if you’re connecting over an HTTP proxy server or have high firewall settings.
Why SoftEther VPN program terminate suddenly?
The below options might cause SoftEther VPN to stop without warning:
- The program’s executable file is corrupted/overwritten; Reinstall SoftEther to solve it.
- The programs such as hamcore.se2, etc. are corrupted; Reinstall SoftEther VPN to solve it.
- Computer’s physical memory issues; Use memory-checking tools to test memory defects. (ECC or Registered ECC Memory is recommended for highly reliable computers.)
- Running firewall or antivirus programs; Disable them temporarily to check the result.
What is ”The time on the server and the client does not match” Error?
You will face this message if there is a substantial discrepancy between the time that is set on the VPN Server and the time that is on the VPN client machine that is connected.
If this happens, make sure both computers’ clocks are set to the correct time, and adjust them if necessary.
Conclusion
SoftEther VPN is a flexible and secure solution that works on various operating systems. Only the Windows client offers a proper graphical user interface.
The Mac and Linux apps are command line only. So, we explained how to use the built-in L2TP/IPsec VPN client.