How to Install SoftEther VPN on Ubuntu
SoftEther VPN is one of the most powerful free and open-source multi-protocol VPN software that provides a secure connection to a remote network. This VPN software is compatible with most major operating systems such as Windows, Linux, FreeBSD, macOS, and Solaris.
Prerequisites for Installing SoftEther VPN on Ubuntu
To install and configure SoftEther VPN on Ubuntu 22.04 and Ubuntu 20.04 servers, you need:
- A Linux VPS hosting running Ubuntu.
- A non-root user with
sudoprivileges. - Register a domain name to enable HTTPS for OpenConnect VPN.
Steps to Install and Configure SoftEther VPN on Ubuntu Linux
Following the steps and instructions we will explain below, you can easily install and configure SoftEther VPN on Ubuntu 22.04/20.04.
Step 1: Installing Required Dependency
It is better to start your first step by upgrading the system’s package cache. For this purpose, enter the following command:
apt-get update –yAfter you have updated your cache and system packages, use the following command to install the required dependencies:
apt-get install build-essential gnupg2 gcc make –yNow that you have installed all the necessary dependencies, it is time to install the latest stable version of SoftEther VPN.
Step 2: Installing the latest stable version of SoftEther VPN on the Server
wget https://github.com/SoftEtherVPN/SoftEtherVPN_Stable/releases/download/v4.39-9772-beta/softether-vpnserver-v4.39-9772-beta-2022.04.26-linux-x64-64bit.tar.gzSample output:
HTTP request sent, awaiting response... 200 OK

Length: 7529219 (7.2M) [application/x-gzip]

Saving to: ‘softether-vpnserver-v4.38-9760-rtm-2021.08.17-linux-x64-64bit.tar.gz’

softether-vpnserver-v4.38-9760-rtm- 100%[==================================================================>]   7.18M  1.01MB/s    in 10s

2021-10-15 08:36:37 (704 KB/s) - ‘softether-vpnserver-v4.38-9760-rtm-2021.08.17-linux-x64-64bit.tar.gz’ saved [7529219/7529219]
After downloading the latest stable version of SoftEther VPN, use the following command to extract the content of the downloaded file:
tar xvf softether-vpnserver-*.tar.gzRun the following command to change the path to the VPN server directory:
cd vpnserver/Use the following command to install dependency packages:
sudo apt install gcc binutils gzip libreadline-dev libssl-dev libncurses5-dev libncursesw5-dev libpthread-stubs0-devThen, referring to the extracted directory, start the SoftEther VPN creation process by entering the following commands:
makeAfter completing the process of building and downloading SoftEther VPN, you will receive the following output:
*** PacketiX VPN Server HTML5 Web Administration Console (NEW) ***
This VPN Server / Bridge has the built-in HTML5 Web Administration Console.
After you start the server daemon, you can open the HTML5 Web Administration Console is available at
https://127.0.0.1:5555/
or
https://ip_address_of_the_vpn_server:5555/
This HTML5 page is obviously under construction, and your HTML5 development contribution is very appreciated.
--------------------------------------------------------------------
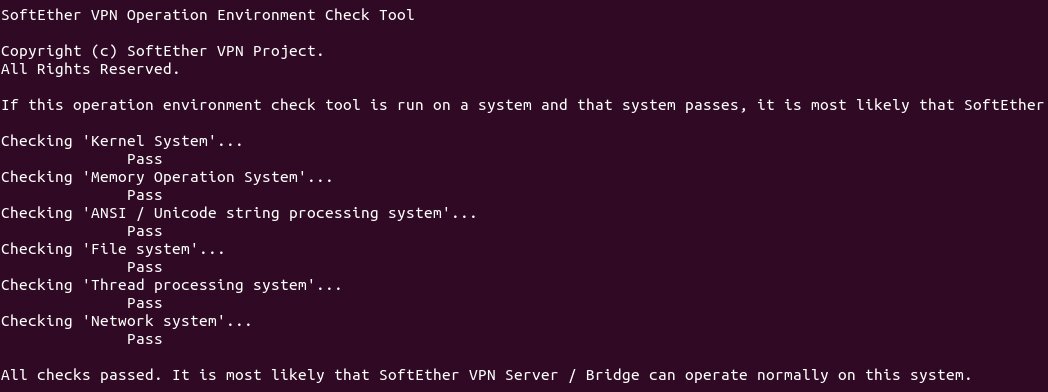
make[1]: Leaving directory '/root/vpnserver'The make command creates two binaries, vpnserver (server binary)and vpncmd (SoftEther VPN terminal management tool), from the source code.
In addition, the make command checks the server environment to run the EtherVPN server, and if it confirms the server environment to run the EtherVPN, you can see the pass option.
We suggest that if you want the file system to be organized, move the VPN server directory to /opt/. For this purpose, enter the following command:
cd ..

sudo mv vpnserver /opt/softether
Step 3: Creating Systemd Service Unit for SoftEther VPN
Enter the following command to run the VPN server:
sudo /opt/softether/vpnserver startTo stop running the VPN server, enter the following command:
sudo /opt/softether/vpnserver stopBy creating the systemd service unit, the SoftEther VPN server will automatically run at boot time. Enter the following command to build the systemd service unit:
sudo nano /etc/systemd/system/softether-vpnserver.serviceAt this stage, you should add the following lines to the file we created to manage the SoftEther VPN service.
[Unit]

Description=SoftEther VPN server

After=network-online.target

After=dbus.service

[Service]

Type=forking

ExecStart=/opt/softether/vpnserver start

ExecReload=/bin/kill -HUP $MAINPID

[Install]

WantedBy=multi-user.target
Save the changes and exit the file. Then start the VPN server:
sudo systemctl start softether-vpnserverSet auto-start at boot time using the following command:
sudo systemctl enable softether-vpnserverAfter completing the above process, you can check the status of the service by typing the following command:
systemctl status softether-vpnserverSample output:
softether-vpnserver.service - SoftEther VPN server

Loaded: loaded (/etc/systemd/system/softether-vpnserver.service; enabled; vendor preset: enabled)

Active: <span style="color: #00ff00;">active (running)</span> since Sat 2022-09-17 11:39:15 UTC; 20s ago

Main PID: 2944053 (vpnserver)

Tasks: 32 (limit: 629145)

Memory: 19.9M

CPU: 603ms

CGroup: /system.slice/softether-vpnserver.service

├─2944053 /opt/softether/vpnserver execsvc

└─2944054 /opt/softether/vpnserver execsvcNote: If the output above gives you a chance to do something before quitting, you can take control of the terminal management by pressing the Q button.
As you can see in our sample output, the active (running) view is green, indicating that the service is active. If you notice that your service is not running, you can find the root of the problem by checking the journal. For this purpose, use the following command :
sudo journalctl -eu softether-vpnserverYou can also check the listening ports by using the following command:
sudo ss -lnptu | grep vpnserverSample output:
udp   UNCONN 0      0            127.0.0.1:1194       0.0.0.0:*    users:(("vpnserver",pid=2952110,fd=62))

udp   UNCONN 0      0       12.234.224.168:1194       0.0.0.0:*    users:(("vpnserver",pid=2952110,fd=58))

udp   UNCONN 0      0              0.0.0.0:51612      0.0.0.0:*    users:(("vpnserver",pid=2952110,fd=5))

udp   UNCONN 0      0              0.0.0.0:53400      0.0.0.0:*    users:(("vpnserver",pid=2952110,fd=11))

udp   UNCONN 0      0              0.0.0.0:56452      0.0.0.0:*    users:(("vpnserver",pid=2952110,fd=53))

udp   UNCONN 0      0              0.0.0.0:40085      0.0.0.0:*    users:(("vpnserver",pid=2952110,fd=16))

tcp   LISTEN 0      128            0.0.0.0:992        0.0.0.0:*    users:(("vpnserver",pid=2952110,fd=40))

tcp   LISTEN 0      128            0.0.0.0:1194       0.0.0.0:*    users:(("vpnserver",pid=2952110,fd=44))

tcp   LISTEN 0      128            0.0.0.0:5555       0.0.0.0:*    users:(("vpnserver",pid=2952110,fd=48))

tcp   LISTEN 0      128            0.0.0.0:443        0.0.0.0:*    users:(("vpnserver",pid=2952110,fd=36))
Since SoftEther VPN activates different ports (L2TP, IPsec, SSTP, OpenVPN, and SoftEther’s internal VPN protocol) simultaneously, you will notice in the output that the SoftEther VPN server is listening to several ports.
HTML5 management console uses port 5555 and SSTP, and SoftEtherVPN protocols use TCP port 443. But note that you can connect to the SoftEtherVPN server from TCP port 443 if you have not connected to Apache or Nginx web servers through this port before.
Step 4: Opening the ports in the firewall
In the systems where the firewall is running, it is necessary to open some ports to configure the SoftEtherVPN server.
For users who use the UFW firewall, the following command is executed to issue permission to specific ports (usually ports 443, 5555, 992, and 1194) from the firewall:
sudo ufw allow 80,443,992,1194,555/tcp

sudo ufw allow 1194,51612,53400,56452,40085/udp
After adding new rules to the UFW firewall, you can reload it with the following command:
ufw reloadStep 5: Configuring the SoftEther VPN server
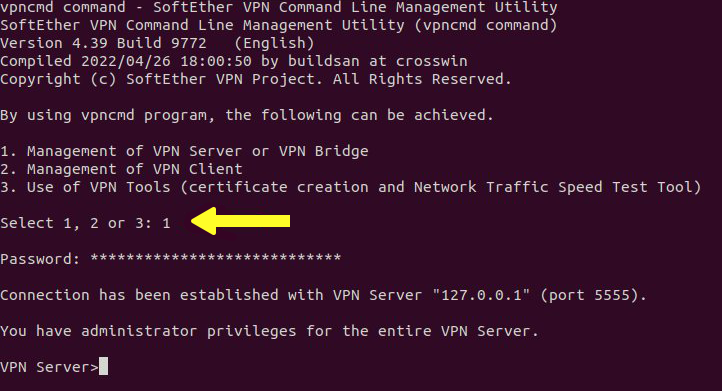
At this stage, we start softether vpn server configuration using the vpncmd command:
/opt/softether/vpncmdIn the output you receive, select option 1 to continue the SoftEther VPN server configuration process:
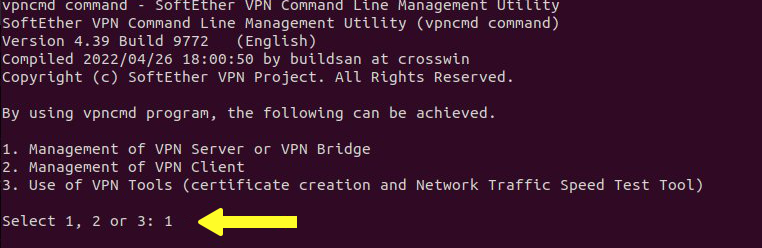
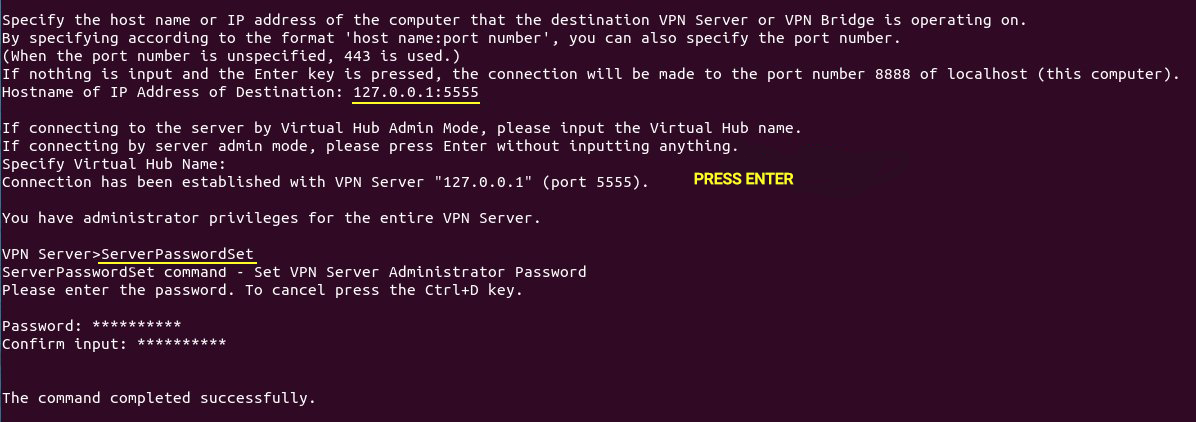
Since the management console listens on port 5555, you must type 127.0.0.1:5555 to access the management console.
Then, skip through the Virtual Hub selection stage by pressing the Enter button.
At this point, you need to specify a password for the management console because it does not have a password by default, so you will use the ServerPasswordSet command to set the management console password:
You cannot complete the SoftEtherVPN configuration steps without setting the virtual hub, so you need to configure the virtual hub for your VPN server, and it is better to use the default virtual hub named DEFAULT.
Hub DEFAULT
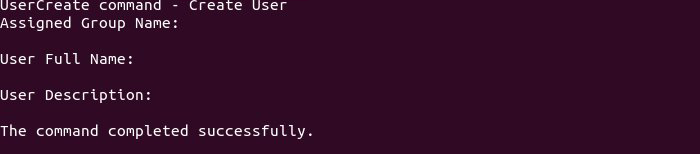
Then create an account with the desired username for the VPN:
UserCreate usernameTip: Replace your desired username instead of the username in the above command.
Also, if you wish, you can complete the user description, full name, and group name for your VPN account (optional).
Then press the Enter button.
To set your VPN account password with the username you specified in the previous step, enter the following command:
UserPasswordSet username
For VPN clients to obtain IP addresses from the VPN server, you must enable NAT and DHCP virtual server functions. For this purpose, run the following command:
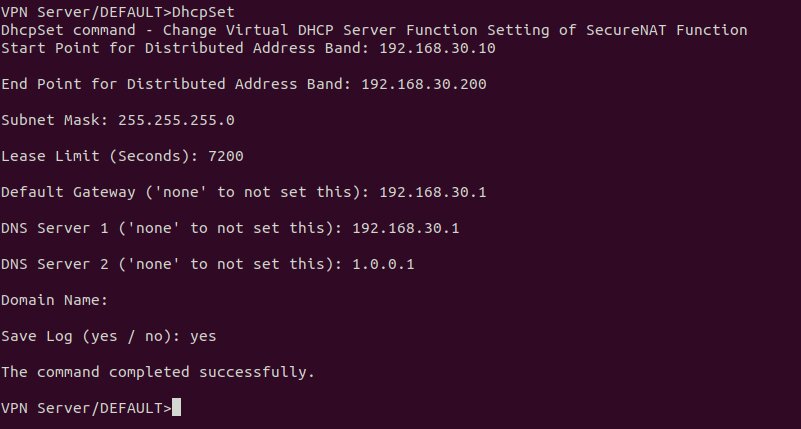
SecureNatEnableThen we will configure NAT using the DhcpSet command for VPN users:
DhcpSetIn the output, you will come across a list of questions that we will guide you to answer in the following:
- Start Point for Distributed Address Band: 192.168.30.10
- Start Point for Distributed Address Band: 192.168.30.10
- End Point for Distributed Address Band: 192.168.30.200
- Subnet Mask: 255.255.255.0
- Lease Limit (Seconds): 7200
- Default Gateway: 192.168.30.1
- DNS Server 1: 192.168.30.1
- DNS server 2: 1.0.0.1
- Domain Name: Press Enter and skip this part.
- Save Log: yes
After applying the settings, you can leave the management console; the following command is used to exit the management console:
exitStep 6: Installing DNS Resolver on the server
Installing the DNS Resolver on the server is for the purpose that we choose the VPN server as the DNS server for the clients. So we install the bind9 DNS server:
sudo apt install bind9After BIND is installed, it will run automatically, and to check its status, use the following command:
systemctl status namedSample output:
service - BIND Domain Name Server

Loaded: loaded (/lib/systemd/system/named.service; enabled; vendor preset: enabled)

Active: active (running) since Sun 2020-05-17 08:11:26 UTC; 37s ago

Docs: man:named(8)

Main PID: 13820 (named)

Tasks: 5 (limit: 1074)

Memory: 14.3M

CGroup: /system.slice/named.service

└─13820 /usr/sbin/named -f -u bind
If you find out that the service is not running, run it by typing the following command:
sudo systemctl start namedRun the following command to edit the BIND DNS server configuration file:
sudo nano /etc/bind/named.conf.optionsTo receive recursive DNS queries from VPN clients, put the following line in the file:
allow-recursion { 127.0.0.1; 192.168.30.0/24; };After applying the changes, save and exit the file and modify the /etc/default/named file:
sudo nano /etc/default/namedTo ensure that BIND has permission to query root DNS servers, add -4 to OPTIONS:
OPTIONS="-u bind -4"Then save the changes and close the file.
By default, DNSSEC is enabled by BIND to guarantee the correctness of DNS responses, but due to trust anchor rollover and other issues, it will not be enabled out of the box. To make sure that it works properly, we can rebuild the managed key database by typing the following command:
sudo rndc managed-keys destroy

sudo rndc reconfig
After making the changes, restart BIND9:
sudo systemctl restart namedTo allow VPN clients to connect to port 53, you need to enter the following command:
sudo ufw insert 1 allow in from 192.168.30.0/24Step 7: Getting a TLS certificate from Let’s Encrypt
Well, you may have a question about that when the SoftEtherVPN server creates a TLS certificate with its signature during the installation process, why should we use the Let’s Encrypt certificate? The answer is simple, Let’s Encrypt certificate is reliable, free, and easy to set up.
So, from the default Ubuntu repository, install Let’s Encrypt Client (certbot) via the following command:
sudo apt install certbotThen check the version number by entering the following command:
certbot –versionTip: The best way is to use the Standalone or webroot plugin to get a TLS certificate.
-
Using the Standalone plugin
If you want the SoftEther VPN server to use port 443 (while no web server is already running on your Ubuntu 22.04/20.04 system), to get a TLS certificate from Let’s Encrypt, we recommend using the Standalone plugin. So for this purpose, You must type the following command:
sudo certbot certonly --standalone --preferred-challenges http --agree-tos --email [email protected] -d vpn.example.comTip: Be sure to set a DNS record for your domain name.
- certonly: after receiving the certificate, do not install it.
- –standalone: Get the certificate through the standalone plugin.
- –preferred-challenges http: Run http-01 challenge to validate your domain that uses port 80.
- –agree-tos: Accept the Let’s Encrypt terms of service.
- –email: Enter your email address to be able to register or recover your account.
- -d: Specify the domain name in this field.
If you can get the SSL certificate successfully, the following output will be displayed:
Successfully received certificate.

Certificate is saved at: /etc/letsencrypt/live/vpn.example.com/fullchain.pem

Key is saved at:         /etc/letsencrypt/live/vpn.example.com/privkey.pem

This certificate expires on 2022-12-16.

These files will be updated when the certificate renews.

Certbot has set up a scheduled task to automatically renew this certificate in the background.

- - - - - - - - - - - - - - - - - - - - - - - - - - - - - - - - - - - - - - - -

If you like Certbot, please consider supporting our work by:

* Donating to ISRG / Let's Encrypt:   https://letsencrypt.org/donate

* Donating to EFF: https://eff.org/donate-le-
Using the webroot plugin
But what should you do if you are in a situation where you already have a web server running on your Ubuntu 22.04/20.04 server listening on ports 80 and 443?
In this situation, the best suggestion to get a certificate is to use the webroot plugin because Webroot is compatible with all web servers, and there is no need to install a certificate on the web server when using Webroot.
First, you need to set up a virtual host for vpn.example.com.
-
Apache
If the web server running on your system is Apache, run the following command to create the virtual host:
sudo nano /etc/apache2/sites-available/vpn.example.com.confThen in the file, add the following lines:
<VirtualHost *:80>

ServerName vpn.example.com

DocumentRoot /var/www/html/

</VirtualHost>
Save the changes you made and exit the file. For web root, create a directory:
sudo mkdir /var/www/htmlIn this step, set the Apache user (www-data) as the web root owner:
sudo chown www-data:www-data /var/www/html –RActivate the virtual host specified below:
sudo a2ensite vpn.example.comFor the changes we made to take effect, you need to reload Apache:
sudo systemctl reload apache2Now that you have successfully created and activated the virtual host, you are ready to receive the Let’s Encrypt certificate through the webroot plugin, so enter the following command for this purpose:
sudo certbot certonly --webroot --agree-tos --email [email protected] -d vpn.example.com -w /var/www/html-
Nginx
If the Nginx web server is running on your Ubuntu server, enter the following command:
sudo nano /etc/nginx/conf.d/vpn.example.com.confThen add the following lines to the file:
server {

listen 80;

server_name vpn.example.com;

root /var/www/html/;

location ~ /.well-known/acme-challenge {

allow all;

}

}
After saving the changes and closing the file, use the following command to create the web root directory:
sudo mkdir -p /var/www/htmlTo set the Nginx user(www-data) as the root web owner, enter the following command:
sudo chown www-data:www-data /var/www/html –RReload Nginx for your settings to take effect:
sudo systemctl reload nginxAfter creating and activating the virtual host, you can get the Let’s Encrypt certificate through the webroot plugin by entering the following command:
sudo certbot certonly --webroot --agree-tos --email [email protected] -d vpn.example.com -w /var/www/htmlStep 8: Installing the Let’s Encrypt TLS certificate on the SoftEther VPN Server
Log in to the VPN management console with Root user permission:
sudo /opt/softether/vpncmd 127.0.0.1:5555Select option 1 in the output of the above command to manage the VPN server and enter the password you specified in the previous step.
To set the server’s private key and TLS certificate, type the following command:
ServerCertSetEnter the following path to set up the certificate:
/etc/letsencrypt/live/vpn.yourdomain.com/fullchain.pemFollow the steps below to set the private key:
/etc/letsencrypt/live/vpn.yourdomain.com/privkey.pem
Exit the management console by entering the following command:
exitRestart the VPN server:
sudo systemctl restart softether-vpnserverStep 9: Installing SoftEther VPN Client
This step includes installing and running the SoftEther VPN server as well as SoftEther VPN client install on the client device.
First, you need to install the necessary dependencies through the following command:
apt-get install build-essential gnupg2 gcc make –yThen download the latest version of SoftEther VPN client using the following command:
wget http://www.softether-download.com/files/softether/v4.38-9760-rtm-2021.08.17-tree/Linux/SoftEther_VPN_Client/64bit_-_Intel_x64_or_AMD64/softether-vpnclient-v4.38-9760-rtm-2021.08.17-linux-x64-64bit.tar.gzAfter the file is downloaded, extract the downloaded file with the following command:
tar -xvzf softether-vpnclient-v4.38-9760-rtm-2021.08.17-linux-x64-64bit.tar.gzThe content of the downloaded file is usually extracted in the vpclient directory, which is better to define a new directory to save the VPN client script:
mkdir /root/vpnscriptThen, in this step, download all the scripts from the VPN script download page using the following command:
cd /root/vpnscriptwget https://raw.githubusercontent.com/mfaizanse/intellexlab-files/main/softether-vpn-client/remove-client.sh
wget https://raw.githubusercontent.com/mfaizanse/intellexlab-files/main/softether-vpn-client/setup-client.sh
wget https://raw.githubusercontent.com/mfaizanse/intellexlab-files/main/softether-vpn-client/vpn-connect.sh
wget https://raw.githubusercontent.com/mfaizanse/intellexlab-files/main/softether-vpn-client/vpn-disconnect.sh
wget https://raw.githubusercontent.com/mfaizanse/intellexlab-files/main/softether-vpn-client/vpn_configAfter downloading the scripts, define the appropriate permission for the downloaded scripts:
chmod 755 *Then edit the vpn_config file by entering the VPN username, local gateway IP, VPN server IP, and VPN client directory.
nano vpn_configAdd the following lines to the configuration file:
CLIENT_DIR="/root/vpnclient"

NIC_NAME="opera1 "

ACCOUNT_NAME="vpnuser"

VPN_HOST_IPv4="vpn-server-ip"

LOCAL_GATEWAY="gateway-ip-of-client-machine"
After applying the changes, save the file and exit the file.
Then run the following command to start the VPN client:
./setup-client.shYou should then enter your VPN server IP, port, hub name, VPN username, virtual adapter name, and password, as shown in the output below:
Connected to VPN Client "localhost".

VPN Client>AccountCreate vpnuser

AccountCreate command - Create New VPN Connection Setting

Destination VPN Server Host Name and Port Number: 69.28.88.203:443

Destination Virtual Hub Name: myhub

Connecting User Name: vpnuser

Used Virtual Network Adapter Name: opera1

The command completed successfully.

vpncmd command - SoftEther VPN Command Line Management Utility

SoftEther VPN Command Line Management Utility (vpncmd command)

Version 4.38 Build 9760   (English)

Compiled 2021/08/17 22:32:49 by buildsan at crosswin

Copyright (c) SoftEther VPN Project. All Rights Reserved.

Connected to VPN Client "localhost".

VPN Client>AccountPassword vpnuser

AccountPasswordSet command - Set User Authentication Type of VPN Connection Setting to Password Authentication

Please enter the password. To cancel press the Ctrl+D key.

Password: **********

Confirm input: **********

Specify standard or radius: radius

The command completed successfully.
Now it’s time to connect to the VPN server through the following script:
./vpn-connect.shIf connected, you will see the following output:
Stopping the SoftEther VPN Client service ...

SoftEther VPN Client service has been stopped.

The SoftEther VPN Client service has been started.

vpncmd command - SoftEther VPN Command Line Management Utility

SoftEther VPN Command Line Management Utility (vpncmd command)

Version 4.38 Build 9760   (English)

Compiled 2021/08/17 22:32:49 by buildsan at crosswin

Copyright (c) SoftEther VPN Project. All Rights Reserved.

Connected to VPN Client "localhost".

VPN Client>AccountConnect vpnuser

AccountConnect command - Start Connection to VPN Server using VPN Connection Setting

The command completed successfully.

vpncmd command - SoftEther VPN Command Line Management Utility

SoftEther VPN Command Line Management Utility (vpncmd command)

Version 4.38 Build 9760   (English)

Compiled 2021/08/17 22:32:49 by buildsan at crosswin

Copyright (c) SoftEther VPN Project. All Rights Reserved.

Connected to VPN Client "localhost".

VPN Client>AccountList

AccountList command - Get List of VPN Connection Settings

Item                        |Value

----------------------------+-------------------------------------------

VPN Connection Setting Name |vpnuser

Status                      |Connected

VPN Server Hostname         |69.28.88.203:443 (Direct TCP/IP Connection)

Virtual Hub                 |myhub

Virtual Network Adapter Name|opera1

The command completed successfully.
Finally, you have successfully connected to the VPN server and created a new VPN interface named vpn_opera1. To check it, run the following command:
ifconfigOutput:
eth0: flags=4163<UP,BROADCAST,RUNNING,MULTICAST>  mtu 1500

inet 69.28.85.54  netmask 255.255.254.0  broadcast 69.28.85.255

inet6 fe80::200:45ff:fe1c:5536  prefixlen 64  scopeid 0x20<link>

ether 00:00:45:1c:55:36  txqueuelen 1000  (Ethernet)

RX packets 19867  bytes 74357003 (74.3 MB)

RX errors 0  dropped 0  overruns 0  frame 0

TX packets 8098  bytes 1085017 (1.0 MB)

TX errors 0  dropped 0 overruns 0  carrier 0  collisions 0

lo: flags=73<UP,LOOPBACK,RUNNING>  mtu 65536

inet 127.0.0.1  netmask 255.0.0.0

inet6 ::1  prefixlen 128  scopeid 0x10<host>

loop  txqueuelen 1000  (Local Loopback)

RX packets 854  bytes 648247 (648.2 KB)

RX errors 0  dropped 0  overruns 0  frame 0

TX packets 854  bytes 648247 (648.2 KB)

TX errors 0  dropped 0 overruns 0  carrier 0  collisions 0

vpn_opera1: flags=4163<UP,BROADCAST,RUNNING,MULTICAST>  mtu 1500

inet 192.168.30.10  netmask 255.255.255.0  broadcast 192.168.30.255

inet6 fe80::5c86:a0ff:fe6a:a652  prefixlen 64  scopeid 0x20<link>

ether 5e:86:a0:6a:a6:52  txqueuelen 1000  (Ethernet)

RX packets 312  bytes 20440 (20.4 KB)

RX errors 0  dropped 0  overruns 0  frame 0

TX packets 292  bytes 22588 (22.5 KB)

TX errors 0  dropped 0 overruns 0  carrier 0  collisions 0
So far, you learned how to install SoftEther server. Let’s see what to do if we decide to stop using this VPN.
How to Uninstall SoftEther VPN on Ubuntu?
- Run the command below to stop the VPN server:
/etc/init.d/vpnserver stop- Use the following command to remove the registration of the VPN server:
/sbin/chkconfig --del vpnserver- Delete the file ‘’ /etc/init.d/vpnserver’’.
- Delete the directory where you have already installed the VPN server.
Where is the SoftEther VPN config file?
The vpn_server.config configuration file for the SoftEther VPN Server can be found in the directory where the SoftEther VPN Server is installed. The /usr/local/vpnserver/ is the default installation path for the SoftEther VPN Server on Ubuntu. To access the installation directory, type cd /usr/local/vpnserver/
How do I stop SoftEther Service?
Run the following command to stop the SoftEther VPN service on Ubuntu:
sudo /etc/init.d/vpnserver stopWhy is SoftEther VPN not working?
There could be different reasons that stop SoftEther. Here, you can review why SoftEther VPN is not working:
- Check if the VPN server is still running. To do this, run:
sudo /etc/init.d/vpnserver start- The firewall might block the VPN traffic. To check this, disable the firewall temporarily and then test the SoftEther VPN. If the issue is resolved, configure the firewall to allow VPN traffic then.
- The configuration settings must be checked to avoid incorrect setup. The configuration file of SoftEther is located in the directory where the SoftEther VPN Server is installed (called vpn_server.config). To view and check the configuration file content run:
sudo nano vpn_server.config- The VPN client configuration should also be checked.
- The VPN server is sometimes not accessible from the internet which causes Softether VPN not to work. So, run the command below to check if the server is correctly reachable.
ping <server_ip_address>Note: You can try reinstalling the SoftEther VPN Server if none of these fixes work.
How do I manage a remote computer’s SoftEther VPN client?
You can use the SoftEther VPN Client Remote Manager, use vpncmd, or build your own soft from source. Otherwise, follow the below steps to manage SoftEther VPN Client running on a remote computer:
- Click Start > SoftEther VPN Client Manager > Manage SoftEther VPN Client on a Separate Computer.
- Enter the destination SoftEther VPN Client computer’s name in the “Computer name” section of the “Manage SoftEther VPN Client on a Separate Computer” window.
- Click OK.
What are the Reasons for Setting up a Personal VPN server
Now that you know how to install Softether VPN, let’s review the main reasons for choosing SoftEther:
- For system administrators or VPN service providers, setting up a VPN server is the wisest way.
- You may not trust VPN service providers in terms of the possibility of intrusion and access to your personal information, so to increase the security of your data, your preference can be to set up a VPN server and take the self-host route.
- Implanting network security is a good reason to set up Linux SoftEther. For example, managing an email server protects your email data from hackers, and you can add an IP address whitelist to the firewall and allow users to access email data only by entering The IP address of the VPN server.
FAQ
What are the ports used in SoftEther VPN?
SoftEther VPN uses TCP ports: 443, 992, and 5555 to listen by default.
Which protocol is implemented in SoftEther?
SoftEther transfers its data based on TCP/IP protocol connection. Therefore, to create a SoftEther VPN, the steps must be performed through network devices and servers compatible with the TCP/IP protocol.
Summary
As a VPN service provider or a system administrator, you would find this article useful for installing and setting up Softether on your Ubuntu server.
Related Service : Buy Linux VPS
Can I install softether vpn on a server with a Wordpress on it? because we use port 443 on both of them, correct?
thanks a lot for this amazing post.. please replacethe " tar xvf " with "tar xzf"