How to Install Wireshark in Ubuntu and Analyze Network Packets
Install Wireshark in Ubuntu to analyze network traffic using an open-source tool. Install it via Ubuntu repositories to troubleshoot network issues and monitor data packets effectively.
🤖AI Overview:
Install Wireshark in Ubuntu to capture and analyze network packets for troubleshooting and monitoring. This open-source protocol analyzer requires system updates and user permission configuration. It supports detailed inspection of network traffic and security threat detection on Ubuntu systems.
Prerequisites to Install Wireshark in Ubuntu Linux
To let this tutorial work correctly, provide the options below and move on.
- A Server running Ubuntu VPS.
- A non-root user with
sudoprivileges.
Install and Configure Wireshark Network Packet Analyzer on Ubuntu
To a system admin, it is essential and ideal to be aware of network traffic activity occurring on their system. It is also professional to identify network issues and latency problems before users do. Other fans of this popular packet analyzer are network professionals and security analysts.
Let’s get started and learn How to Install, Configure, and Use Wireshark to help you start working with the most famous application to analyze network that is compatible with over 2,000 network protocols.
Step 1. Update System & Install Wireshark
Since Wireshark is available on all major Linux distributions, the universe repository of Ubuntu includes Wireshark and is enabled by default. However, you are recommended to use the below commands to update the Ubuntu system and enable the universe repository to install Wireshark in Ubuntu.
You can install Wireshark in Ubuntu through both methods of Ubuntu repository and PPA on Ubuntu. To download Wireshark, use the Install Wireshark Ubuntu command line:
sudo add-apt-repository ppa:wireshark-dev/stable
sudo apt update
sudo apt install wireshark
In this way, you can use the official PPA that Wireshark developers provide to install the latest stable version of Wireshark on Ubuntu/Ubuntu-based distributions.
Step 2. Configure Wireshark on Ubuntu
When prompted for confirmation after executing the aforementioned program, select Y, press Enter, and Wireshark will begin to install on your computer. The following dialog will show up during the Wireshark installation, asking if you want to permit non-superusers to collect packets. It is preferable to leave it disabled and press Enter because turning it on can pose a security risk.
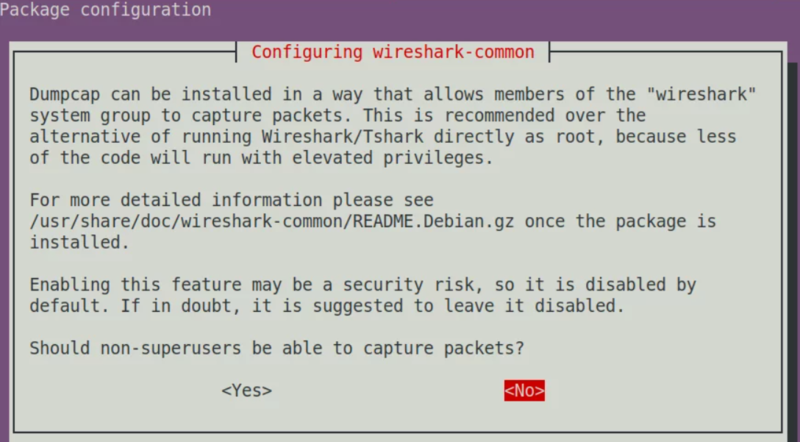
In this way, you have prevented non-superusers from capturing packets.
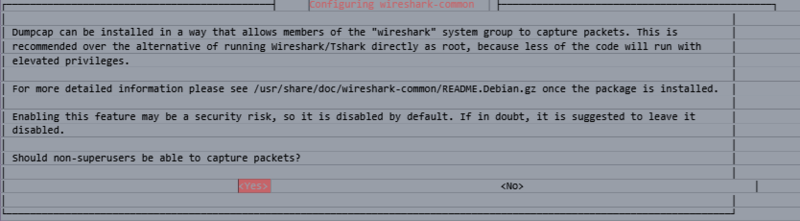
Note: If you selected No, run the command below as root:
sudo dpkg-reconfigure wireshark-commonChoose Yes by using the tab key, followed by the enter key.
You can also check if Wireshark is installed by using the command below:
$ wireshark --versionYou must add the non-superuser user to the Wireshark group since you have permitted them to capture packets. Join the Wireshark group by using the usermod command:
sudo usermod -aG wireshark $(whoami)And to change dumpcap binary file permissions, type:
sudo chgrp wireshark /usr/bin/dumpcap
sudo chmod 750 /usr/bin/dumpcap
sudo setcap cap_net_raw,cap_net_admin=eip /usr/bin/dumpcap
Once your user has been added to the wireshark group, you can go back to your original account:
su <account name>Remember to replace <account_name> with your actual account name:
su operaAt this point, you are recommended to restart your Ubuntu system to apply the required modifications to your system.
$ sudo rebootHow to Launch Wireshark in Ubuntu
Now that you passed all the required steps, installing Wireshark in Ubuntu must have been successfully ended. Let’s see how to start Wireshark in Ubuntu. The CLI or the application launcher can be used to start the Wireshark program. Simply put Wireshark into your console to begin from the CLI to open Wireshark from terminal Ubuntu:
$ sudo wiresharkYou can start Wireshark via the GUI if you are logged in as the root user. In the search bar, enter Wireshark by pressing the super key. Click the Wireshark symbol to open it when it displays.
Activities > Show Applications > Wireshark.

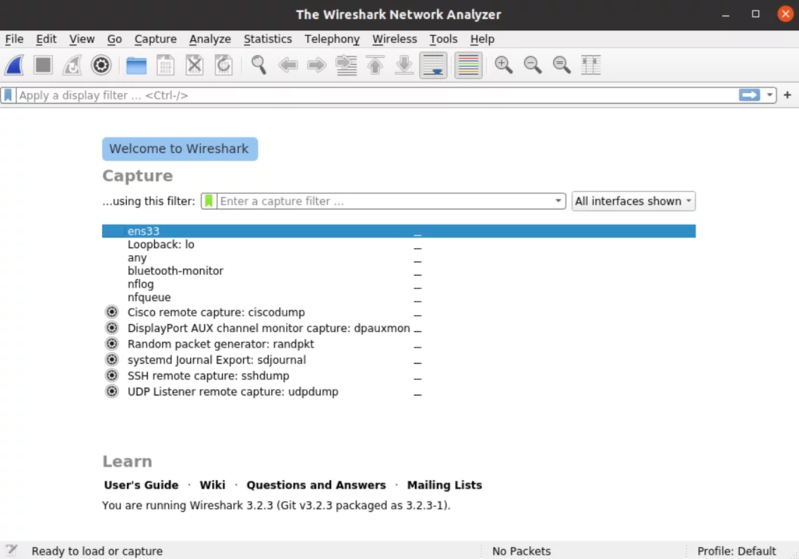
Remember that if you run Wireshark without root or sudo privilege, you won’t be able to record network data. When Wireshark opens, the default view that appears is as follows:
How to Use Wireshark on Ubuntu
Wireshark is a robust tool with lots of capabilities. It contains a command-line tool called tshark that operates similarly to it but via a terminal rather than a graphical user interface. Also, the pcap library is used by Wireshark to capture network packets.
In this part, you will learn how to use some of the most important features of Wireshark and customize it for better usage.
Capture Packets Using Wireshark on Ubuntu
Once you install Wireshark in Ubuntu as a network analysis and packet analyzer tool, you will certainly use it to capture packets. You can utilize a list of interfaces to and from which to collect packets when you launch Wireshark. With Wireshark, you can monitor a wide variety of interfaces, including external devices, wired interfaces, and more.
Follow the below path to learn how to capture packets:
- Choose the interface on which you wish to capture packets from the list of possible network interfaces in the Wireshark window.
- As seen in the screenshot below, click the start button located in the toolbar at the top to begin capturing packets on the chosen interface.

In the event that there isn’t any traffic right now, you can create some by going to any website or by using a networked file. Subsequently, the collected packets will appear on the screen in real-time.
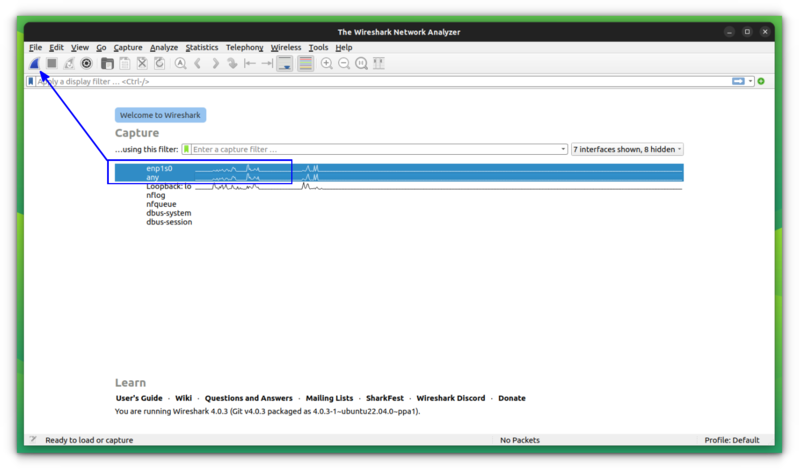
- Packets to and from many interfaces can be simultaneously captured. Simply click on the interfaces you wish to capture to and from while holding down the CTRL button, and then click the icon that says “Start capturing packets,” as shown in the figure below.
- Click the stop button, as indicated in the screenshot below, to end packet capture.
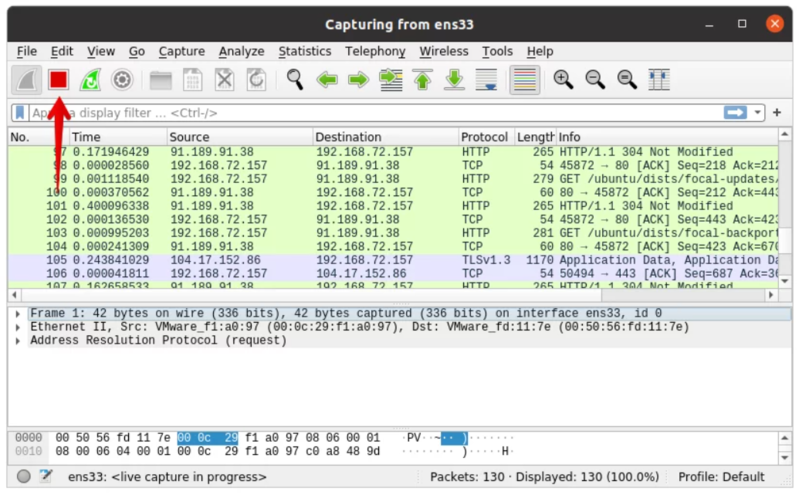
- Three panes comprise Wireshark, as seen in the screenshot above:
- The highest panelist among all the packets Wireshark was able to collect.
- Each selected packet’s packet header details are displayed in the main pane.
- Each selected packet’s raw data is displayed in the third pane.
Display Filter Using Wireshark on Ubuntu
As we mentioned earlier, the display filter is one of the Wireshark features that help you save time and be more accurate. Wireshark has a strong filtering engine built in. By removing distractions and concentrating on particular traffic, display filters can help you solve problems more quickly. For instance, use the http filter to observe only HTTP traffic. The screenshots above demonstrate how Wireshark shows a lot of packets for a single network activity. Thousands of packets are exchanged back and forth on your network in a typical network. Searching through hundreds of recorded packets to locate a specific one is really challenging. This is where Wireshark’s display filtering feature kicks in.
You can limit the sorts of packets that Wireshark displays to those that match your search criteria. It simplifies the results and helps you locate what you’re looking for in this way. The results can be filtered according to a number of criteria, including protocols, source and destination IP addresses, and port numbers.
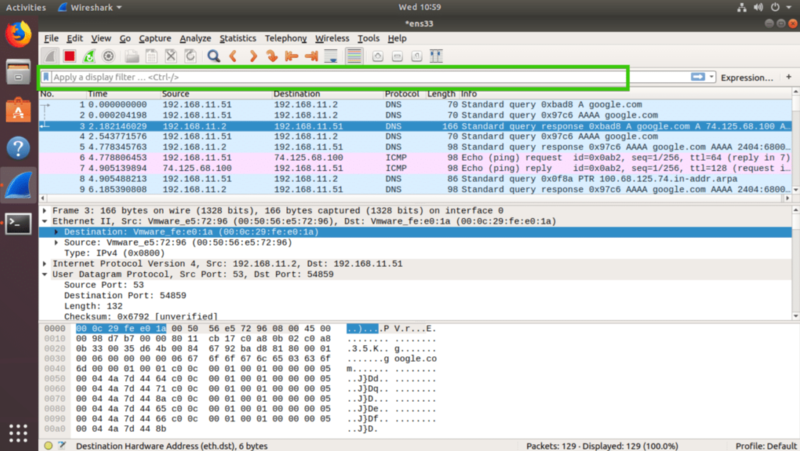
You can utilize a number of pre-defined filters in Wireshark. Wireshark offers name suggestions to assist with auto-completion as you type the filter name. Enter the name of the protocol in the “Apply a display filter” section beneath the toolbar to limit the number of packets that display to those that contain it.
As seen in the example below, you can filter packets by simply typing the filter expression into the textbox.
Additionally, Wireshark’s packets can be graphically filtered. Click the Expression… button as seen in the screenshot below to accomplish it.

The screenshot below should show what happens when a new window opens. You can now construct a filter expression to perform a highly targeted packet search.
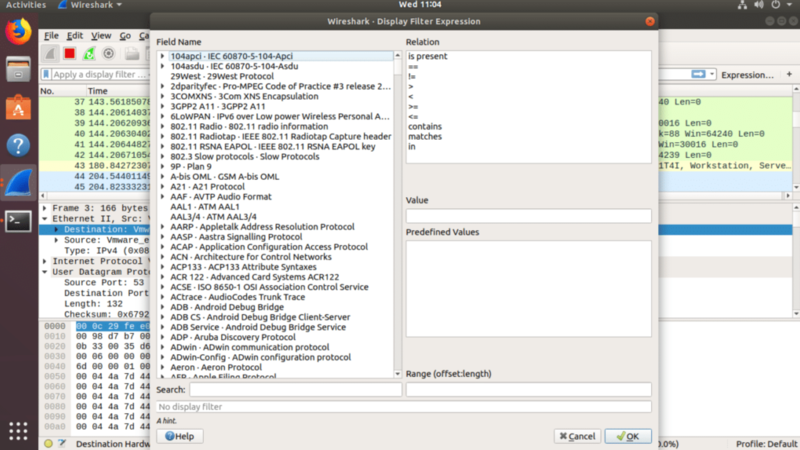
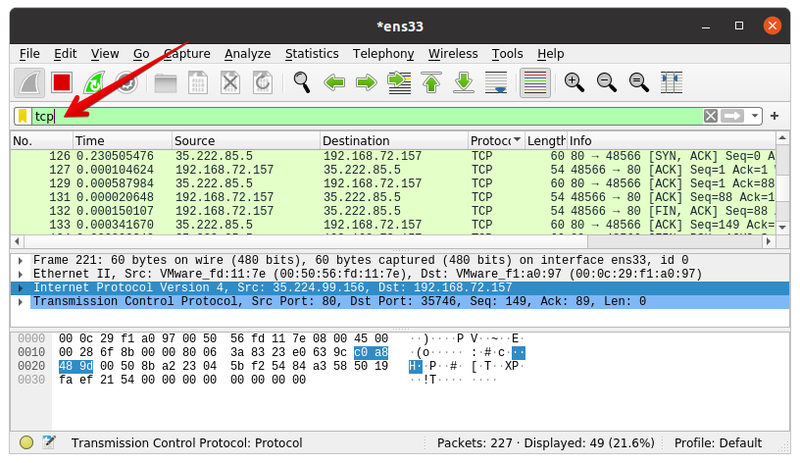
Nearly every networking protocol is listed in the Field Name section. There is a long list. You can use the Search textbox to key in the protocol you’re looking for, and the Field Name section will display the ones that match.
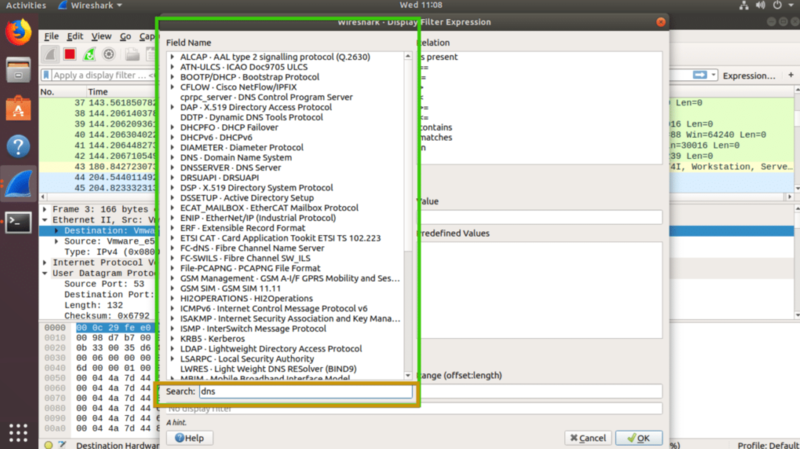
For example, if you type tcp, you will see just the TCP packets from every packet that was collected. You’ll only see TCP packets after inputting the filter name.
We tried to present an introduction to the best features of Wireshark. You must go over and play with each feature of Wireshark in order to gain a firm understanding of it.
Save Captured Packet data to File
It can be useful to save your packet data for later examination if you’re working on an especially complicated analysis. This enables you to share the info with others or come back to the issue at a later time. You can save your packet data by using File > Save As.
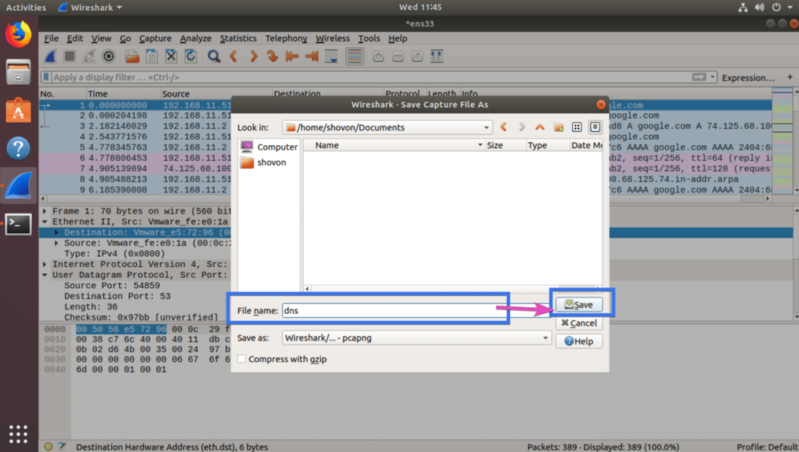
In this way, the file will be saved.
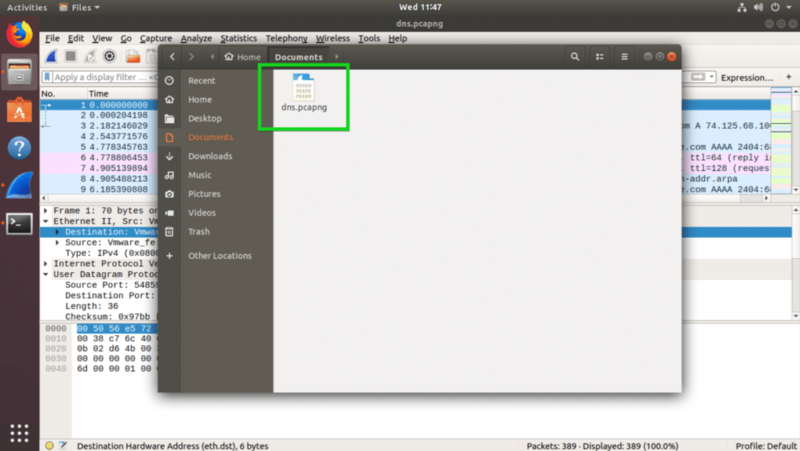
The saved packets can now be opened and examined at any time. Use <Ctrl> + o or File > Open from Wireshark to open the file. Next, choose the file and press the Open button.
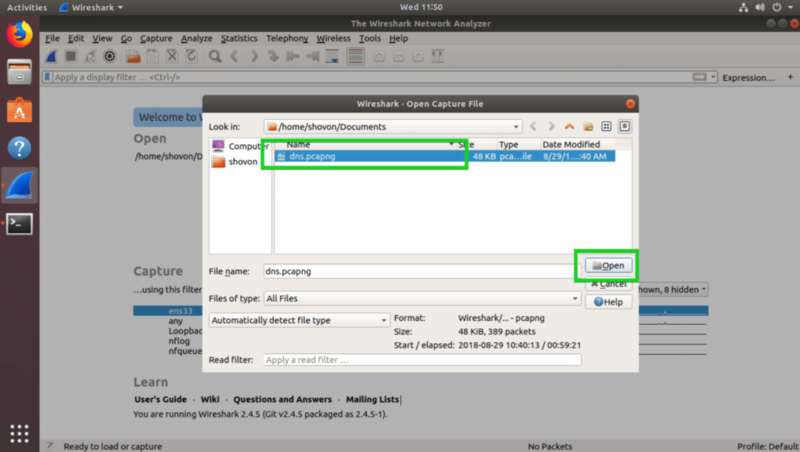
Now, you can use the captured packages by loading them from the file.

Tips To Use & Customize Wireshark on Linux Ubuntu
- View packets with details: you can use the
ping google.comin the terminal. Once you click on a specific packet, details about its associated TCP/IP protocol layers become visible. - Personalize the Wireshark interface: With a wealth of customization options, Wireshark lets you adjust the interface to your tastes. For example, you have the ability to design your own custom columns, rearrange the data columns, and select which ones are shown. Click Edit > Preferences to begin customizing your workspace.
- Make use of color coding: It can greatly increase the effectiveness of your analyses. With Wireshark, you may establish color rules for various traffic types, which facilitates visual distinction between them. This option is available by selecting View > Coloring Rules.
- Recording Filters: Moreover, you can filter recording session traffic based on parameters like protocol, destination, etc. that raise red flags for you. This option is located under the “Capture Filter” entry in the “Capture” menu.
How to Update Wireshark in Ubuntu
Let’s go through this part and learn How to Update Wireshark on Ubuntu after you Install Wireshark Ubuntu 22.04 or 20.04. It is essential to keep your Wireshark installation up to date for a number of reasons. Updates can fix software faults, add new functionality, or repair holes in the security system.
To do this, run:
sudo apt updateThis command refreshes your system’s designated repositories with the most recent versions of the software that is available. Execute the following command to upgrade your APT packages:
sudo apt upgradeHow to Uninstall Wireshark on Ubuntu
You might eventually find that Wireshark is not necessary on your PC. If so, system resources can be freed up by thoroughly and successfully uninstalling the software.
This command can be used to remove Wireshark on Ubuntu 22.04 or 20.04:
sudo apt remove wiresharkIt is recommended as a best practice and security precaution to remove the Personal Package Archive (PPA) from your system after uninstalling Wireshark if you installed it via one initially.
The command to remove the PPA is as follows:
sudo add-apt-repository --remove ppa:wireshark-dev/stable -yConclusion
Learning how to install Wireshark in Ubuntu equips you with a powerful tool for network diagnostics and security analysis. This guide covered all essential steps, from installation to configuration, usage, and security considerations, tailored for beginners.
By following best practices outlined here, you can safely and effectively use Wireshark to monitor and troubleshoot your network. Always keep your system and software updated to ensure optimal performance and security.
We encourage you to explore Wireshark’s extensive documentation and experiment with different filters and captures to deepen your understanding. Network analysis can be challenging initially, but with patience and the right tools, it becomes an invaluable skill.
FAQ
2. How can I install Wireshark on Ubuntu?
Update your system and run "sudo apt install wireshark". For the latest version, use the official PPA if needed.
3. Is it safe to allow non-root users to capture packets?
It poses security risks but can be configured safely by adding the user to the Wireshark group.
4. How do I start Wireshark after installation?
Launch it from the applications menu or run "sudo wireshark" in the terminal.
5. What features does Wireshark offer for network analysis?
It captures live packets, provides detailed views, supports filtering, and aids troubleshooting.
6. How do I update Wireshark on Ubuntu?
Run sudo "apt update" and "sudo apt upgrade" to keep Wireshark current.
7. How can I uninstall Wireshark if necessary?
Use "sudo apt remove wireshark"; remove PPA if used.
8. Can I save captured packets for later?
Yes, save using "File > Save As" and reopen for offline analysis.
9. What if I cannot capture packets without root access?
Add your user to the Wireshark group and adjust permissions, then restart.
10. How does filtering help in Wireshark?
Filters display only relevant packets, simplifying analysis and focusing on specific traffic.