Setup IKEv2/IPsec VPN on Windows, Linux, Mac, Android, ios
Setting up IKEv2/IPsec VPN on various platforms such as Windows, Linux, Mac, and Android involves Configuring VPN on a VPS server, accessing the generated certificate and VPN authentication information, importing the IKEv2 VPN configuration file to the desired device and manually configuring through Network Connections.
How to configure IKEv2 VPN client on Windows?
After downloading or transferring the IKEv2 configuration file to a Windows device, having IKEv2 VPN Server Information (server address, hostname or IP address, VPN Username and Password), and ensuring you have Administrator Access, follow the instructions:
Setup IKEv2 VPN client on Windows8/10/11
1. Open the “Start” menu, type “cmd.exe” in the search bar, right-click the cmd.exe entry, and click “Run as administrator.”
2. Import the IKEv2 VPN configuration file (usually with .p12 extension) to Windows (Windows 7, 8, 10, and 11) by running the following command:
# Import Certificate (replace with your own value (.p12 file))
certutil -f -importpfx "\path\to\your\file.p12" NoExport
3. Enter the VPN server password for client config files. (if you have not set up a password for the client config file, press Enter to skip the password field.)
4. After ensuring importing client CA cert, create a VPN connection in Windows 8, 10, and 11 using the following command:
# Create VPN connection (replace server address with your own value)
powershell -command ^"Add-VpnConnection -ServerAddress 'Your VPN Server IP (or DNS name)' ^
-Name 'My IKEv2 VPN' -TunnelType IKEv2 -AuthenticationMethod MachineCertificate ^
-EncryptionLevel Required -PassThru^"
# Set IPsec configuration
powershell -command ^"Set-VpnConnectionIPsecConfiguration -ConnectionName 'My IKEv2 VPN' ^
-AuthenticationTransformConstants GCMAES128 -CipherTransformConstants GCMAES128 ^
-EncryptionMethod AES256 -IntegrityCheckMethod SHA256 -PfsGroup None ^
-DHGroup Group14 -PassThru -Force^"
The server address in the output of the IKEv2 helper script should match the server address you have entered.
5. Now everything is set to route your traffic through VPN, so click the “Wireless/Network” icon in the system tray, choose “VPN,” and click the “Connect” button.
6. To verify the VPN connection, search your IP address by visiting a website like https://whatismyipaddress.com/ to confirm that the VPN server’s IP address has been replaced with your IP address.
Note: previous commands do not work on Windows 7. To add a new VPN connection, we will manually create the VPN connection in Windows 7 in the following.
Set up Ikev2/IPSec VPN on Windows 7
1. Download the Ikev2/IPSec VPN configuration file and import the Certificate by starting the Cert Installer and entering your login credentials.
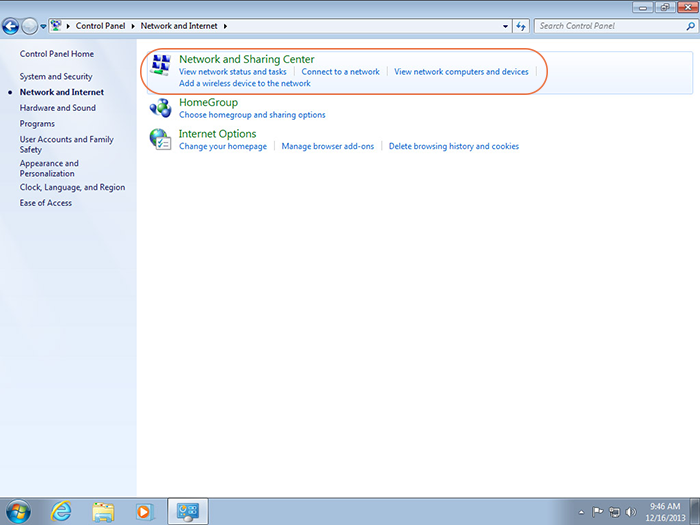
2. Open the Windows Start menu and navigate to Control Panel > Network and Internet >Network Sharing Center.
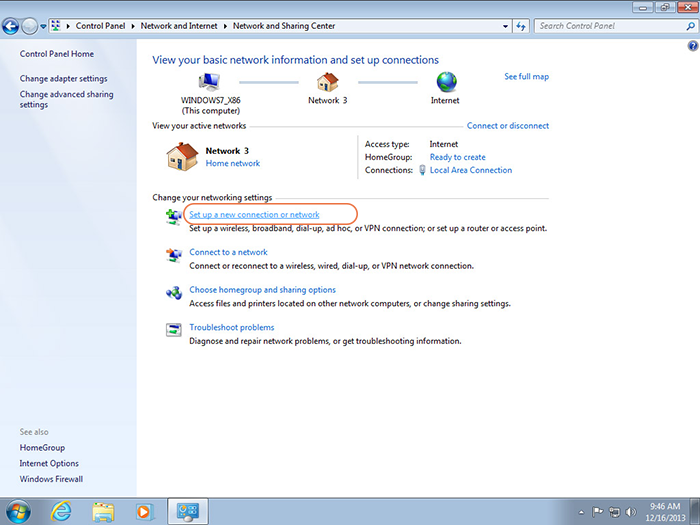
3. Select “Set up a new connection or network.”
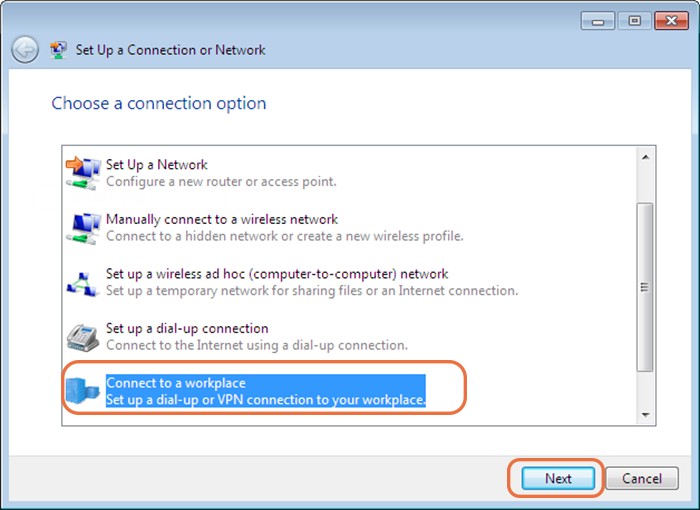
4. Click “Connect to a workplace” and “Next.”
5. Choose “Use my Internet connection (VPN).”

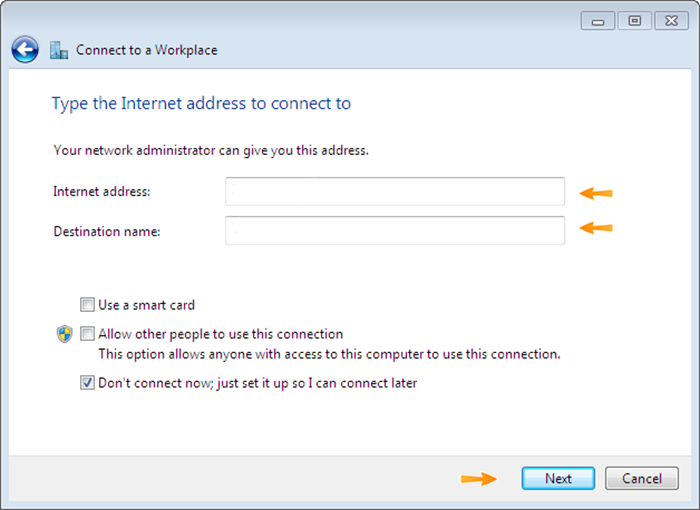
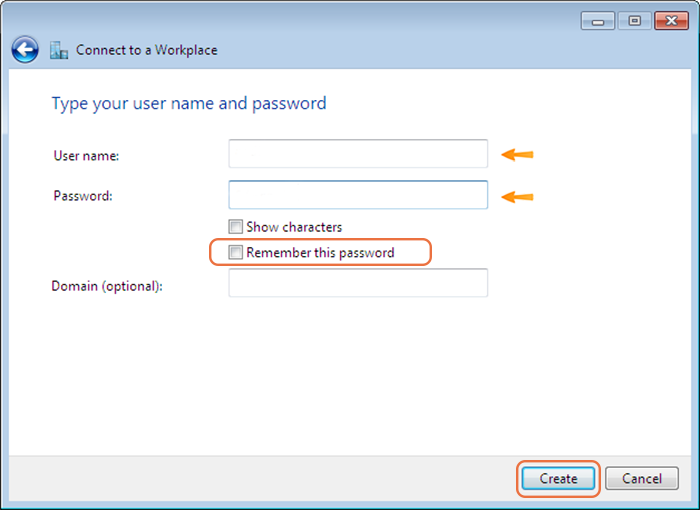
6. Enter VPN server Details:
- Internet address: enter server address or hostname.
- Destination name: specify a descriptive name for the VPN connection.
- Click the “Next” button to proceed.
- Type your username and password in related fileds.
- To save your username and password for every connection, check the check box next to “Remember my credentials.”
- Click on “Create” button.
7. Configure Security:
- Once you connect by default, right-click on the newly created VPN connection, select the “Properties” option, and adjust security settings.
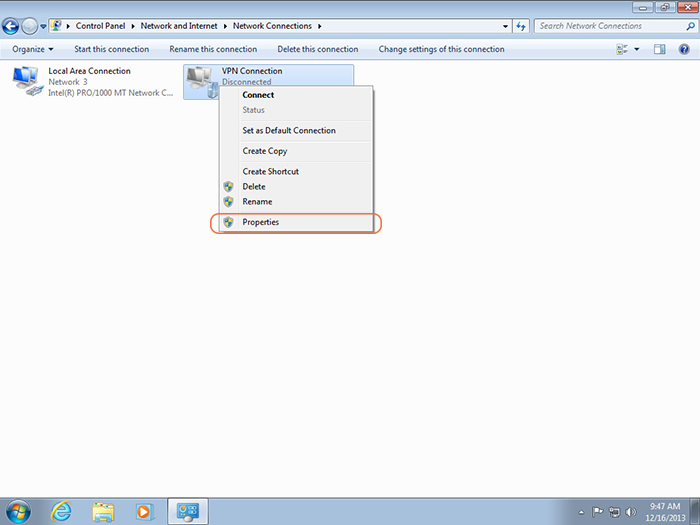
- Choose the “Security” tab.
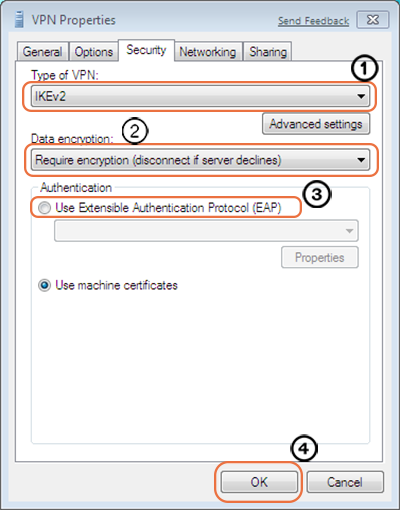
- Under the Security tab, set “IKEv2” as the VPN type.
- Set “Require encryption” for data encryption.
- Enable “Use Extensible Authentication Protocol (EAP)” by marking the box.
- Click “OK” to save the changes.
8. Connect to the IKEv2 VPN on Windows:
- Click on the VPN connection in the network list.
- Enter your VPN credentials.(if needed)
- Click “Connect“.

By displaying the Connected status under the VPN connection, you can verify your VPN connection works properly.
How to disconnect the IKEv2 VPN connection on Windows?
- Click on the network connection icon in the system tray.
- Select your IKEv2 VPN connection from the list of available networks.
- Click the “Disconnect” button below the connection name to terminate the IKEv2 VPN connection on Windows.
How to remove the IKEv2 VPN connection on Windows?
Navigate to the start menu > Network Connections or Network Sharing Center > Change adapter settings > right-click on the IKEv2 VPN connection > click the Delete and Yes buttons.
Alternatively, you can open Settings, select Network & Internet, click the VPN tab, select the IKEv2 VPN connection you want to remove, and click Remove or Delete the connection.
Why cannot connect to the VPN server on Windows?
- Check the firewall to allow access to the VPN server.
- Ensure the VPN server address you specified on your VPN client is correct.
- Don’t use the DNS name to connect if it was not set up when configuring IKEv2.
- Check for potential errors in the VPN logs and status.
- Check network issues between the VPN client and server.
How to Set Up and Use IKEv2/IPsec VPN on Linux?
IKEv2 VPN client configuration on Linux involves installing strongSwan software and required plugins for Network Manager along with accessing VPN server details (like server address, credentials, and encryption setting) to add a new IKEv2 VPN connection on Linux.
1. Install strongSwan plugin:
Launch the terminal and update your package lists, then install the strongSwan package and any necessary plugins for Network Manager using the specific distro’s package manager using the following command with root privileges:
Ubuntu/Debian:
sudo apt-get update
sudo apt-get install -y strongswan network-manager-strongswan libcharon-extra-plugins
RHEL/ CentOS:
sudo yum install epel-release
sudo yum --enablerepo=epel install NetworkManager-strongswan-gnomeFedora:
sudo yum install NetworkManager-strongswan-gnomeArch Linux:
sudo pacman -Syu  # upgrade all packages
sudo pacman -S networkmanager-strongswan
2. Import IKEv2 VPN configuration file and extract CA certificate
To import the IKEv2 VPN configuration file (.p12) to your Linux system and extract the CA certificate, client certificate, and private key, run the below commands:
openssl pkcs12 -in vpnclient.p12 -cacerts -nokeys -out ca.cer
openssl pkcs12 -in vpnclient.p12 -clcerts -nokeys -out client.cer
openssl pkcs12 -in vpnclient.p12 -nocerts -nodes  -out client.key
rm vpnclient.p12
Replace “vpnclient.p12” in the previous commands with your value.
Note: you may prompted to enter the password that is displayed in the output of the IKEv2 helper script.
To change the ownership of the files ca.cer, client.cer, and client.key to the root user and the root group and set the read and write permissions to the files, run the following command:
sudo chown root:root ca.cer client.cer client.key
sudo chmod 600 ca.cer client.cer client.key
3. Set up IKEv2 VPN connection:
- Open Settings and go to Network.
- Click the “+” icon in the VPN section.
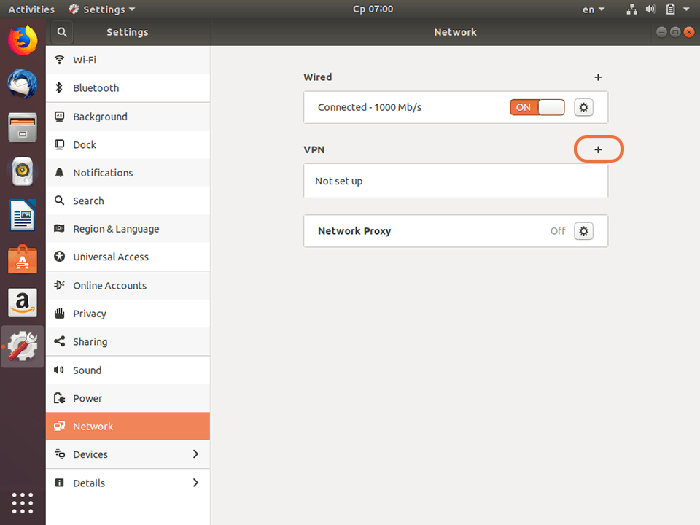
- Select “IPsec/IKEv2 (strongswan)” for the type of connection.
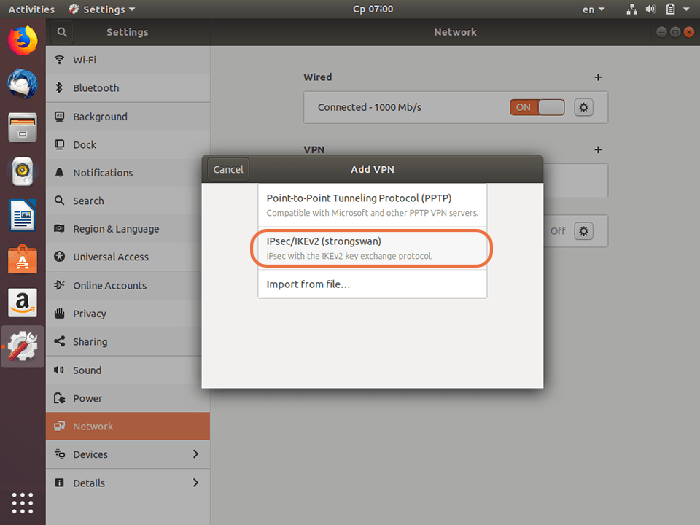
- Specify a unique name for the VPN connection.
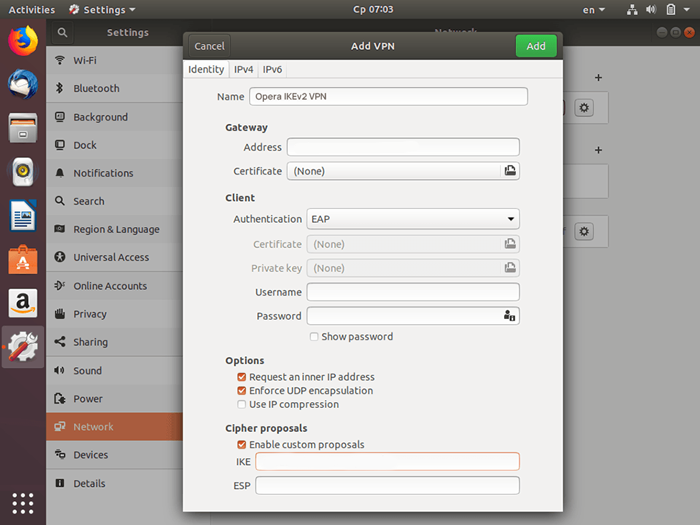
- Enter Your VPN Server IP in the Gateway Address.
- Import ca.cer file for Certificate.
- Under Client section, set Certificate(/private key) for Authentication.
- Select Certificate/private key for client Certificate (if it exists).
- Import cer file for Certificate (file) and client.key file for Private key.
- Ensure that the “Request an inner IP address” and “Enforce UDP encapsulation” options are enabled from the options section.
- Under the Cipher proposals, check the check box next to the Enable custom proposals.
- Skip the IKE filed without any changes.
- Set “aes128gcm16” for the ESP field.
- Set disable in the IPv6 method section on the IPv6 tab to avoid IPv6 leaks(optional).
- To save VPN details, click on the “Add” button.
4. Connect to IKEv2 VPN:
To connect to the IKEv2 VPN on Linux, find the Network Manager icon in the notification bar, click on the icon, select the desired IKEv2 VPN connection from the VPN section, and click on Connect.

How to connect VPN in Linux using command line?
To connect to the VPN in Linux using the command line, open the terminal (pressing the Ctrl+Alt+T keys) and run the following command:
sudo nmcli c up VPNHow to disconnect IKEv2 VPN in Linux?
Click on the Network Manager icon in your system’s notification area, select your IKEv2 VPN connection, and click “Turn off ” or ” Disconnect” in the VPN section.
To disconnect the IKEv2 VPN on Linux using the command line, use the following commands:
sudo nmcli c down VPNOr
sudo ipsec down <connection_name>How to check VPN connection status in Linux?
To verify your VPN connection, visit the “whatismyipaddress.com” website and check your IP address has changed to Your VPN Server IP so that you can confirm your traffic is being routed properly.
Alternatively, you can use the terminal to check your VPN status by running the following command:
ifconfigLook for interfaces named tun0 or tap0 in the output; if your IP address is assigned to one of them, you can verify that your VPN connection is active.
Also, using the nmcli connection show –active command helps to identify all active connections, including your VPN connection (if it’s active).
How do I remove IKEv2 VPN in Linux?
- Open “Settings” or “System Preferences“.
- Navigate to the “Network” or “Wi-Fi” section.
- Select “VPN settings“.
- Find your IKEv2 VPN connection by name.
- Click the “Remove VPN” button in the details tab.
How to connect to IKEv2/IPsec VPN in macOS?
After transferring the IKEv2 VPN configuration file to your macOS device, downloading the IKEv2 certificate file, and having the IKEv2/IPsec VPN server details in hand, follow the below instructions:
1. Import IKEv2 certificate file:
Your keychain app will automatically launch by opening the downloaded IKEv2 certificate file. To proceed with modifying the system keychain, you must enter your password.
The Keychain Access pop-up prompts you to confirm that you are adding the certificate.
Double-click the newly imported VPN certificate, and set IP Security (IPSec) to Always Trust by selecting “Always Trust” for “when using this certificate” under the “Trust” section in the properties window.
Enter your password again, and the settings will update.
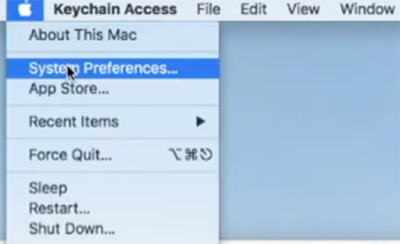
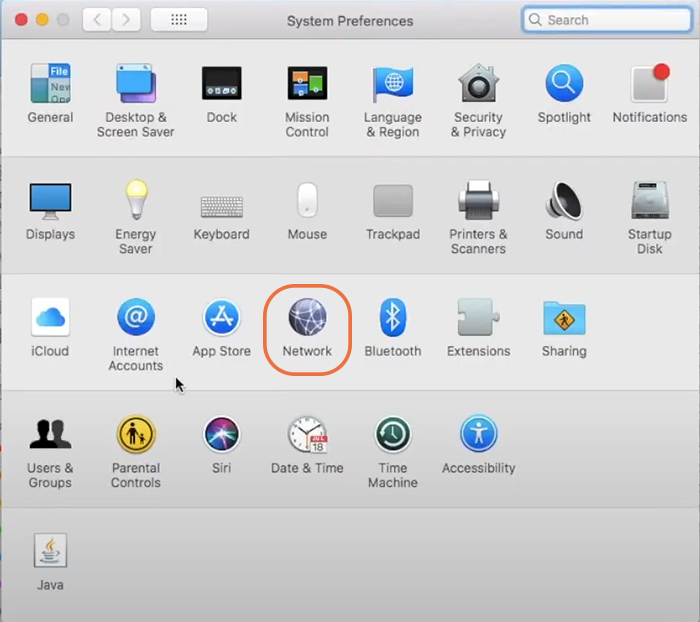
2. Create IKEv2 VPN connection on a macOS device:
- Go to the Apple menu > “System Preferences.”
- Select “Network” and click on the “+” icon to set up a VPN connection.
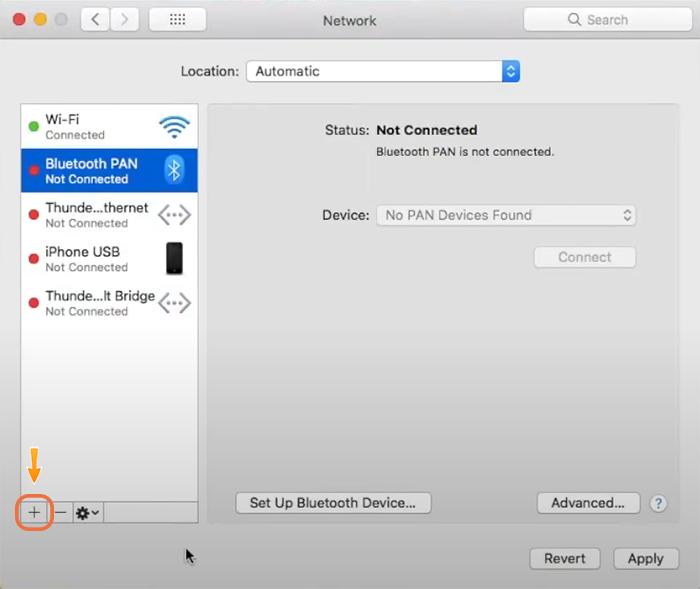
- In the window that appears, select VPN for Interface.
- Set IKEv2 for VPN Type.
- Choose a special name for a VPN connection.
- Click “Create“.

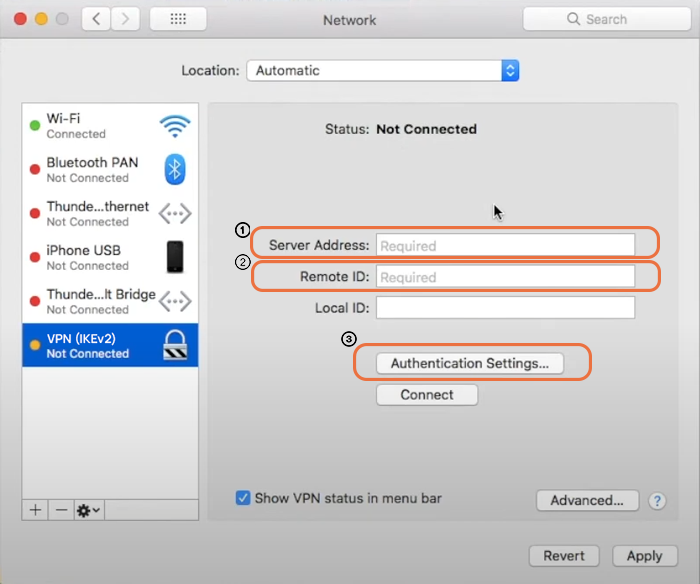
- Enter your VPN server’s IP address or server’s domain name in the “Server Address” and “Remote ID ” fields.
- Click the “Authentication Settings” button.
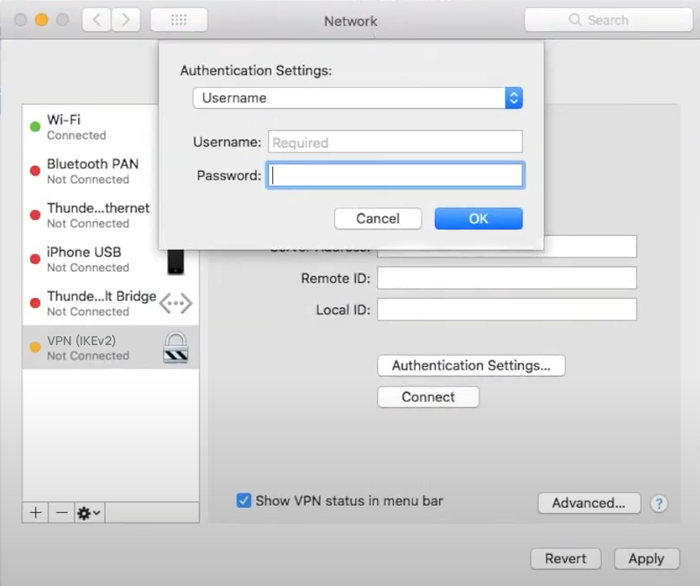
- Set Username for Authentication.
- Enter your username in the “Username” field.
- Enter your password in the “Password” field.
- Click on the “OK” button.
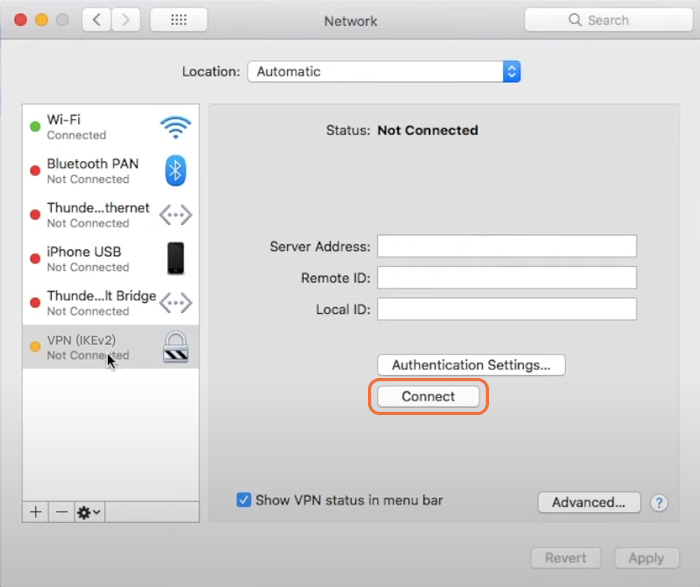
- Ensure to check the “Show VPN status in menu bar” checkbox.
- Click the “Apply” button.
3. Connect to IKEv2 VPN on macOS:
Select a newly created VPN connection, and click on “Connect.”
Displaying the VPN icon in the menu bar indicates the VPN is active.
You can also manage your VPN connection (Connect or Disconnect ) through the VPN icon shown in the top menu bar.
4. Verify the VPN connection:
Once the VPN connection is established, launch your browser and search “my ip.”
If your IP address is changed to the VPN server’s IP address, you can confirm that your VPN is working correctly.
How to remove IKEv2 VPN on MacOS?
To delete the VPN connection on macOS, open System Preferences, select profiles, and remove the IKEv2 VPN profile by clicking the minus symbol.
How to configure IKEv2 VPN client on iOS device
First, you need to import the IKEv2/IPsec VPN configuration file to your iOS device via AirDrop or using File Sharing or download from mail or a secure website. Then follow the below steps:
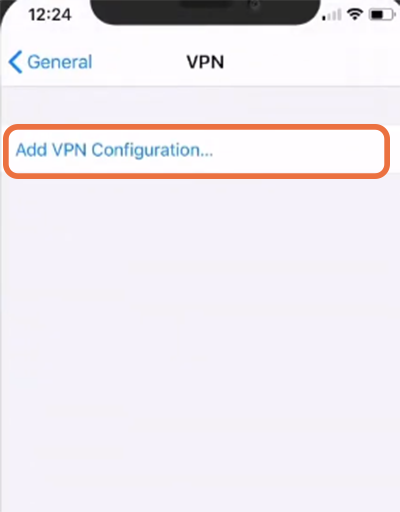
1. Open the “Settings” app on your iOS device.
2. Go to General > VPN.
3. Click on the “Add VPN Configuration” button.
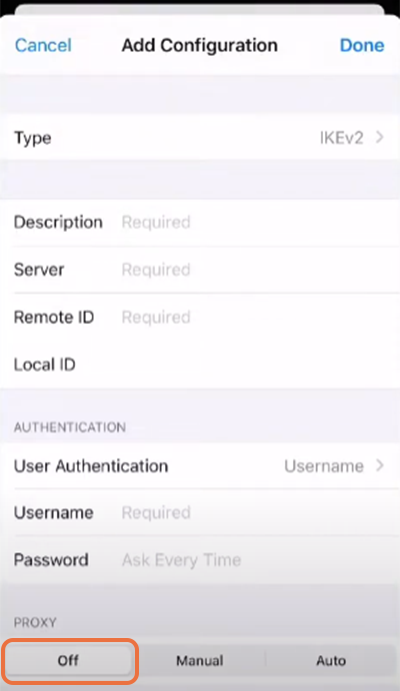
4. Configure IKEv2 VPN based on VPN server information:
- VPN Type: Set IKEv2 as VPN Type.
- Description: type description or specify name for VPN connection.
- Server: enter the server’s IP address or domain name.
- Remote ID: same as the Server field.
- Local ID: leave the local ID field empty.
- User Authentication: set Username for Authentication.
- Username: Enter your VPN username.
- Password: Enter your password.
5. Disable Proxy by choosing the off tab.
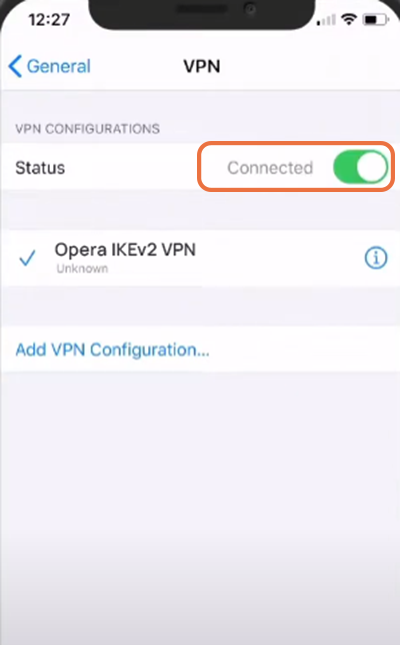
6. Turn the VPN switch ON to connect to the IKEv2/IPsec VPN service.
Once the VPN connection is established, you can see connected states next to the VPN status, and the VPN icon will display on the status bar.
How to disconnect VPN on an iOS device?
Go to settings, tap on VPN, select desired VPN connection with its special name and disconnect the VPN connection by toggling the Status button to the Off position.
How to delete IKEv2 VPN connection on iOS?
To remove the IKEv2 VPN connection:
Go to Settings > General > VPN & Device Management, select VPN profile, and Click Delete VPN.
How to add IKEv2 VPN connection on Android?
Before setting up IKEv2 VPN connection on Android, you need to transfer the IKEv2 VPN configuration file (.SSWAN profile) and CA certificates to your Android device and install the strongSwan VPN client (recommended) from Google Play Store.

1. Configure VPN settings:
You have two options: 1. Add IKEv2 VPN by importing the VPN profile 2. Manually add IKEv2 VPN
Method1:
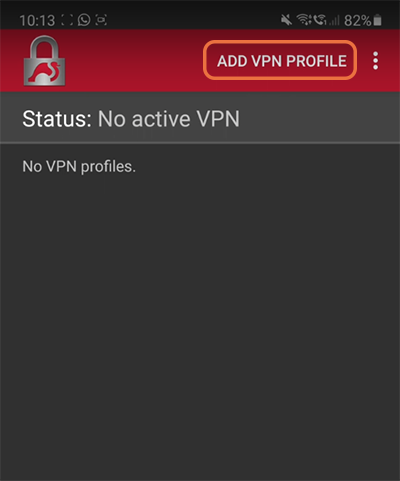
- Open strongSwan VPN client.
- Tap on three vertical dots next to the Add VPN Profile option.
- Tap “Import VPN profile“> “Files“.
- Select .SSWAN profile you transferred to your device before.
- Enter your username.
- Save your credentials.
- Select “Import“.
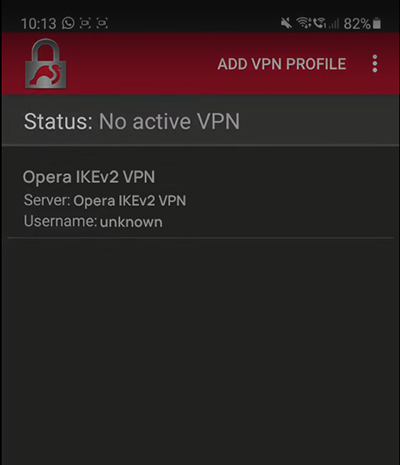
- Select your VPN profile to connect to IKEv2 VPN.
Method2:
- Import the Certificate to your Android device from email or other methods.
- Open strongSwan VPN Client.
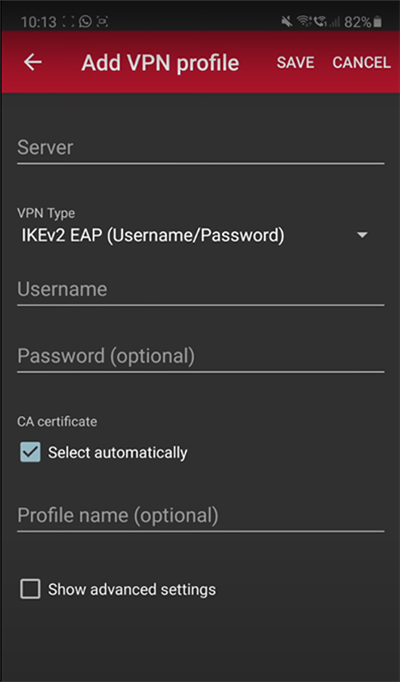
- Tap “Add VPN Profile“.
- Enter the VPN server’s IP address or Domain name in the “Server” field.
- Set “IKEv2 EAP (Username/Password)” for “VPN Type.”
- Paste Login username in the “Username” field.
- Paste the password in the “Password” field.
- Enable the CA certificate for Select automatically by checking the check box.
- Specify the desired VPN connection name.
- To add DNS servers to the strongSwan profile for resolving local FQDNs through the VPN, enable “Show Advanced Settings” and enter the IP address of the DNS server in the ” DNS server ” field. (Optional)
- Tap Save to save the VPN configuration.
2. Connect to IKEv2/IPsec VPN on Android
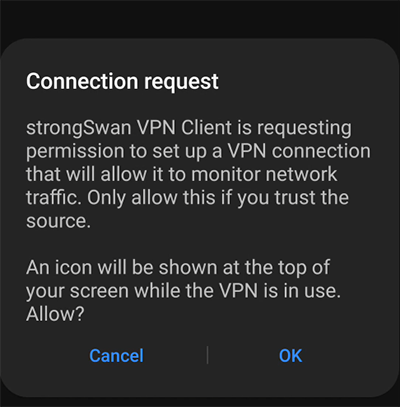
Connect to IKEv2 VPN by tapping the newly created VPN profile and confirming the app prompt that wants you to trust the app.
3. Verify your VPN connection
Check your IP address by visiting the “whatismyip” website; if your IP address has changed to the VPN server’s IP address, that means your traffic is routed through the VPN.
Conclusion
Once you connect to IKEv2/IPsec VPN on various platforms, a secure tunnel between your device and the server will establish that acts like a private and encrypted pathway for your data to transfer.
To improve the security of your connection, keep your device and VPN client update and monitor for DNS leaks and IP leaks by various tools.
If you get in trouble for connecting to a VPN, check the Firewall Rules to allow necessary traffic through the VPN tunnel.