How To Setup L2TP VPN Server on Mikrotik, Linux, Windows
L2TP/IPsec is a built-in VPN protocol on many operating systems and an efficient way to transmit Internet traffic through a VPN tunnel.
L2TP, built into many operating systems, creates a secure tunnel for your internet traffic, but it relies on IPsec for encryption.
Setup L2TP VPN Server on your operating system offers a good balance of convenience and security for everyday web browsing and email.
What do I need to set up L2TP on MikroTik?
Before stepping into the MikroTik L2TP server setup, we would better see and gather what we need for the MikroTik l2tp VPN setup.
- A MikroTik VPS or router.
- Winbox Software.
Instructions for Installing an L2TP VPN on a MikroTik Server
Let’s see how to set up an L2TP VPN server on Mikrotik VPS through the PSK (Pre-Shared Key) method in 4 easy steps.
Step 1: Add Firewall Rule
First, we must set a firewall rule to allow the VPN’s traffic to go through the server.
- Connect to your MikroTik server or router, enter into Winbox, and from the left menu, go to IP ⇒ Firewall.
- In the Firewall window, go to the NAT tab and click on the blue plus (+) sign to create a new rule.
- Click on the Action tab in the “New NAT Rule” window. Then, click on the Action drop-down menu and select the “Masquerade” option.
- Click on the OK button to finish creating the rule.

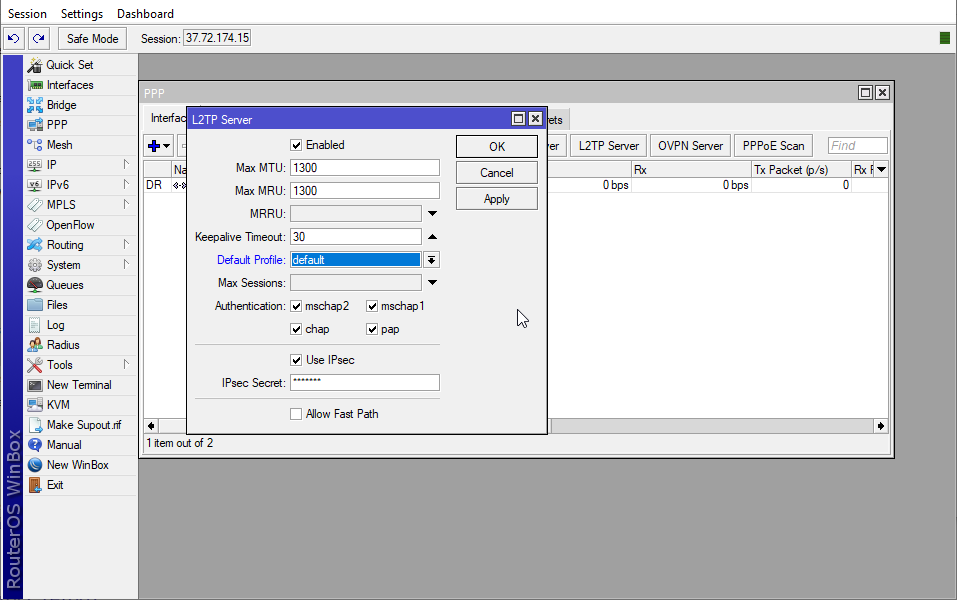
Step 2: Activate L2TP Server
Now, we need to enable the L2TP VPN protocol on the server.
- From the left menu in Winbox, open the PPP window.
- In the newly opened window, go to Interface ⇒ L2TP Server.
- In the “L2TP Server” window, check the “Enabled” and “IPsec Secret” boxes, or put “Use IPsec” on “required.”
- In the “Default Profile” section, select the default option.
- You need to provide a passphrase and put it in the “IPsec Secret” section. We will need it, so remember to write it down.
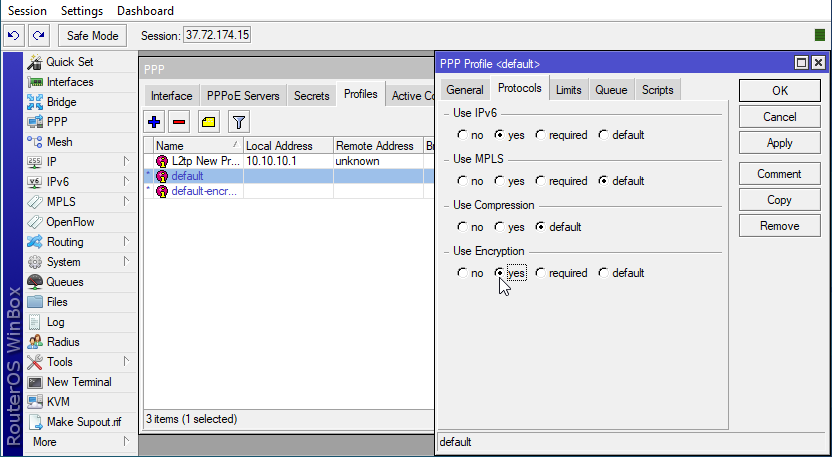
Step 3: Activate Encryption In Profiles
To encrypt the data, we need to enable the encryption option. To do this:
- Go to the Profiles tab from the PPP section.
- Select the default profile. In the new window, go to the Protocols tab and choose the “yes” option under the “Use Encryption” section.
- Click the Apply then OK buttons to apply and save the changes.
Step 4: Create A Username
It’s time to create a user profile to use the L2TP VPN on different operating systems such as Windows, Android, and IOS.
Click on the PPP section on the left menu, go to the Secrets tab, and click on the blue plus sign (+).
Enter the information below in the fields:
- Name: Choose any name that you wish.
- Password: choose any password that you want.
- Profile: Choose the default profile.
- Local Address: 10.10.10.2
- Remote Address: 10.10.10.3
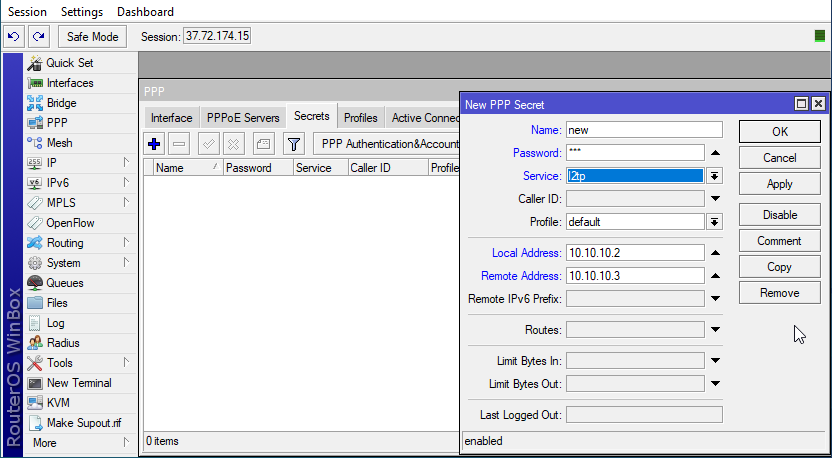
Note: The local address is the IP where the user sees the MikroTik IP when connected to the server.
The remote address is the IP where the user sees his IP when he connects to the MikroTik server.
Note that these values must be different for each user.
For example, for another user that you will create, you should select the value of the local address and remote address, respectively 10.10.10.4 and 10.10.10.5
To simplify things, you can create an IP Pool to evade creating IP addresses manually. Keep in mind after creating the IP pool, you have to change some settings.
However, we did not create an IP Pool to keep the process of setting up an L2TP VPN server on MikroTik VPS/Router short and simple in this article.
How To Connect To the L2TP VPN
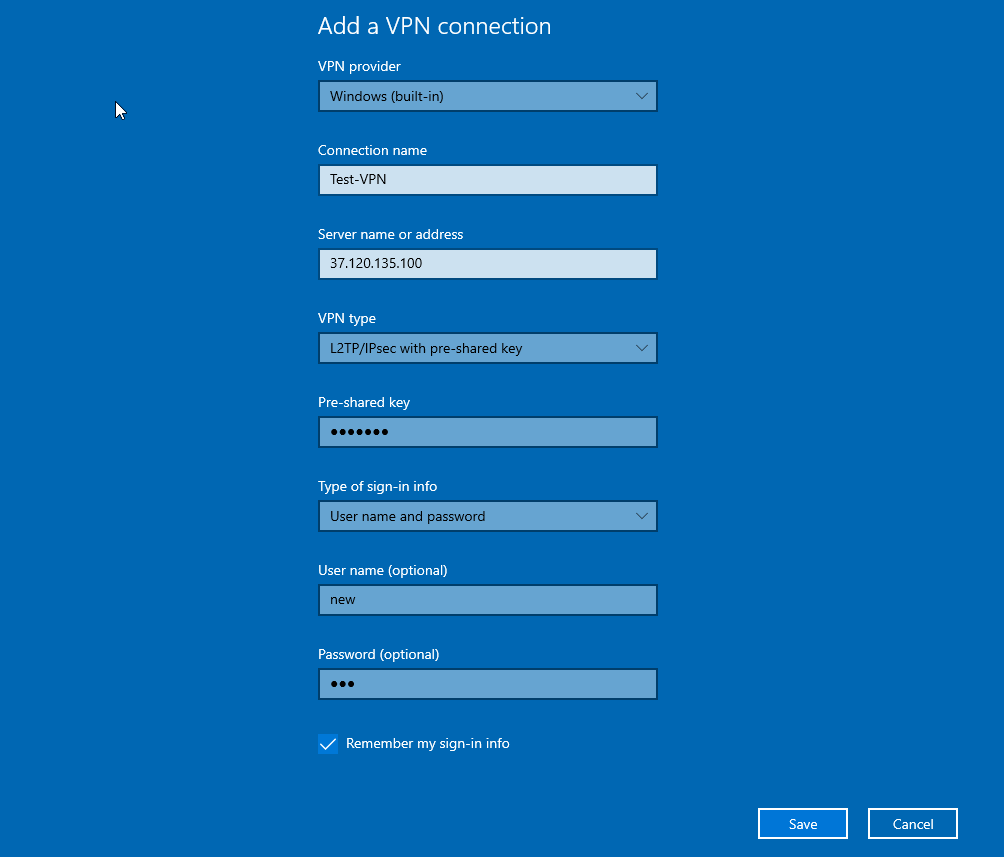
After configuring the VPN server, create a client in your operating system.
To create a VPN connection in Windows 10, search for the “VPN” term in the search field, select “Add VPN Connection,” and in the VPN type menu, select “L2TP/IPsec with pre-shared key.”
Now you can fill in the empty fields. Note that you must enter the passphrase that you created when activating the L2TP server in the “Pre-shared key” section.
What ports are used by the MikroTik L2TP firewall?
The default ports used to access the MikroTik firewall are as follows:
- UDP Port 1701 – for L2TP VPN Connection
- UDP Port 500 – for IPSec Connection
- UDP Port 4500 – for IPSec NAT Traversal
- ESP (Protocol 50) – for IPSec ESP
What is the default port for L2TP in MikroTik?
L2TP uses UDP port 1701 for link establishment; further traffic may go through this port or any other UDP port.
Steps to Setup L2TP VPN Server on Linux
SSH to log in to your Linux VPS and follow the below steps to Setup L2TP VPN Server Linux:
ssh username@VPS_IP_AddressStep 1: Update your Server
sudo apt update sudo apt upgradeStep 2: Install L2TP VPN on Linux:
Run the command below to install all the required packages for the L2TP VPN Server:
sudo apt install xl2tpd strongswanStep 3: Configure L2TP
To edit the configuration file for L2TP, run:
sudo nano /etc/xl2tpd/xl2tpd.confWhen you are done, add the following lines to the file:
[global] ipsec saref = yes [lns default] ip range = 10.10.10.2-10.10.10.255 local ip = 10.10.10.1 require chap = yes refuse pap = yes require authentication = yes ppp debug = yes pppoptfile = /etc/ppp/options.xl2tpd length bit = yesStep 4: Create PPP Options File:
To complete this step, use the command below:
sudo nano /etc/ppp/options.xl2tpdThen, add the following lines:
refuse-pap refuse-chap refuse-mschap require-mschap-v2 require-mppe-128 noccp noauth persist maxfail 0 debug dumpStep 5: Configure IPsec:
To configure IPsec, edit the IPsec configuration file:
sudo nano /etc/ipsec.confAdd the following lines:
config setup uniqueids=never conn %default ikelifetime=60m keylife=20m rekeymargin=3m keyingtries=1 authby=secret keyexchange=ike ike=aes256-sha1-modp1024,aes128-sha1-modp1024! esp=aes256-sha1-modp1024,aes128-sha1-modp1024! conn L2TP-PSK-noNAT authby=secret pfs=no auto=add rekey=no ikelifetime=8h keylife=1h type=transport left=%any leftprotoport=17/1701 right=%any rightdns=8.8.8.8,8.8.4.4 rightprotoport=17/%anyStep 6: Add Pre-Shared Key
To create the pre-shared key file and add your chosen key, run:
sudo nano /etc/ipsec.secretsThe pre-shared key format must be like:
your_vps_ip : PSK “your_secret_key”
Step 7: Restart the VPN Services
To apply the changes, run the command below and restart services:
sudo service strongswan restart sudo service xl2tpd restartStep 8: Check Firewall Ports
The UDP ports 500, 4500, and 1701 must be open on your Linux VPS firewall.
Step 9: Configure User
To create usernames and passwords for VPN users, use the command below and assign them local IP addresses in /etc/ppp/chap-secrets.
Step 10: Test Connection
Test the VPN connection using a client device’s username and password.
How do I change my L2TP port?
You can change the L2TP port through a Source-NAT rule, the direct configuration of the L2TP port is not possible.
What ports need to be open for L2TP VPN?
Without a NAT rule, the list of ports needed for L2TP/IPsec is as follows:
- Protocol: UDP, port 500
- Protocol: UDP, port 4500 (for IPSEC NAT-Traversal mode)
How To Setup L2TP VPN Server on Windows Server
To setup L2TP VPN Server on Windows, you will need to have an already running Windows VPS as an L2TP over IPsec VPN.
Once you’re all set, log in via Remote Desktop Protocol as an administrative user and follow the steps below:
Step 1: Update Your System
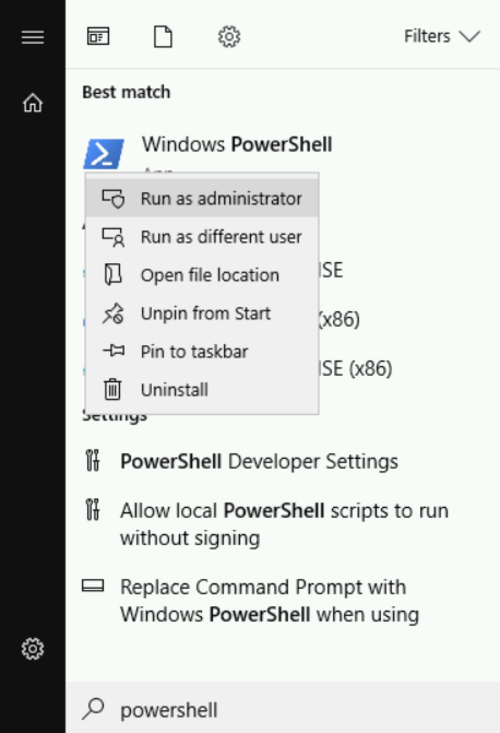
- In the Start menu, search for PowerShell. Right-click on it, open it in Administration mode, and select Open as Administrator.
Run the command below to install the Windows update module:
Install-Module PSWindowsUpdatePress Y when you are prompted. To view the list of latest updates, run:
Get-WindowsUpdateTo install updates, type:
Install-WindowsUpdateWhen you are finished, restart your system:
Restart-ComputerStep 2: Install Remote Access Role
- You can use Remote and Remote Access Services (RRAS), which offers an intuitive interface for configuring networking functions like VPN, NAT, Dial-Up Access server
- To do this, open PowerShell in administration mode.
- Run the command below to install the Remote Access feature with Direct Access VPN (RAS) and Routing and management tools:
Install-WindowsFeature RemoteAccess
Install-WindowsFeature DirectAccess-VPN -IncludeManagementTools
Install-WindowsFeature Routing -IncludeManagementTools
Step 3: Configure Routing and Remote Access
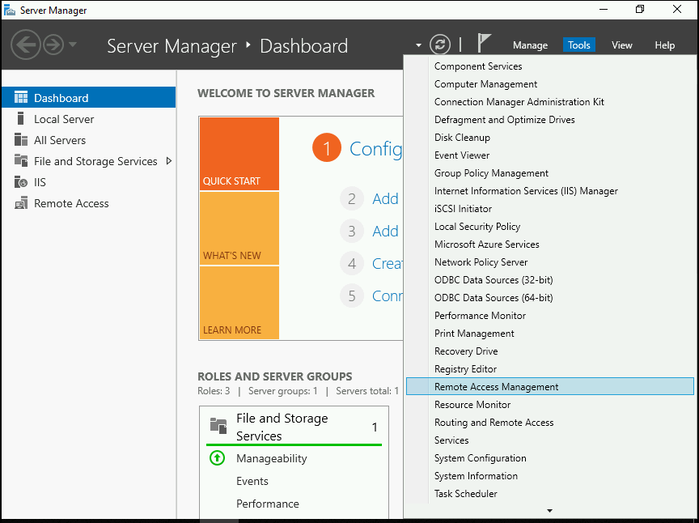
- Open Server Manager and on the Tools tab, select Remote Access Management.
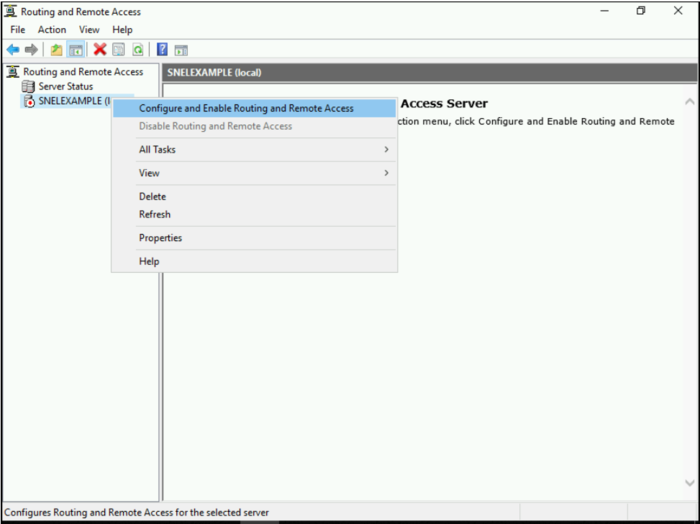
- Right-click on your local server in the left pane, then select Configure and Enable Routing and Remote Access.
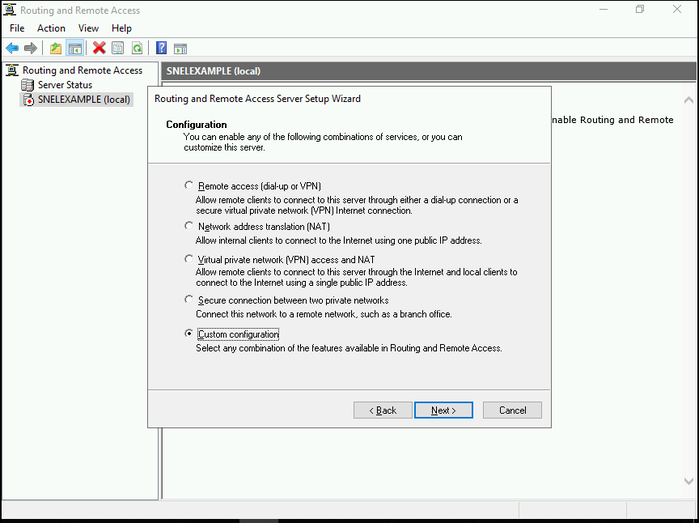
- To configure the routing and access manually, select the Custom Configuration button in Configure and Enable Routing and Remote Access Wizard.
- Click the Next button.
- Check the boxes for VPN Server and NAT, then click Next to view a summary of your selections.
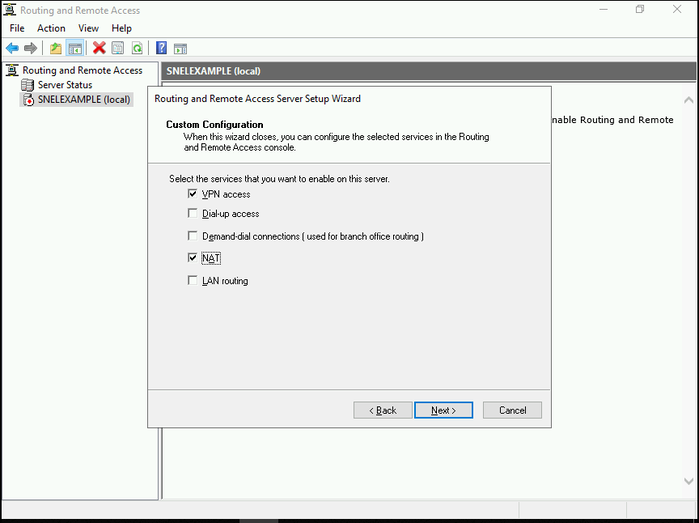
- Click on the Finish button. Once you see the below prompt, click on the Start Service button.

Step 4: Configure VPN Properties
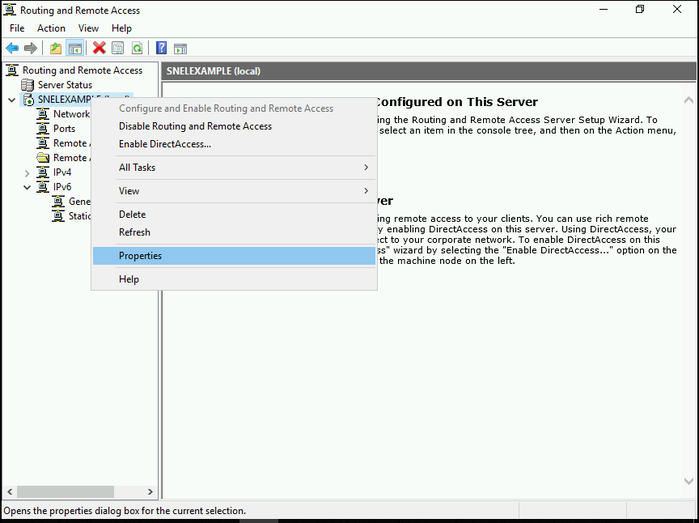
- Continue setting up the VPN by going to the Routing and Remote Access window. There, right-click on your local server and click Properties.
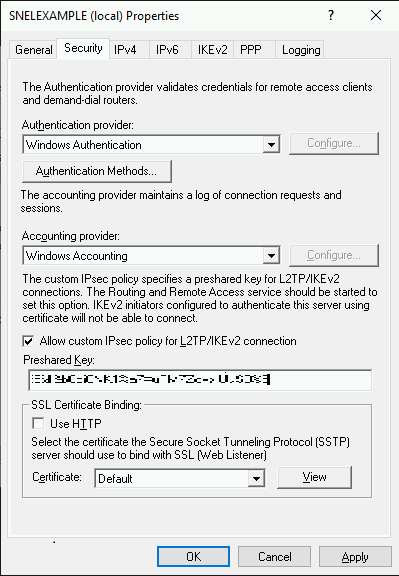
- On the Security tab, click on the Allow custom IPSec policy for L2TP/IKEv2 connection box.
- You can use tools to generate a random key.
- Then, write down the PSK (Pre-shared key) to share it with future users you prefer to connect to the VPN server and put it in the blank field.
- Choose the Static Address Pool option under IPv4 Address Assignment on the IPv4 tab.
- An IP address range entry popup will appear when you click the Add button.
- Enter the IP address range’s beginning and ending addresses that you want users to be assigned to.

- After entering the address range, click “OK” to confirm. Then, click “OK” again to save all the changes you’ve made.
- You might see a warning about needing to restart Routing and Remote Access for the changes to take effect.
- It’s safe to ignore this for now (we’ll restart the service later).
Step 5: Configure NAT
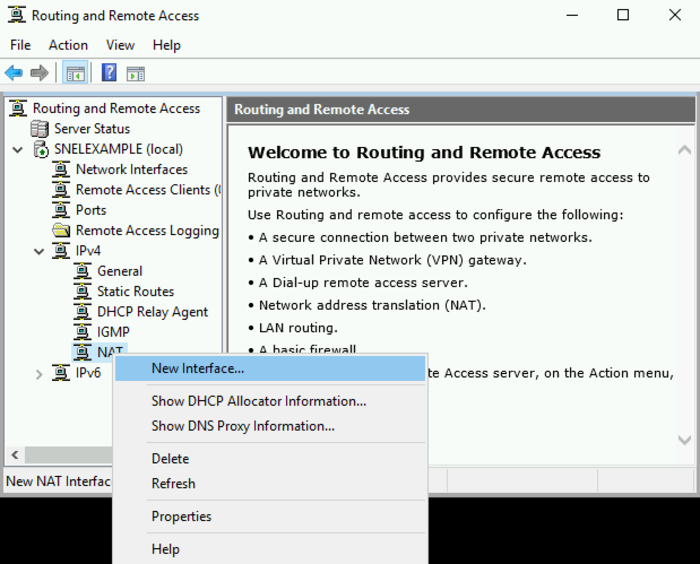
- In the Routing and Remote Access window, navigate the left pane by expanding your local server first. Then, expand the “IPv4” section.
- You’ll find the NAT object listed there. Right-click on “NAT” and select the option “New Interface“.
- In the “New Interface” window, choose “Ethernet” from the available options. Click “OK” to continue.
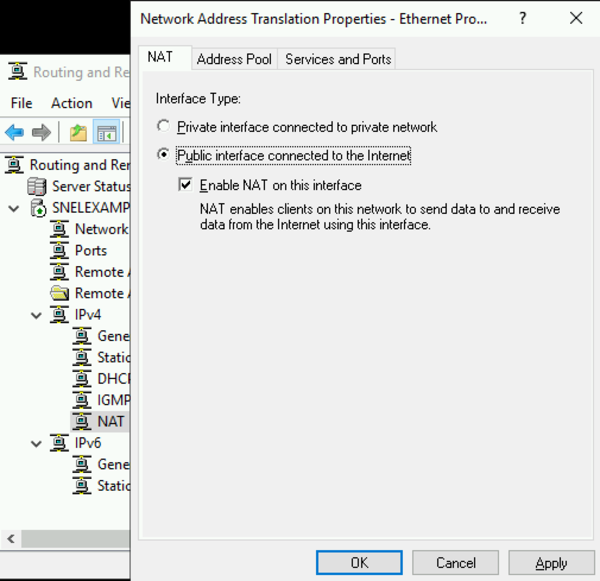
- Once the selection is confirmed, switch to the “NAT” tab. There, select the radio button labeled “Public interface connected to Internet.”
- Additionally, make sure the checkbox for “Enable NAT on this interface” is selected.
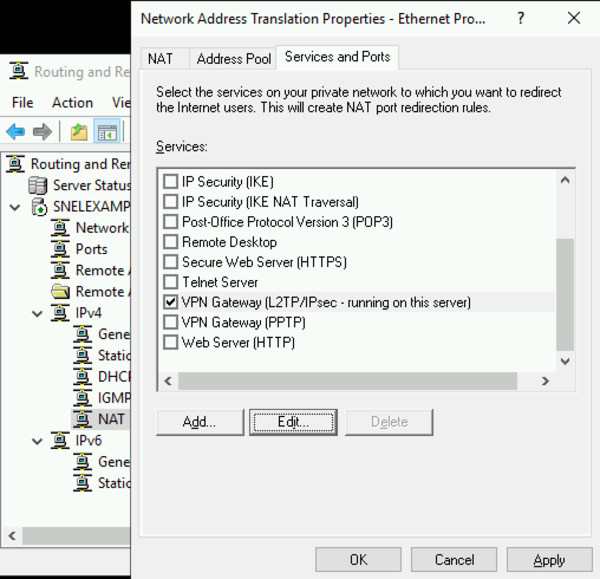
- Navigate to the ‘Services and Ports’ tab. Select the checkbox labeled ‘VPN Gateway (L2TP/IPSec – running on this server)’.
- This will open a new interface for editing the service.
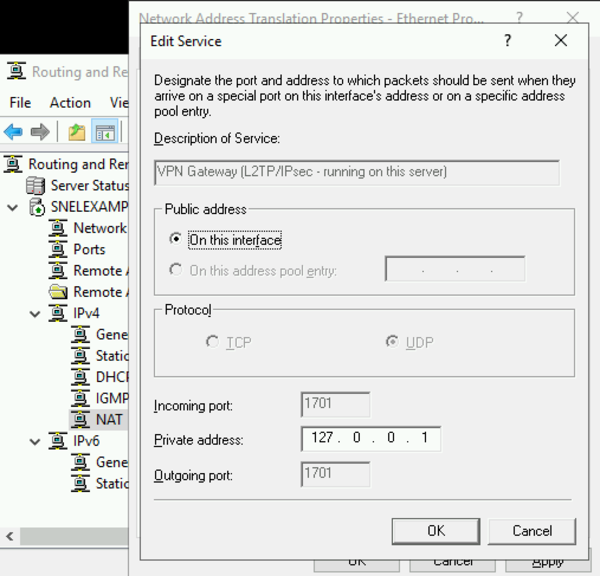
- Change the private address from 0.0.0.0 to 127.0.0.1 and click OK to save.
- After configuring the NAT interface options, click “OK” to save your changes.
Step 6: Restart Routing and Remote Access
- Within the left navigation pane of the Routing and Remote Access window, locate your local server name.
- Right-click it and choose “Restart” from the available options.
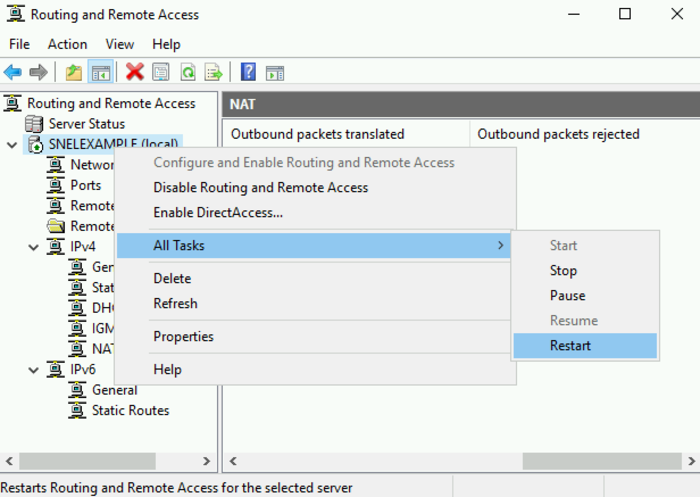
- Clicking “Restart” initiates a service restart for Routing and Remote Access.
- This will apply all the configuration changes you have implemented.
Step 7: Configure Windows Firewall
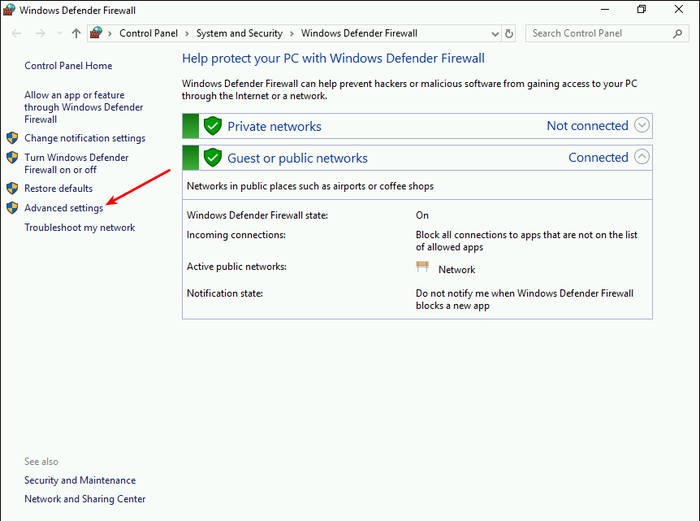
- When Windows Defender Firewall appears in the search results, click on it to launch the program.
- Once open, locate and click the option labeled “Advanced settings“.
- This will open the Windows Defender Firewall with the Advanced Security console.
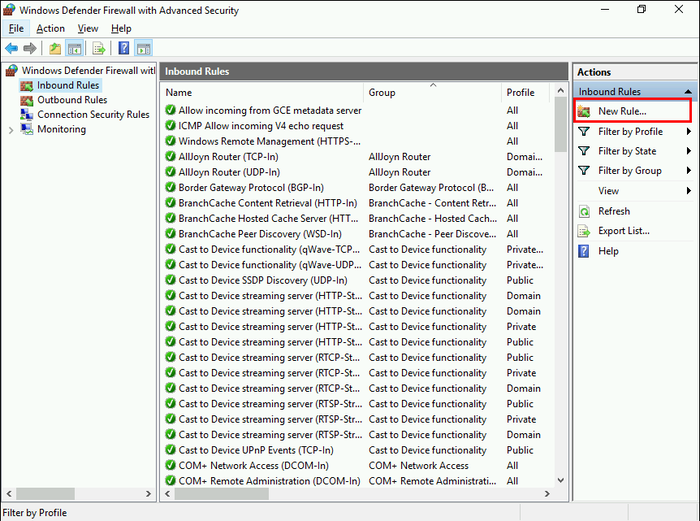
- Once you’ve selected “Inbound Rules,” locate the right-side pane of the console.
- There, find and click the button labeled “New Rule” to initiate the process of creating a new firewall rule.
- To enable VPN access, use predefined firewall rules in Windows Server
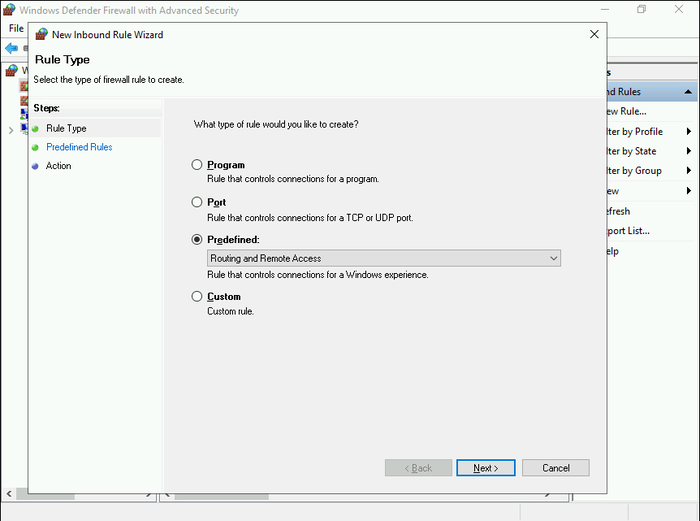
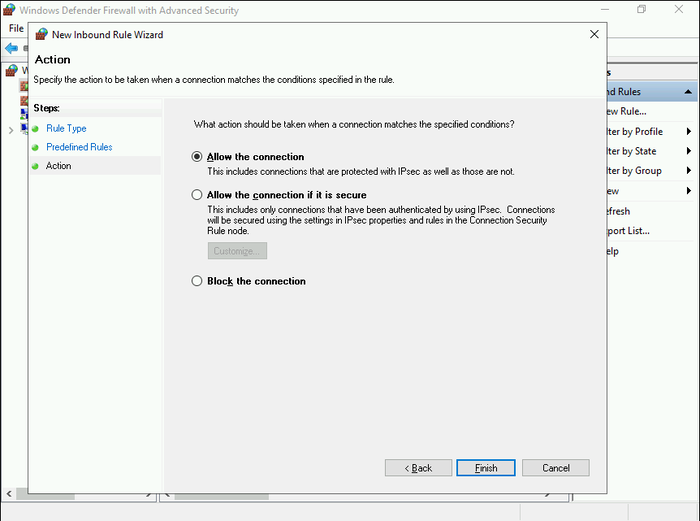
- In the New Inbound Rule Wizard, select the “Predefined” option and choose “Routing and Remote Access” from the list.
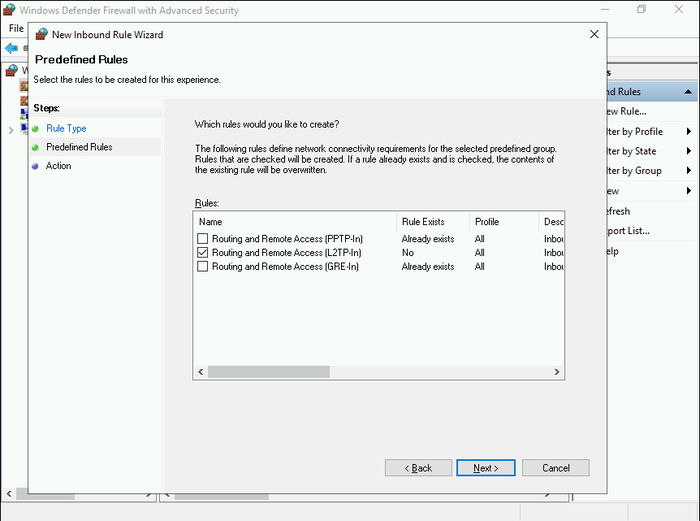
- Under Predefined Rules select Routing and Remote Access(L2TP-In) checkbox and click Next.
- In the “Action” section, choose “Allow the connection” and click “Finish” to complete the rule creation.
Step 8: Create a VPN User
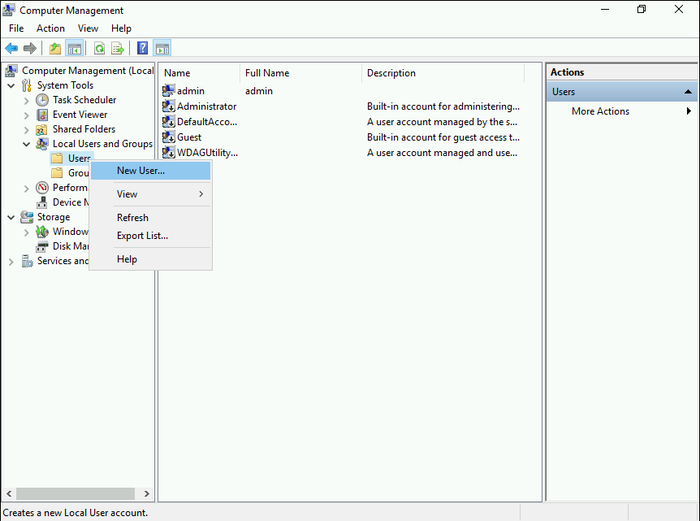
- In the Computer Management window, navigate to “Local Users and Groups” and expand it.
- Right-click on “Users” and select “New User” to create a new user account for VPN access.
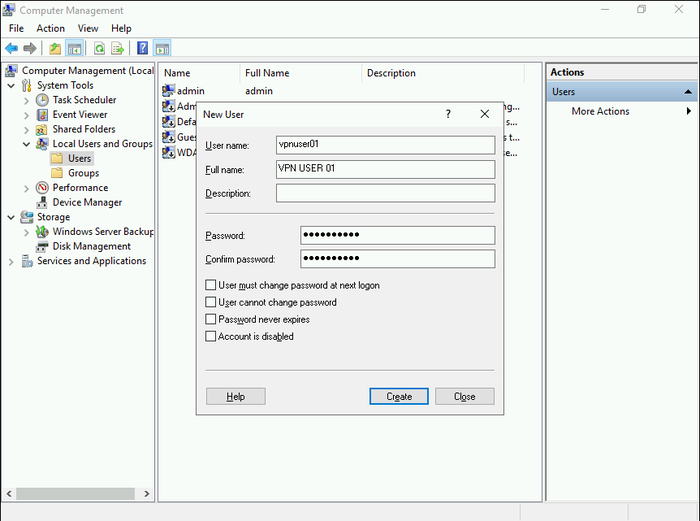
- Provide a username, full name, and a strong password for the new user.
- Uncheck the “User must change the password on next login” box. Click “Create” to establish the user account.
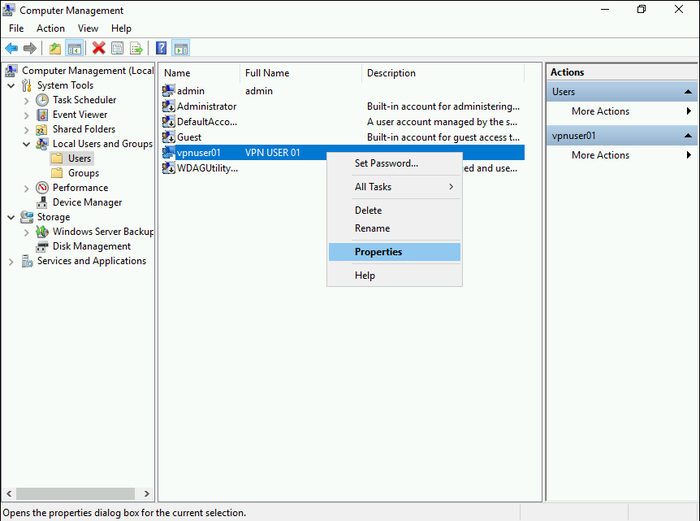
- Locate the newly created user in the user list, right-click it, and select “Properties.”
- In the user properties window, switch to the “Dial-in” tab.
- Select the “Allow access” option under “Network Access Permissions.” Click “OK” to save the changes.
Step 9: Connect to VPN Clients
- Now, you are ready to connect to VPN clients.
- To do this, you need to provide the user who wants to connect to the distant VPN server with the PSK, Windows username, and password.
Step 10: Check VPN
- In the Start menu search bar, type “Remote Access Management Console“.
- Click on the application to open it. The console will display the current state of your VPN services.
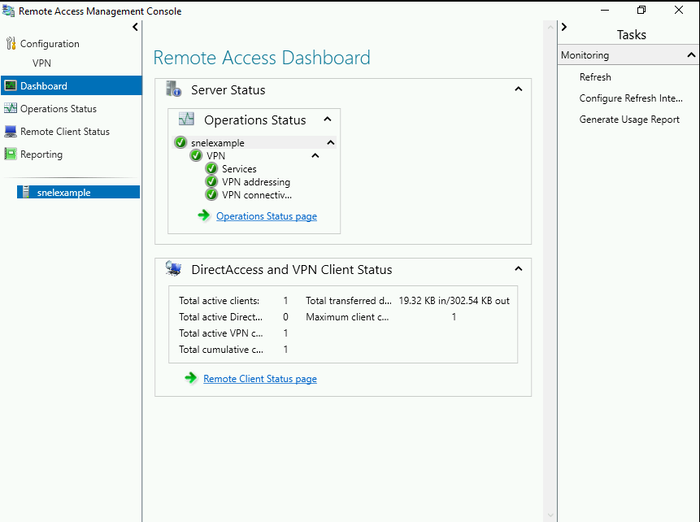
- Look for indicators like icons or text labels to determine the status (e.g., “Running,” “Connected,” or green checkmarks if applicable).
- If successful, you might be able to view details about currently connected VPN clients within the console.
- This information might include usernames, IP addresses, or connection durations.
FAQ
How can we solve the problem of not loading websites when surfing in browsers after connecting to a VPN?
In this situation, you must add static DNS to your VPN client. To do so, open the RUN page by pressing the Windows key + R.
Write the name of the VPN that you have created, click on it, and choose Properties.
On the new page, choose the Networking tab and double-click on Internet Protocol Version 4 (TCP/IPV4).
On the new page, choose "Use the following DNS server addresses" and fill them out, then press OK on both sections to apply the changes.
Summary
By following these steps and carefully configuring your server settings, you’ve established a secure L2TP/IPSec VPN on Mikrotik, Linux, and Windows Server.
Then, you can enable authorized users to connect remotely with enhanced network security.
Remember to prioritize strong passwords or alternative authentication methods for optimal protection.
Once you set up L2TP/IPSec VPN on your server, you can use the VPN server to securely connect to the other connected devices.