Copy Paste Not Working in Remote Desktop/RDP
If you are using a Windows VPS, you have probably encountered a problem when copying/pasting files from a client desktop workstation to a remote desktop workstation and vice versa, and you have noticed that copy/paste is disabled on the remote desktop. You may receive the “Remote Desktop Session” error when copying and pasting files on the remote desktop, or after copying the desired file, the Paste option is disabled on the remote desktop. In this situation, you will notice that the copy-paste on the desktop Remote/RDP is not working.
This may not seem like a serious problem, but users who have encountered this problem know how troublesome and annoying it can be and affect the progress of your projects and tasks.
As you know, users who buy Windows VPS use an RDP (Remote Desktop Connection) Program sponsored by Microsoft to connect to Windows VPS remotely. If you ask how? We have already taught you how to connect remotely to Windows VPS, and you can use our instructions to connect to Windows VPS. This program facilitates remote connection and management of Windows VPS and provides access to files and programs of the remote server and file transfer. But one of the common problems you can experience in connection with RDP is the problem of copying and pasting files from the local computer to the remote server, which can be solved. This problem can have various reasons, which are not difficult to solve with the methods we will teach. Therefore, this article aims to guide you to solve the problem of Copy/paste not working in RDP.
What factors make Copy/paste not work in RDP?
Sometimes the inability to copy and paste files and texts between the local computer and the server in RDP can be caused by the incorrect operation of the rdpclip.exe (RDP Clipboard Monitor) process. Remote Desktop Clipboard Monitor is a Windows tool that allows users to manage the shared clipboard between the local computer and the remote desktop and provides the possibility to copy-paste files between the remote server and the local computer.
In addition, Clipboard Access being disabled in the local system is one of the common reasons for this problem. Also, this problem may be due to settings and changes in the Windows registry and the Group Policy editor, which prevent copy-paste operations between two local and remote computers.
How to solve the problem of disabling RDP Copy paste?
In this tutorial, we use the following methods to activate the Copy-paste function in Remote Desktop Connection:
- Enabling Clipboard Access on Remote Desktop Connection Properties
- Enabling Clipboard Redirection on the local computer through the Registry Editor configuration
- Enabling Clipboard Redirection on the remote server
- Enabling copy-paste in the Remote Desktop Connection settings in the Group Policy editor
- Disabling the rdpclip.exe process
- Changing in Clipboard settings
- Updating Windows Network Drivers
Method 1: Enabling Clipboard Access in Remote Desktop Connection
Sometimes incorrect settings of Remote Desktop Connection cause some problems; that’s why you should ensure the correct configuration of Remote Desktop Connection. To solve the problem of the Copy/paste function not working when connecting to Windows VPS with RDP, one of the simplest methods is to enable Clipboard Access in Remote Desktop Connection.
You need to ensure your local computer is set up to have remote desktop access to your clipboard (the place to store the copied data). If Clipboard Access is not enabled in Remote Desktop Connection settings, you should enable it to solve this problem. For this purpose, follow the steps below:
1. Change in Remote Desktop Connection settings
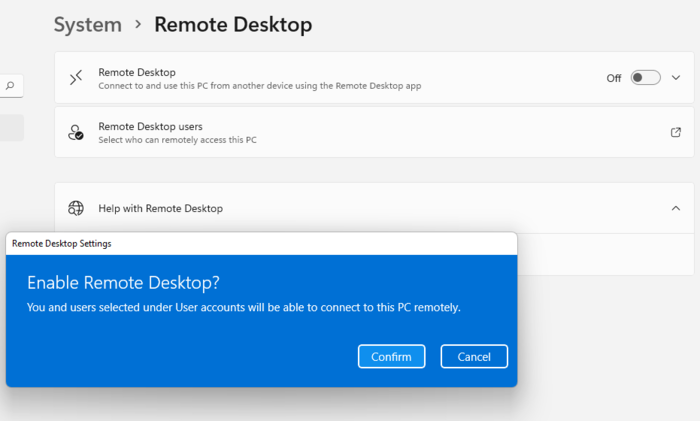
Go to settings. Then select System > Remote Desktop options.
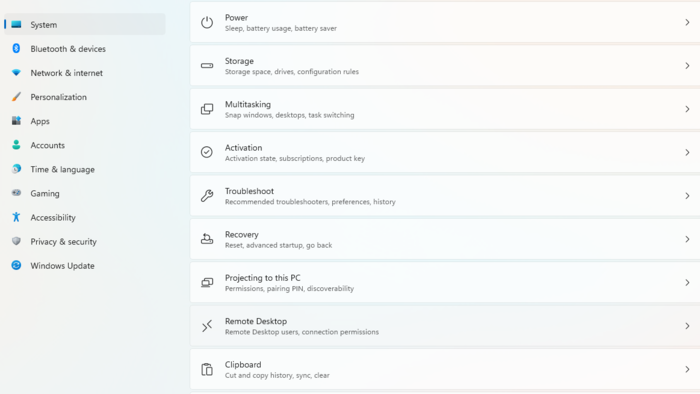
Activate the Enable Remote Desktop option and then confirm the notification that appears.
2. Access to Remote Desktop Connection
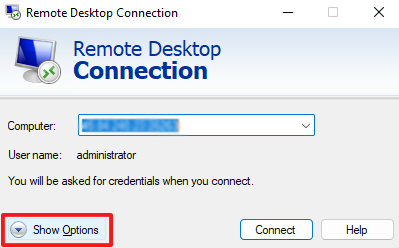
First, open the native RDP client, the same as Remote Desktop Connection in Windows, by searching for the term” Remote Desktop Connection” in the Start menu’s search bar.
You can also type mstsc.exe in the Application Launcher (Win+R) box to access Remote Desktop Connection.
3. Access the Remote Desktop Connection settings panel
When the Remote Desktop Connection window opens, select the “Show options” option.
4. Enable Clipboard Access
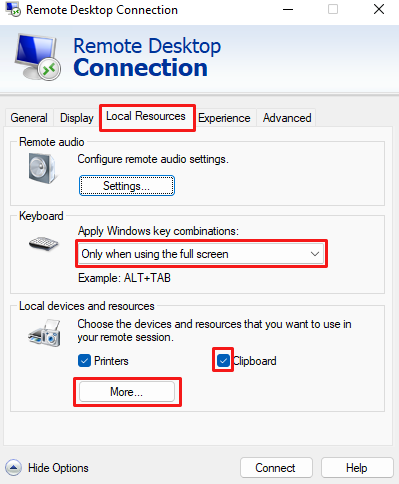
Select the “Local Resources” tab on the top bar of the Remote Desktop Connection window.
In the Local Resources section of the Keyboard section, open the drop-down menu and select the” Only when using the full screen “option to use the combination keys CTRL+C and CTRL+V( for Copy/Paste).
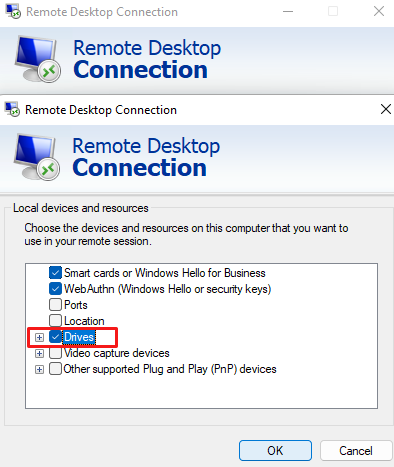
In the Local Resources section, if the box in front of the term Clipboard is not checked, you must enable the Clipboard Access box by checking it; then selecting the More… option.
5. Enable access to local computer disk drives
To enable the Copy/paste function, you must allow access to the disk drives of your local computer in the Remote desktop connection settings panel. For this reason, in the window that opens after selecting the More option in the Local Resource section, you must find the” Drives” option in the list of options you see and check the box in front of it, and then select the “OK” option.
6. Save changes
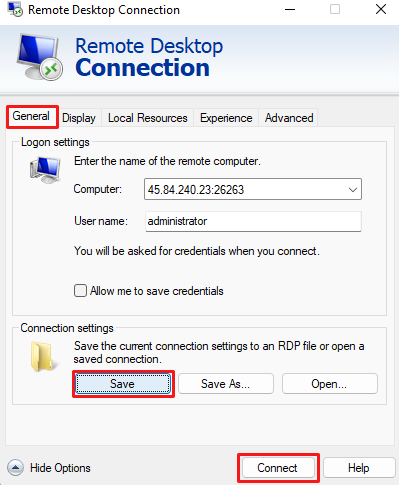
To save the settings you made in the Remote desktop connection, go to the “General” tab and select the “Save “option to enable the Copy/paste function between the remote server and your local computer. Then you can connect to Windows VPS and make sure the problem is solved.
Method 2: Enable Clipboard Redirection through Registry Editor configuration
Incorrect configuration in the Registry Editor for Remote Desktop connection is another cause of the Copy/paste function not working. Therefore, configuring Registry Editor and enabling Clipboard Redirection on the local computer can solve this problem.
Tip: Before you follow the steps below to configure Registry Editor, make a backup copy of Registry Editor to avoid possible damage.
1. Launching Registry Editor
First, you need to launch the Registry Editor so that you can configure it to set up a Remote desktop connection. For this reason, access the Run command dialog box by simultaneously pressing the “Windows + R” buttons on the keyboard, typing” regedit” in the text field of the dialog box, and pressing the “Enter” button to launch the Registry Editor.
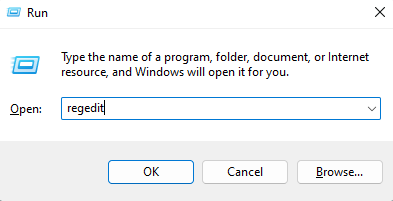
If you see the Confirmation Prompt, confirm it by selecting” Yes.”
2. Registry Editor configuration
Enter the following path in the Registry Editor address bar:
Computer\HKEY_LOCAL_MACHINE\SOFTWARE\Policies\Microsoft\Windows NT\Terminal Services
After entering the path in the address bar, you will see the Default file on the right side of the Terminal Services sub-set.
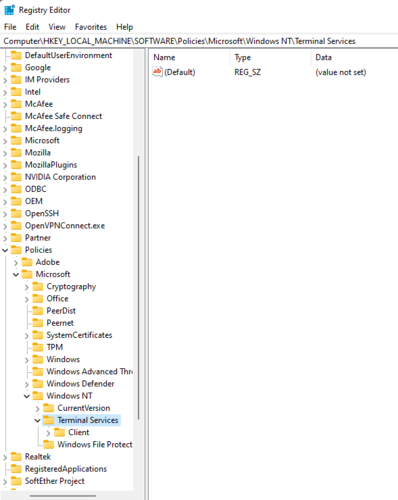
Right-click in the space on the window’s right side, select “New,” then select “DWORD (32-bit) Value “from the drop-down menu.
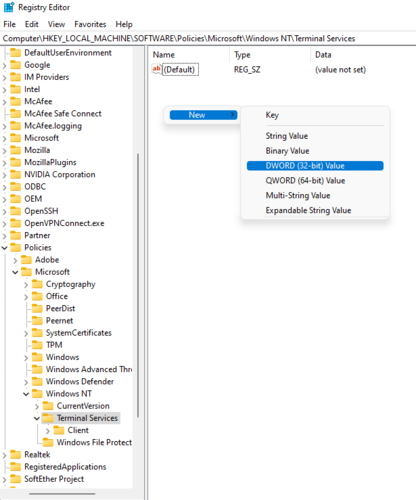
Then name the new DWORD as DisableClipboardRedirection.
3. Enabling Clipboard Redirection
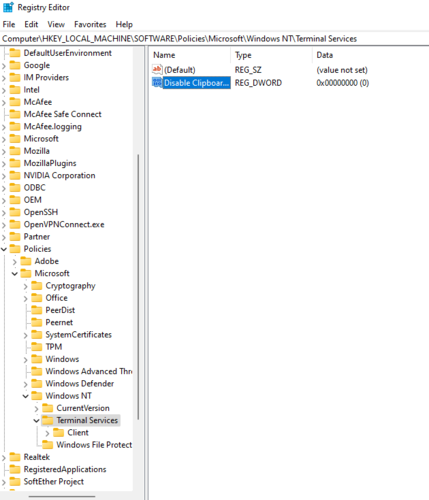
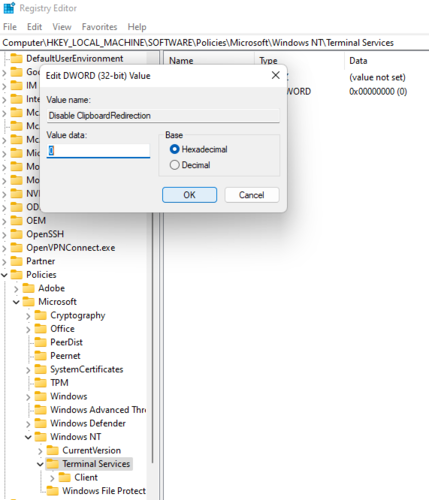
With the “DisableClipboardRedirection” value enabled, the Copy/paste function between the local computer and the remote server does not work. Therefore, you must disable “DisableClipboardRedirection” to be able to use copy/paste functions between the remote server and the local computer. For this purpose, double-click on DisableClipboardRedirection.
In the window that opens, set the value of DisableClipboardRedirection to 0 (zero) to disable “DisableClipboardRedirection” and select “OK “ to save the changes.
Then restart your computer and check the Copy/paste function between the remote server and the local computer.
Tip: If, after entering the path of step 2, in the address bar, there is already a DisableClipboardRedirection file in addition to the default file, you should check that its value is not set to 1 or any number other than 0. Otherwise, set the value of” Disable Clipboard Redirection” to 0.
If you fail to change the value of DisableClipboardRedirection, right-click in the space on the right and select New > DWORD (32-bit) Value and rename DisableClipboardRedirection as DWORD. By entering its value as default, It is set to 0.
Method 3: Enabling Clipboard Redirection on the remote server
As we enabled Clipboard Redirection on the local computer through Registry editor configuration, you can do the same on the remote server to solve the problem of sharing files between the remote server and the local computer. So follow the steps below.
1. Launching Registry Editor
On the remote server, to launch the Registry Editor, you must first open the Run dialog box by pressing the Windows + R keys simultaneously, and in the text field of the dialog box, type” regedit” and press the Enter button.
2. rdpwd configuration of the Registry Editor
After the Registry Editor window opens, enter the following path in the address bar:
HKEY_LOCAL_MACHINE\SYSTEM\CurrentControlSet\Control\Terminal Server\Wds\rdpwd
By searching for the desired path in the Registry Editor, you will see a list under the rdpwd sub-set, where you should find the “fDisableClip” option from the right pane and change its value to 0(zero). Then select Ok.
3. RDP-Tcp configuration of Registry Editor
First, you must enter the following path in the address bar:
HKEY_LOCAL_MACHINE\SYSTEM\CurrentControlSet\Control\Terminal Server\WinStations\RDP-Tcp
Then, on the right side of the screen, find the” fDisableClip “option from the list corresponding to the RDP-Tcp folder, set its value to 0(zero), and then select Ok.
Then close the Registry Editor, and after restarting the remote computer, try the copy/paste function between the local computer and the remote server.
Method 4: Enabling copy-paste in the Group Policy editor
So far in this article, we have taught standard methods to fix the problem of copy/paste functions not working. If your problem still persists, there is probably a policy that does not allow you to share files between the server and your local computer. To check this policy, which could be the cause of your problem, you should check the Group Policy editor and make sure that Clipboard Redirection is enabled in it.
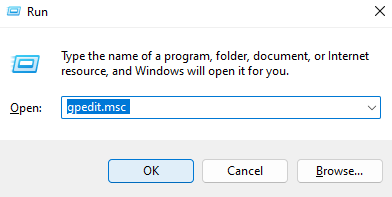
1. launching the Group Policy editor
To access the Application Launcher, simultaneously press the Winkey + R buttons and type”gpedit.msc “in the launcher box to run the Group Policy editor.
After running the Group Policy Editor, confirm the confirmation prompt by selecting Yes.
2. Configuration of the Group Policy editor
Follow our guide to reach the desired address:
“Computer Configuration“> “Administrative Templates“> “Windows Components“> “Remote Desktop Services“> “Remote Desktop Session Host“> “Device and Resource Redirection.”
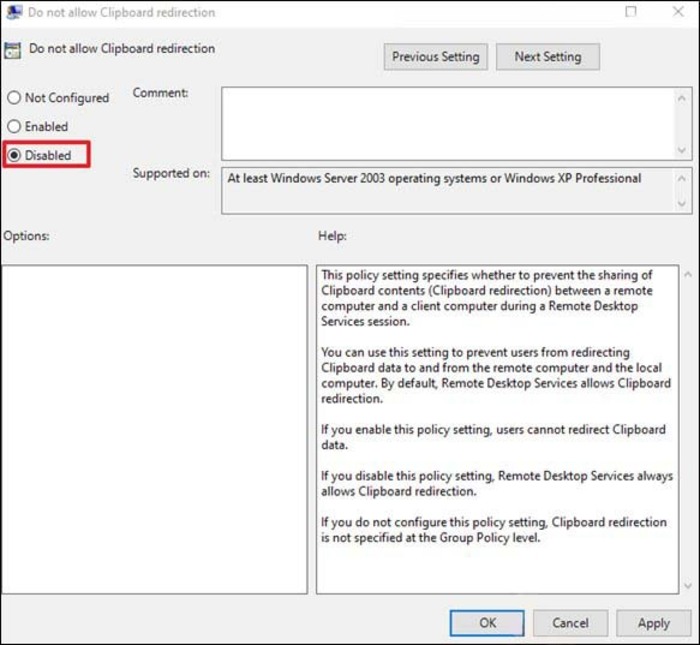
As a result, in the list you see on the right pane, select the” Do not allow Clipboard redirection” option by double-clicking on it.

3. Changing the Clipboard configuration
In the window that opens, set this policy to Disabled, select the Apply and Ok buttons, and close the Group Policy Editor.
Finally, now with the settings you applied, users will be allowed to copy/paste files between the local computer and the remote server.
Tip: After the settings you created, enter the Command prompt with Administrator permission, and you can use thegpupdate /forcecommand to update or restart the group policy editor.
Tip: Perform this procedure on the remote server in addition to the local computer.
Method 5: Disabling RDP Clipboard Monitor (rdpclip.exe)
One of the sure ways to solve the problem of the Copy/paste function not working is to disable the RDP Clipboard Monitor process, which includes the following steps:
1. Open task manager
To open the task manager, right-click on the start menu on the remote server desktop and select the “task manager” option from the menu.
Tip: There is a faster way to open the Task Manager; press CTRL + SHIFT + END keys simultaneously.
2. End the RDP Clipboard Monitor process
In the” Processes “tab of the Task Manager window, find the RDP Clipboard Monitor process and select “End task.”
3. Run rdpclip.exe again
After ending the RDP Clipboard Monitor process, go to the “File” tab and click “Run New Task.”
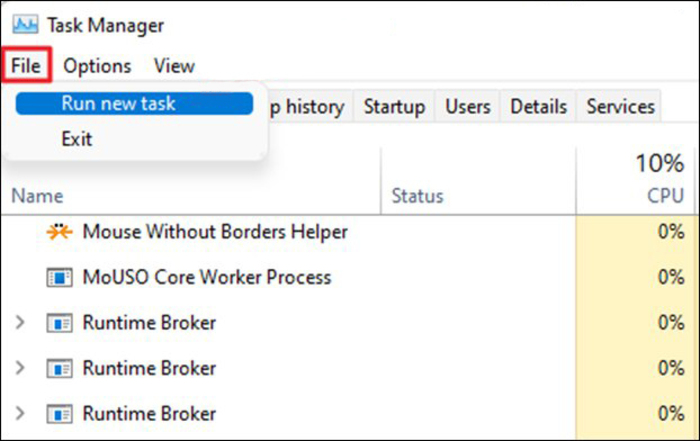
Then enter rdpclip.exe in the Test field and select Ok.
Finally, you will have no problem copying/pasting files between the remote server and the local computer.
Method 6: Changing in Clipboard settings
At the beginning of the article, we explained the Clipboard function, which is the holder of the files you copy. Another way to solve the problem of being unable to copy/paste files between the remote server and the local computer is to change the Clipboard settings. Follow the steps below to configure Clipboard settings:
1. Enter the system settings by pressing Win+I and selecting the” System “option.
2. On the right side of the opened window, find the “Clipboard” option and click on it.
3. Click on the” Get Started” button at the bottom of the Sync across Devices
As a result, you can share files and texts between the remote server and the local computer.
Method 7: Updating Windows Network Drivers
Windows Network Drivers’ failure can also cause the copy/paste function not to work. To solve this problem, you can update or reinstall Windows Network Drivers.
Follow the steps below to update Windows Network Drivers:
1. Press the Win + X keys simultaneously and see the Quick Access menu.
2. Click on the Device Manager option from the Quick Access menu.
3. Then select the Network adapters option by double-clicking on it.
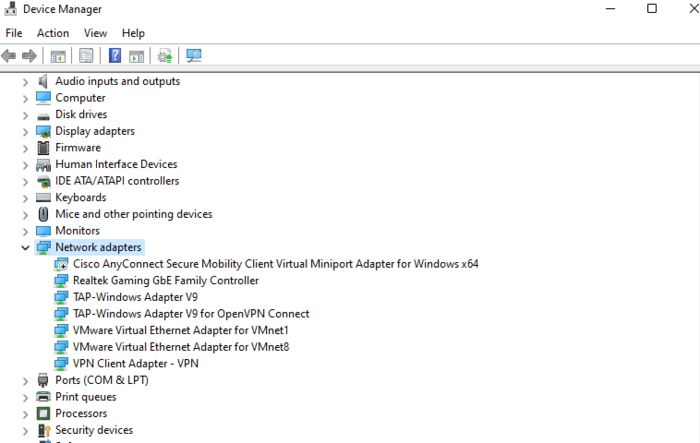
4. Right-click on the desired network driver so that you can update it by selecting the Update Driver option.
Select the “Search automatically for the updated driver software” option and follow the steps.
To reinstall Windows Network Drivers, you must follow the steps below:
1. According to the steps we explained, open Network adapters by double-clicking.
2. By right-clicking on the desired network driver, click on the “Uninstall device” option.
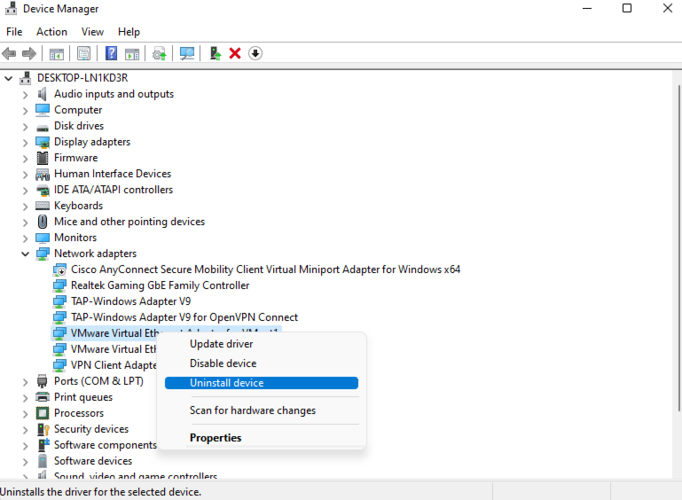
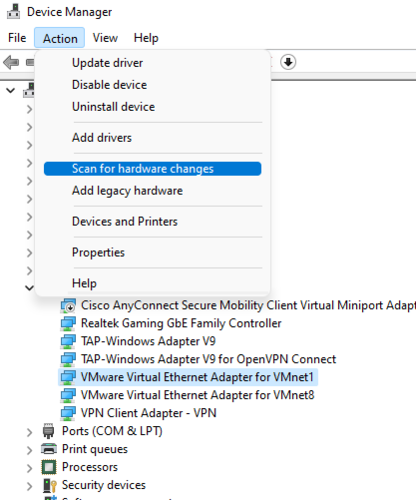
3. Then select Action tab > Scan for hardware changes.
4. Finally, restart your local computer to save your changes.
FAQ
Are the instructions in this tutorial used to fix the copy/paste problem on Linux VPS?
Unfortunately, no, the instructions in this article are for Windows.
When do we update the drivers to fix the problem of copy/paste not working?
Your priority should be properly configuring Clipboard settings and enabling Clipboard access on the remote server and local system when using the Remote desktop connection. If your problem is not solved, you can update or reinstall the network drivers as a last resort.
Conclusion
Using the copy/paste functionality between the remote server and the local computer significantly increases productivity and improves your performance when using a VPS. Users have different reasons for sharing files between their local computers and remote server. The Copy/paste function not working in a remote desktop connection is an annoying problem. In this article, we have taught 7 methods so that you can solve the problem of Copy/paste not working in Windows Remote Desktop Services and enjoy the features of Windows VPS to the fullest. Which method was able to solve your problem? We will be happy to share your experiences and opinions with users and us in the comments section.