How to Install Syncthing on Ubuntu
Syncthing is an open-source application that enables you to transfer your files directly between two (or more) devices. In this article, you will learn How to Install Syncthing Ubuntu to Synchronize Files. This peer-to-peer (without relying on a central server) synchronization program is available for Linux, BSD, macOS, Windows, Android, and Solaris. Join us with this article to follow the required steps to install and Configure Syncthing on Ubuntu.
Prerequisites to Install Syncthing on Ubuntu
To let this tutorial works correctly, provide the options below.
- A system running Ubuntu.
- A non-root user with
sudoprivileges.
What is Syncthing and How does it work?
Syncthing is a free, open-source, and peer-to-peer continuous file synchronization application. Using Syncthing allows you to synchronize your files/directories between your devices/nodes on a local network or remote devices in a network. Regardless you prefer to work over the internet or locally, Syncthing is what you need to synchronize files between multiple computers and access a folder across many devices.
This cross-platform file syncing solution encrypts all your data with the TLS method during the transmission. To synchronize files, you will need to have at least two devices. The device that you choose to configure and view the status for, is called the ‘’local device’’ and the other device is called the ‘’remote device’’. After creating, modifying, or deleting your data, Syncthing replicates all the changes to other existing servers automatically.
Best Features of Syncthing
- Free.
- Open-source.
- Fast Synchronization.
- Supports LDAP authentication.
- Automatic data syncing.
- Uses relay servers when peering is failed.
- No data loss & file corruption.
- Runs on Linux & Windows.
- Selective Sync.
- Ideal alternative to ‘’Resilio Sync’’.
Install Syncthing on Ubuntu 22.04|20.04|18.04
You can use two ways to install Syncthing. To install Syncthing on Windows, macOS, BSD, and Android, download a Tarball from the Official Syncthing Website. The second method is to add the official Syncthing repository to install the package from it When you are installing Syncthing on Ubuntu/Debian.
Let’s go through the steps of this guide to learn how to install Syncthing on Ubuntu. The following content will work on Debian and Ubuntu 18.04, 20.04, and 22.04.
Step 1. Add Official Deb Repository & GPG keys of Syncthing
Since the Syncthing package is available on the official repository, you can add it to download the packages from the repo by running the commands below. Open your terminal and type:
sudo apt install curl apt-transport-httpscurl -s https://syncthing.net/release-key.txt | sudo apt-key add -echo "deb https://apt.syncthing.net/ syncthing release" | sudo tee /etc/apt/sources.list.d/syncthing.listStep 2. Update Ubuntu & Install Syncthing Ubuntu
sudo apt update
sudo apt install syncthing
when you are done, you can use the following command to check your current installed version:
$ syncthing --versionStep 3. Configure Syncthing on Ubuntu
When Syncthing is installed completely, the systemd file is created under the location (/lib/systemd/system) directory. There, you will find a [email protected] file. So, you are ready to set up it as a System Service by Systemd. In this way, you can enable Syncthing manually, and run the systemd command to start it at boot automatically.
sudo systemctl enable [email protected]Do not forget to replace username with your username.
Then, use the following commands to start the Syncthing service:
sudo systemctl start [email protected]To check the latest status, type:
systemctl status [email protected]Step 4. Configure Syncthing UFW Firewall
Sine Syncthing uses port 22000, you need to be allowed to use this port to be able to communicate with peers. So, run the command below to allow port 22000 if you are using the UFW firewall.
sudo ufw allow 22000/tcpAnd if you are not using UFW, but you would like to, type:
sudo ufw enableStep 5. Access Syncthing Web Interface on Ubuntu
On port 8384, Syncthing is listening. To access the WebUI of Syncthing, point the web browser’s address bar to 127.0.0.1:8384. Using Syncthing allows you to use it through CLI and GUI through Syncthing-GTK. The CLI that Syncthing offers has identical functionalities to the WebUI.
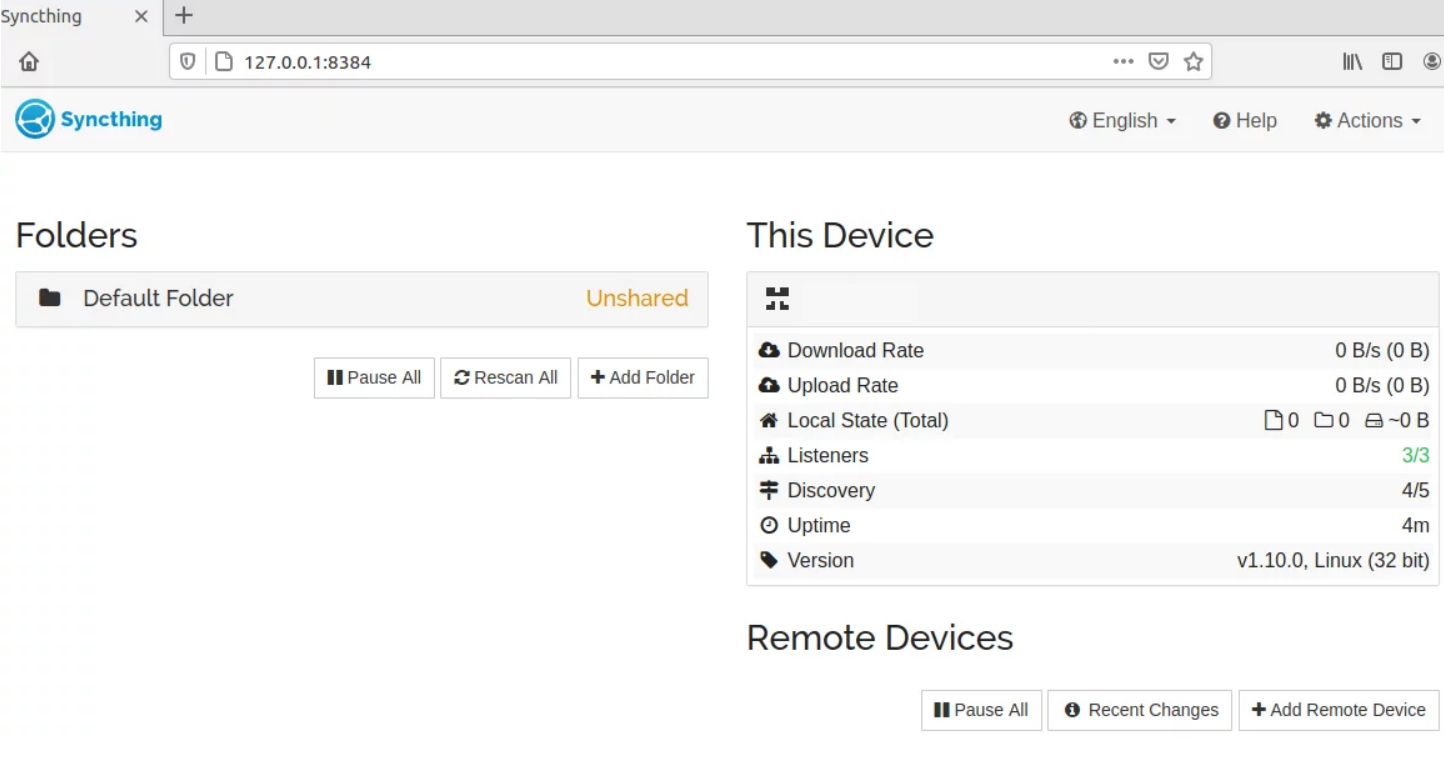
How to Use Syncthing to Sync Data between two devices
So far, you reviewed the way you can Install Syncthing on Ubuntu to Synchronize Files. So, you have now set up file or folder syncing between the devices after installing two or more Syncthing clients on diverse operating systems and devices.
The Syncthing WebUI is the interface you can use for Syncthing. Then, you will need to add the preferred devices you want to sync between them. In Syncthing, a Cluster is a collection of devices that syncs folders with one another. Syncthing must be installed on each device in the cluster. The Syncthing Android app has to be installed on Android devices. So, make sure Syncthing is set up and installed on all machines before attempting to sync data between two or more of them.
Step 1. Device ID
Devices in Syncthing are recognized by an individual lengthy alphanumeric string. The Device ID is the name given to this string. Choose Actions > Show ID to access your Device ID. Only the devices you want to sync with should have access to this ID. A QR Code that can be scanned by smartphones will also be displayed by Show ID.
Only when both devices are equipped with the other’s device ID will two devices be able to connect and communicate with one another.

Step 2. Add Syncthing Device ID
Click the Add Remote Device button in the bottom right corner of the Syncthing WebUI to add a device. On the local network, it automatically detects the Syncthing-installed devices. Enter the Device ID of the second device you want to sync with manually if it is not automatically detected. Next, select the Save button.
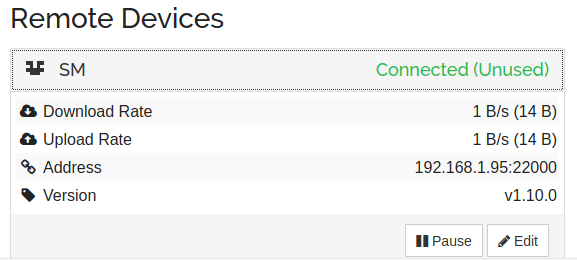
You’ll be notified by the second device that you want to connect with it. The second device will be added to the cluster when you click the Add Device button. The second device will show up as Connected in the list of Remote Devices after a little delay.
Step 3. Add Folders
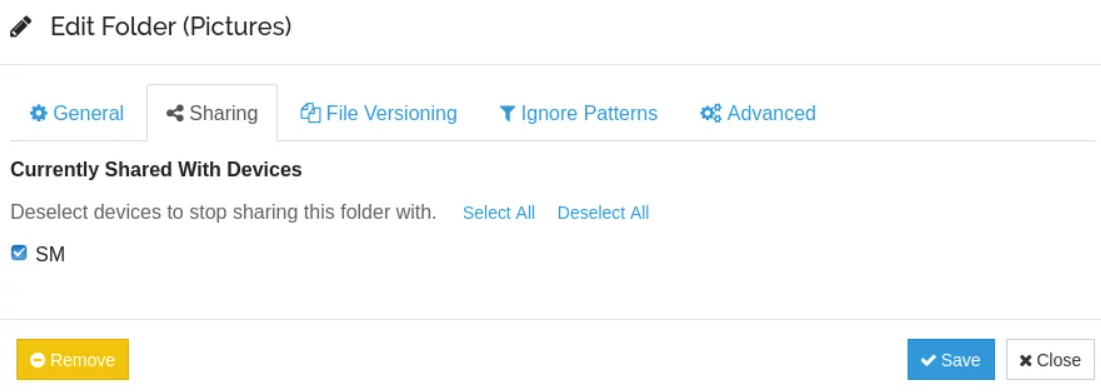
After adding a device to our cluster successfully, we can now begin synchronizing with it. However, we must first instruct it as to which directories to sync. Click the Add Folders button in the Folders section of the Syncthing WebUI to add a folder for syncing. You can enter the Folder Path of the folder you want to sync in the popup that appears. Then, go to the Sharing tab and tick the boxes next to the devices that should sync this folder.
The devices checked will be informed that you want to share this folder with them when you click Save. The request is up for acceptance or rejection. If they decide to accept it, a path question will now be presented on the machine that is receiving the notice asking where the folder (for which the notification was sent) should be synced. The receiving machine will contain the requested route.
~Sync is the default shared folder. Make sure you restart Syncthing by selecting “Actions” > “Restart” after making changes, such as new Sync folders.
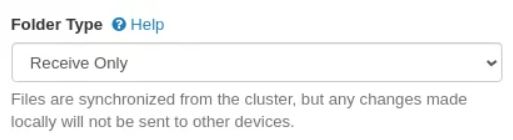
In Syncthing, three different folder types can be synced:
- Send & Receive (default)
- Send Only
- Receive Only
By selecting a folder and then selecting the Edit button, you can access these settings. Then choose the Folder Type option under the Advanced tab.
Note: Users of Linux and Windows devices should be aware that you cannot turn on the Send & Receive option because Windows does not remember the file permissions of Linux, and if Windows sends a file back, it will cause sync problems with (permission) refused. Only send or receive if necessary for this setup.
How to fix ”Failed to create folder marker” Error?
Sending and receiving messages between distant nodes might occasionally cause problems with Syncthing.
Failed to create folder marker: mkdir .stfolder: read-only file systemYou must have write access to the shared folder because Syncthing runs under your own user account. You don’t have write permission on that folder if you encounter the following error while sharing a folder.
So, you need to Configure Syncthing Permissions.
With setfacl, you can provide write permission.
sudo apt install aclsudo setfacl -R -m u:username:rwx /folder/path/Select your other Syncthing device in the Sharing tab. You can input the name patterns for files that shouldn’t be synced in the Ignore Permissions tab. You can select the folder type, rescan interval, and other options on the Advanced tab. the 3600-second standard complete scan interval. You can choose a shorter interval, such as 360 seconds, but avoid making it too short (less than 2 minutes), as this would cause Syncthing to consume a lot of CPU power.
To start syncing, click the Save button. The Web interface of the other device will show a message. In order to get files, click Add. The two devices are now syncing files. The download rate, upload rate, local folder size, and other information are displayed on the right side.
Set Up Nginx as a Reverse Proxy for Syncthing
At this point that you have reviewed all the required steps to Install Syncthing on Ubuntu to Synchronize Files, you can also Configure Nginx as a Reverse Proxy to be able to access the Syncthing server through port 80 (from a remote computer). Also, you can do this using Apache. Because Syncthing listens on 127.0.0.1:8384 and only connections from the same computer are allowed to access the Syncthing Web interface.
In this tutorial, we use the Nginx popular web server. If you are not sure in choosing Nginx or Apache, refer to Apache vs Nginx to decide better.
To install Nginx and create a server config file, run:
sudo apt install nginxWhen you are done, save and close the file. Use the following commands to test the Nginx configuration and reload Nginx.
sudo nginx -t
sudo systemctl reload nginx
If you don’t have a domain name, you can use the external server <IP> address or the URL http://syncthing.example.com to reach the Syncthing server.
Note: Since anyone can access your Syncthing web interface when the reverse proxy is set up, you need to enable user authentication in Setting to restrict access.
How to Synchronize Multiple Folders of Syncthing
It’s a good idea to run multiple instances of Syncthing for each user if you have many shared folders that belong to various users.
sudo systemctl start [email protected]
sudo systemctl start [email protected]
Because Syncthing will create the files with the user it runs as, if you run it as user1 and share folders that belong to user2, you will get out-of-sync/permission refused issues. The user’s syncthing configuration file located in the user’s home directory can be used to set the specific GUI port and sync port required for each instance.
nano ~/.config/syncthing/config.xmlGUI port configuration is
<address>127.0.0.1:8384</address>The default sync port configuration is
<listenAddress>default</listenAddress>Change it to:
<listenAddress>tcp://0.0.0.0:22001</listenAddress>That’s it! Most users find these steps easy to install Syncthing on Ubuntu. I hope you are one of them.
FAQ
Where is the main Syncthing config file location?
To change or fix any settings, go to:
/home/username/.config/syncthing/config.xml.I forgot my username & password? How to access Syncthing GUI
Go to Actions > Advanced to set User and Password. Tick Use TLS for https connection only.
How to not use Syncthing to free up the CPU?
Disable Watch for Changes in the Advanced section in editing the Syncthing folder between devices. Also, you can use the default re-scan that is scheduled for each hour to sync changes hourly to adjust watching longer or shorter.
How to back up files while transmit
File Versioning must be turned on in Folder Settings.
what is syncthing port?
The default syncthing port number is 8384.
Conclusion
In this article, you learned How to Install Syncthing on Ubuntu to Synchronize Files. Following the steps in this guide help you to install, configure, and use Syncthing on Ubuntu. It is a good idea to work with Syncthing if you are looking for a sync program with a friendly WebUI. There is a lot more to learn about Syncthing options since it is being developed constantly.
If you encounter any problems, please do not hesitate to contact us. Our technical support team will try their best to solve your problems.