Fix DNS_PROBE_FINISHED_BAD_CONFIG Error [13 Methods]
If, during online browsing and attempting to access a specific website, the browser fails to resolve the website domain name to an IP address and encounters issues connecting to the web server, it displays the DNS_PROBE_FINISHED_BAD_CONFIG error message. Various factors influence website access, and they load the website content together. If any of these elements face disruption, you will experience failure in accessing the desired website.
The DNS_PROBE_FINISHED_BAD_CONFIG error is a common error indicating a problem in DNS configuration, internet connection, network settings, browser configurations, security programs, or third-party applications, among other issues. Encountering this error when trying to access a website is frustrating for any user, whether they are the website owner or a visitor, as it prevents access to the website and its content. By identifying common causes of this error and learning troubleshooting solutions, especially those related to DNS issues, which are the primary reasons for the DNS_PROBE_FINISHED_BAD_CONFIG error, you can quickly diagnose and fix DNS_PROBE_FINISHED_BAD_CONFIG Error and access your desired website without challenges.
This article introduces the reasons behind the DNS_PROBE_FINISHED_BAD_CONFIG error in web browsers and provides solutions for fixing this error on popular operating systems such as Windows, Linux, macOS, etc. This article aims to assist you in overcoming the DNS_PROBE_FINISHED_BAD_CONFIG error efficiently. If you are using a computer or a VPS with Windows and Linux operating systems, don’t worry if you encounter this error because your problem will be solved by spending 5 minutes reading this article. Let’s start without wasting any time to address and resolve this error.
What is DNS_PROBE_FINISHED_BAD_CONFIG Error?
The DNS_PROBE_FINISHED_BAD_CONFIG error is a common error that occurs when the browser is unable to resolve the domain name to the IP address due to DNS configuration issues or incorrect network settings. As a result of DNS problems in searching for the web server associated with the domain name or IP address, a website becomes inaccessible, and you will receive the DNS_PROBE_FINISHED_BAD_CONFIG error message.

As you have previously become familiar with the definition of a DNS server, if DNS is not configured correctly, the browser fails to resolve the domain name to the IP address, preventing your access to the website. This issue has various reasons, which we will explain below so that you can easily troubleshoot and fix this problem by identifying common causes of the DNS_PROBE_FINISHED_BAD_CONFIG error.
Reasons for occurring DNS_PROBE_FINISHED_BAD_CONFIG Error
To resolve an error, you must first identify the reasons that lead to the occurrence of the error. This way, you can quickly address your problem using the relevant solution. Various causes can lead to the appearance of the DNS_PROBE_FINISHED_BAD_CONFIG error message in the browser, which will be discussed here:
- DNS Server Issues: Misconfigured DNS Servers or Unresponsive DNS Servers are among the main reasons leading to the occurrence of the DNS_PROBE_FINISHED_BAD_CONFIG error. This could be due to the manual configuration of DNS servers, servers being overloaded, or experiencing technical issues.
- Network Configuration Issues: This error may arise due to incorrect network configurations, such as incorrect IP settings or improper router configurations. These issues could result from changes made by administrators, and it’s essential to ensure the correctness of your network configuration.
- Firewall and Security Software: Some security software like firewalls or antivirus programs may interfere with DNS queries and block them. These programs may also support features that block or filter DNS, leading to the occurrence of this error.
- Browser Issues: Sometimes, the source of this error is the browser itself, which is caused by problems in browser settings, including incorrect proxy settings, browser extensions, or expired cache data.
- Hosts File Misconfigurations: Computers use the Hosts File to map domain names to IP addresses. The presence of malicious or incorrect entries in the Hosts File can lead to the occurrence of this error.
- ISP-Related Issues: DNS servers specified by your Internet Service Provider (ISP) may be faulty or misconfigured, leading to the display of the DNS_PROBE_FINISHED_BAD_CONFIG error.
- Temporary Internet Issues: Temporary internet connection problems are one of the reasons for this error, which is temporary and resolves itself after a while.
- Website-Specific Issues: Sometimes, the problem may be specific to the website you are trying to access.
- Local problems in your device’s DNS settings: Expired DNS cache or incorrectly renewed IP address are additional reasons for the occurrence of the DNS_PROBE_FINISHED_BAD_CONFIG error in the browser.
The reason for the occurrence of the DNS_PROBE_FINISHED_BAD_CONFIG error is one of the sources we discussed earlier. However, DNS and network issues can be considered the primary reasons for this error, and this source should be prioritized. The table below introduces corresponding solutions for each of the error sources to help you resolve your issue more quickly:
| Reasons | Solutions To Fix |
|---|---|
| DNS Server Issues | Checking and changing DNS server settings |
| Network Configuration Issues | Making sure your network is configured correctly, Updating Your Network Drivers, Restarting Your Router |
| Firewall and Security Software | Disabling the firewall and antivirus |
| Browser Issues | Disabling your Proxy server, Disabling browser extensions and Clearing Browser DNS Cache, Deleting temporary files |
| Hosts File Misconfigurations | Checking and editing Hosts File |
| ISP-Related Issues | Contacting Your ISP |
| DNS settings problems | Clearing your computer's DNS cache and Renewing Your IP Address |
You will learn how to fix DNS_PROBE_FINISHED_BAD_CONFIG error in the following.
Solutions to fix DNS_PROBE_FINISHED_BAD_CONFIG Error
Now that you have a better understanding of the DNS_PROBE_FINISHED_BAD_CONFIG error and its common causes, you can try the following methods to resolve your issue.
1. Change the DNS Settings
When encountering an error accessing the desired website, examining the DNS server settings is highly beneficial in resolving the issue, as problems related to DNS server configurations are among the primary causes of such errors. Therefore, prioritize checking the DNS server settings. Usually, default DNS server addresses are provided by internet service providers, and sometimes, these servers come with issues that affect your connection. Therefore, changing your DNS server to a more reliable and widely available server, such as Google DNS or OpenDNS, is recommended. Below, we will provide instructions on how to change the DNS server address in different operating systems:
On Windows:
- Go to the Start menu and select Settings.
- Search for “Network Status” and press Enter.
- From the “Advanced network settings” section, click on “Change adapter settings.”
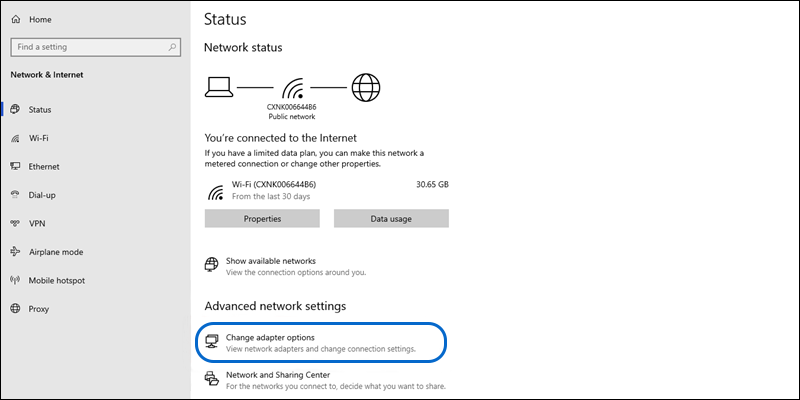
- Right-click on your network connection (usually labeled as “Ethernet” or “Wi-Fi”) and select “Properties.”

- In the list, select the “Internet Protocol Version 4” (TCP/IPv4) option and click on the Properties button.
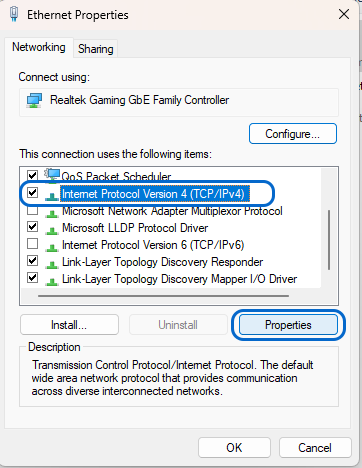
- Choose “Use the following DNS server addresses” and enter the DNS server addresses (e.g., 8.8.8.8 and 8.8.4.4 for Google DNS).

Click “OK” and restart your browser.
On macOS:
- Click on the Apple menu and go to “System Preferences.”
- From the left pane, click on “Network.”
- Select your active network connection (Wi-Fi or Ethernet).
- Click “Advanced.”

- In the “DNS” tab, click the “+” button to add a DNS server (e.g., 8.8.8.8 and 8.8.4.4 for Google DNS).
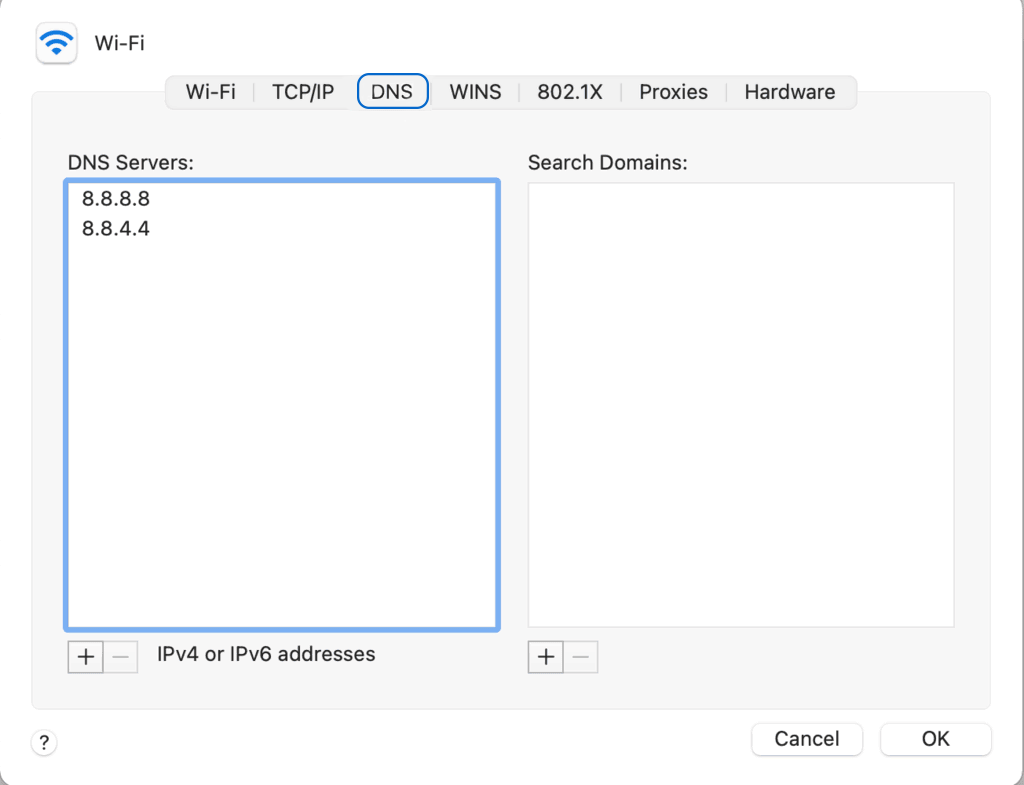
- To save your changes, click “OK” and “Apply.”
On Linux:
You can change DNS server settings by editing the network configuration file, usually located in the directory /etc/resolv.conf. To do this, use a text editor to open and modify the network configuration file, adding the desired DNS server addresses to its content. Our tutorial article on changing DNS server settings in Linux will guide you through the process more precisely.
2. Restart the Router
Issues in your network can lead to connectivity problems and display the DNS_PROBE_FINISHED_BAD_CONFIG error. One of the simplest troubleshooting methods for network-related issues is to restart the router, which, despite its simplicity, has proven effective in resolving problems. To do this, disconnect your router from the power source and wait at least 1 minute before reconnecting it and turning it back on. You can also restart your computer. The connection with the internet service provider is reset by restarting the router, which sometimes resolves the DNS_PROBE_FINISHED_BAD_CONFIG error.
3. Flush DNS Cache
To expedite the response time when searching on the internet, your computer caches DNS search information each time you visit a website. During web browsing, your computer uses this DNS cache information to speed up the display of websites and their content. If the DNS cache contains outdated or expired data, and your computer relies on this obsolete DNS cache, you may encounter the DNS_PROBE_FINISHED_BAD_CONFIG error. Clearing the DNS cache from your system is the best action to resolve this issue, as it removes expired DNS settings and updates search information. You have previously learned how to clear the DNS cache in Windows, Linux, and Chrome, but for a quick reminder, we will briefly mention it again.
On Windows:
To clear DNS Cache in Windows, open Command Prompt as an administrator and execute the following command:
ipconfig /flushdnsOn macOS:
To clear the DNS cache in macOS, open Terminal (click on the Apple icon, followed by Applications > Utilities > Terminal) and use the following command:
sudo dscacheutil -flushcacheOn Linux:
To clear the DNS cache in Linux, execute the appropriate command based on the distribution you are using:
sudo systemd-resolve --flush-cachesOr
sudo systemctl restart nscdOr
sudo /etc/init.d/nscd restart4. Reset Network Settings
Resetting network settings is another method to fix the DNS_PROBE_FINISHED_BAD_CONFIG error, which restores incorrect network configurations to their initial default values and establishes a new connection. Learn how to reset network settings on various operating systems:
On Windows:
- Go to the “Start menu” > “Settings“.
- Select “Network & Internet” and click the “Status” option.
- Click on the “Network reset” button.
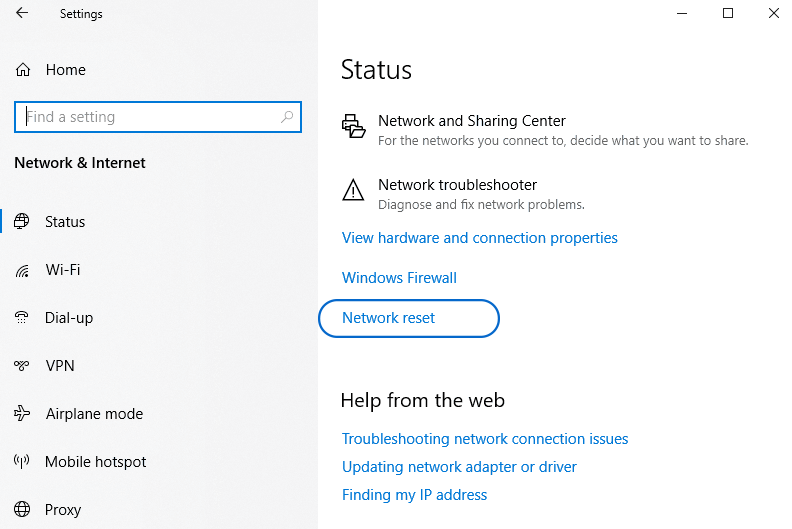
- Click on the “Reset now” button.
On macOS:
- Open Terminal.
- Run the Application.
- Type “cd /Library/Preferences/SystemConfiguration/” and press the “Return” key.
- Execute the following command to delete the network configuration file:
rm -f preferences.plist NetworkInterfaces.plist com.apple.airport.preferences.plist com.apple.wifi.message-tracer.plist- To flush the DNS cache, type:
sudo killall -HUP mDNSResponder ; sudo dscacheutil -flushcacheOn Linux:
- Open Terminal (using the CTRL+Alt+T keys).
- Restart the NetworkManager service with the following command to resolve network-related issues:
sudo systemctl restart NetworkManager- It is necessary to remove the connection profiles to reset all network settings, including your connections. Therefore, to delete all saved network connections, use the following command:
sudo rm -rf /etc/NetworkManager/system-connections/*- Restart the NetworkManager service again.
5. Renew the IP Address
Internet Service Providers (ISPs) provide dynamic IP addresses to users, which change periodically. The Dynamic Host Configuration Protocol (DHCP) handles the proper renewal of IP addresses. It’s possible that DHCP may not renew the IP address assigned to your computer correctly, leading to connectivity issues. Therefore, to resolve the DNS_PROBE_FINISHED_BAD_CONFIG error, you can request a new IP address from DHCP. However, before renewing it, make sure to release the old IP address and then follow the steps below based on the operating system you are using:
On Windows:
- Type cmd in the search bar.
- Open Command Prompt as an administrator.
- Run the following commands to Renew the IP Address:
ipconfig /release
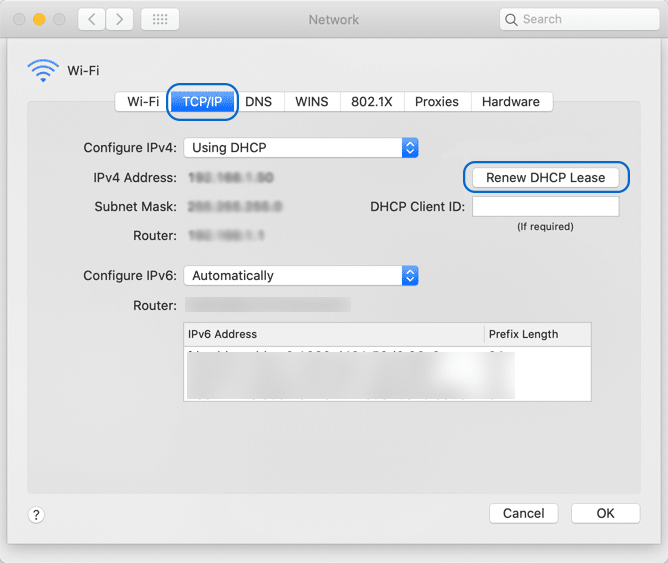
ipconfig /renewOn macOS:
- Navigate to the Apple menu.
- Click on “System Preferences“.
- Then, select the current network.
- Click on the “Advanced” button.
- Switch to the “TCP/IP tab” and click the “Renew DHCP” button.
On Linux:
- Open the terminal.
- Run the following command to release the current IP address:
sudo dhclient -r- Run the following command to renew the IP address:
sudo dhclient6. Update the Network Driver
If your issue persists, updating the Network Driver is worth trying to fix DNS_PROBE_FINISHED_BAD_CONFIG error. Updating the Network Driver helps solve any problems with network drivers, such as corruption or outdated drivers that may cause disruptions in the network or DNS issues. Therefore, regular updates to Network Drivers are a good practice for preventing DNS and network-related issues. Follow the steps below based on the operating system you are using:
On Windows:
- Open the Start menu, and in the search field, type “Device Manager,” then press Enter.
- Find the “Network adapters” option and expand it by clicking on it.
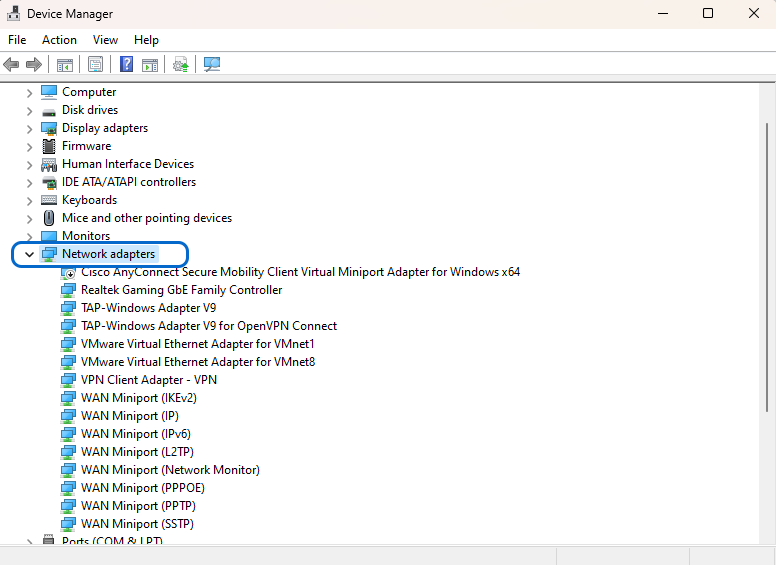
- To update the drivers, right-click on each of the drivers and select the “Update driver” option.
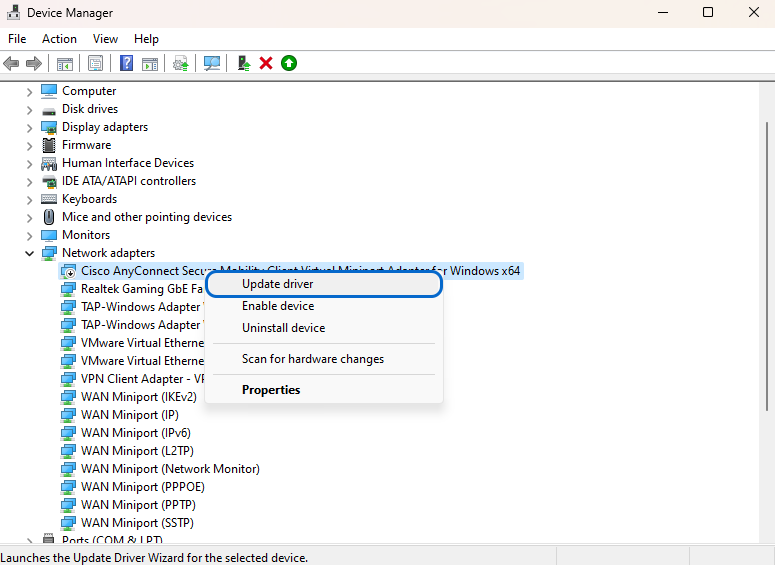
- Restart your computer.
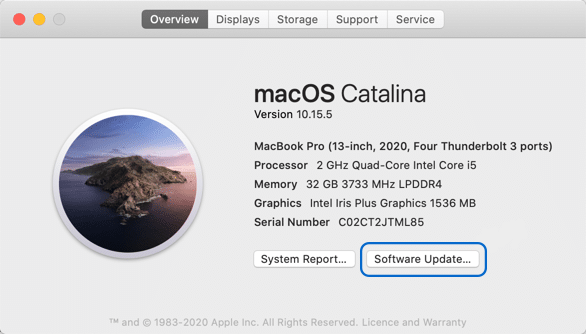
On macOS:
- Go to the Apple menu.
- Choose “About This Mac” > “Software Update.”
- If the “Update” button is displayed, it means your system requires an update. However, by displaying the current version of your operating system, you can ensure that your system is up to date.
On Linux:
- Open the terminal.
- Check the network hardware information by running the following command:
sudo lshw -class network- After checking the name and version of the drivers, find the apt library for the driver using the driver name:
apt search <driver name>- After checking the desired driver version provided in the output of the previous two commands, if necessary, update the driver to the latest version:
sudo apt install <package name>7. Check and Disable Firewalls and Antivirus Software
Some firewalls and security software may block DNS requests, leading to the DNS_PROBE_FINISHED_BAD_CONFIG error. The interference of firewalls and security software with network settings and DNS servers is a common measure for computer protection against malware. Therefore, if you have not succeeded in resolving your issue so far, it’s time to disable firewalls and security software temporarily. The methods vary based on the operating system you are using, and we will explain each one below:
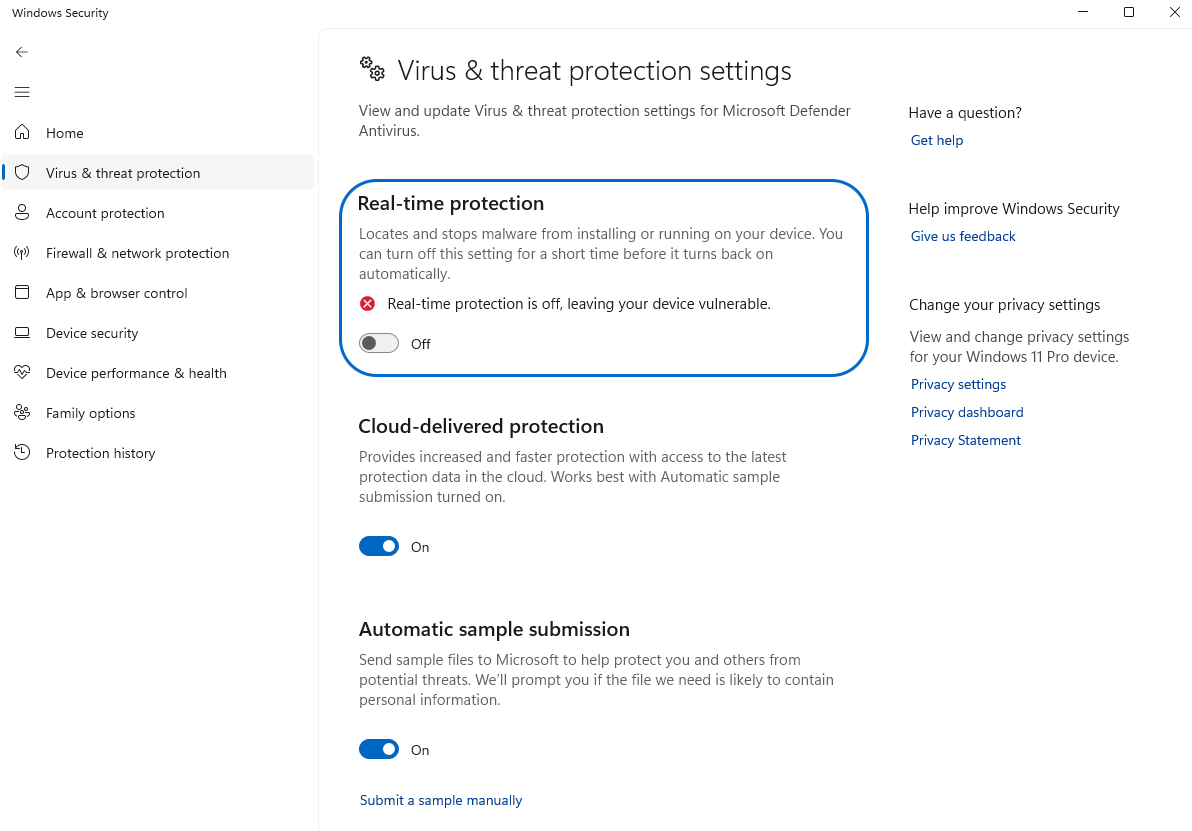
On Windows:
- Open the Start menu.
- Search for “Windows Security” and press Enter.
- Go to “Virus & threat protection settings” and Switch Real-time protection to Off.
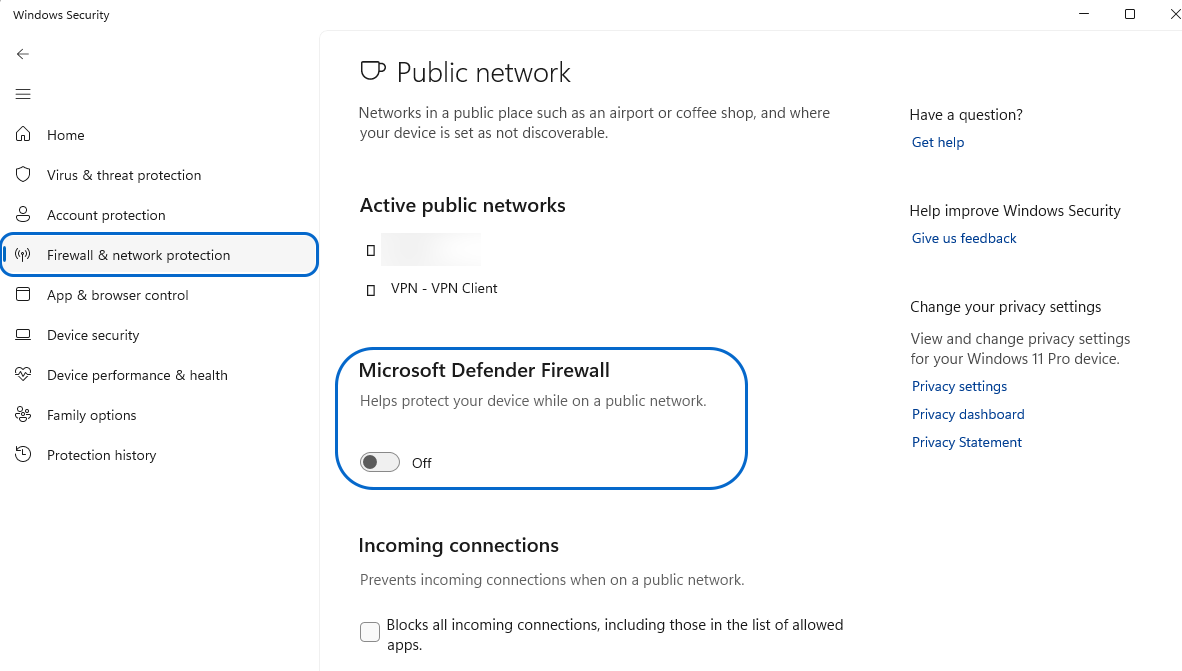
- Go to the “Firewall & network protection” tab, select active network profile (Domain network, Private network, or Public network), and then switch Windows Defender Firewall to Off.
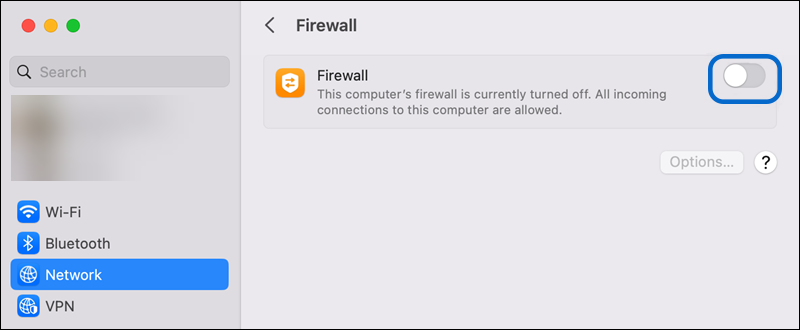
On macOS:
- Go to the Apple menu and click on “System Preferences.”
- In the sidebar menu, select the “Network” tab.
- On the right side, click on “Firewall.”

- Switch the toggle button from “on” to “off” to disable the firewall.
On Linux:
- Open the Terminal.
- The commands to disable the default firewall vary among different Linux distributions. Therefore, based on the distribution you are using, execute the appropriate command:
sudo ufw disable                               # Debian-based systems(e.g., Ubuntu, Debian)
sudo systemctl disable firewalld     # Red Hat-based Systems (e.g., CentOS, Fedora, RHEL)
sudo systemctl disable iptables       # Arch Linux
After disabling the firewall and antivirus, check access to a specific website. If the issue is resolved, the firewall or antivirus settings have caused the error. In such cases, you should contact their support team for assistance or consider replacing the software with an alternative.
Remember that firewalls are a good method for securing your system, so permanently disabling firewalls and antivirus programs makes your system vulnerable to threats and malware. Therefore, it is not recommended to disable firewalls and antivirus permanently.
8. Clear the Browser Cache
In addition to your computer, the browser you consistently use for web browsing stores information in its cache to improve the responsiveness to user requests. The expiration of data in the browser cache can lead to the appearance of DNS error messages, and clearing the browser cache is an effective method to resolve the DNS_PROBE_FINISHED_BAD_CONFIG error. The steps for clearing browser cache in common browsers are provided here:
Clearing the Google Chrome browser cache:
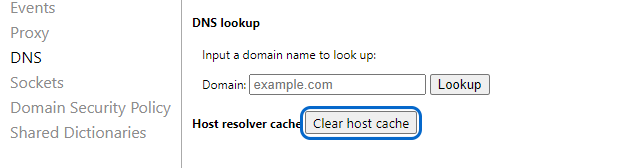
- Open a new tab in Chrome.
- Go to the following address:
chrome://net-internals/#dns- In the DNS tab, click the Clear Host Cache button in front of the Host Resolver Cache.
- Restart the browser and check if your problem is solved by searching for a website in your browser.
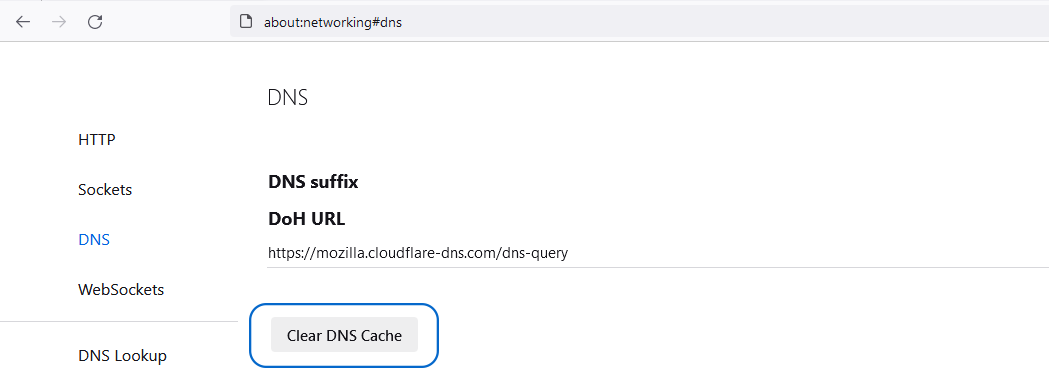
Clearing Firefox browser cache:
- Open a new tab in the Firefox browser.
- Enter the following address in the address bar:
about:networking#dns- Click on the “Clear DNS Cache” button.
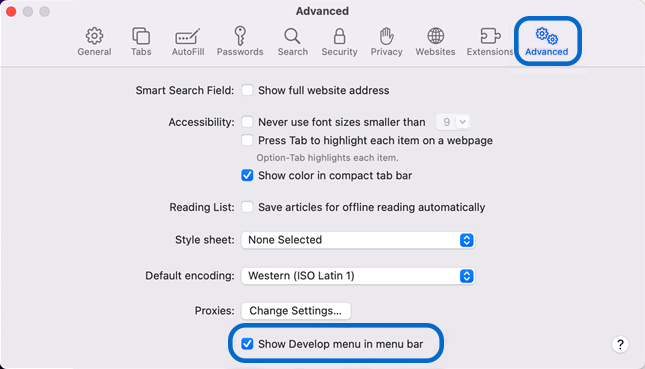
Clearing the Safari browser cache:
- From the Safari menu, select the “Settings” option.
- Navigate to the “Advanced” tab and mark the box next to the “Show Develop menu in menu bar.”
- Then, expand the “Develop” menu from the menu bar and click “Empty Caches” in the displayed list.
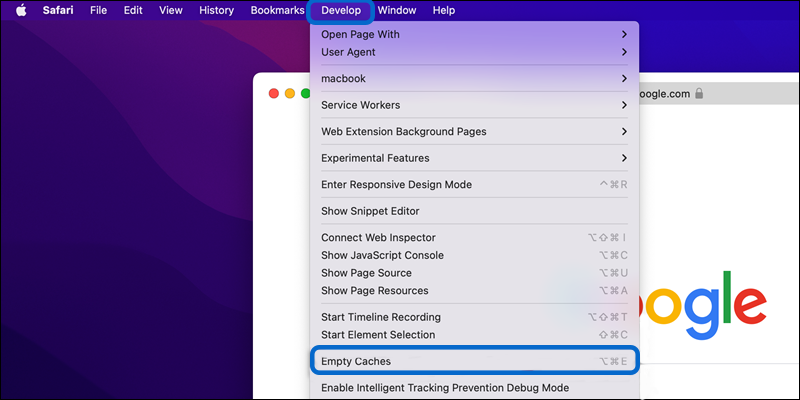
- To apply the changes, restart your browser.
9. Update Your Browser
Various incompatibilities can arise from using an outdated browser, and one of the reasons for the DNS_PROBE_FINISHED_BAD_CONFIG error could be using an old browser. Therefore, updating the browser can be an excellent way to resolve this issue, allowing you to benefit from the latest features. The following instructions will help you update the Google Chrome browser:
- After launching the browser, click on the three-dot icon in the top right corner of the page and select “Settings.”
- Click on “About Chrome.” If your browser is up to date, there is no need to do anything. Otherwise, if you see the “Update Google Chrome” button, it’s time to update your browser.

10. Disable the Proxy Server and browser extensions
Some problems or browser settings can lead to the appearance of the “DNS_PROBE_FINISHED_BAD_CONFIG” error. This may include incorrect proxy settings and browser extensions that may conflict with your network configuration. To resolve this issue, the best method is to disable add-ons such as Proxy Server and browser extensions. To disable or remove extensions in the Chrome browser, follow the steps below:
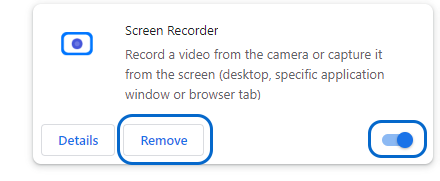
- Open the three-dot menu after launching your browser.
- Hover over More Tools and click “Extensions.”
- Disable the displayed extensions by switching the toggling button to “off” or remove them by clicking the “Remove” button.
To disable Proxy in the Chrome browser on Windows and macOS, follow the instructions below:
On the Google Chrome browser:
- Open the browser and click on the three-dot menu.
- Select the “Settings” option.

- Choose the “System” section from the left-hand menu and click “Open your computer’s proxy settings.”
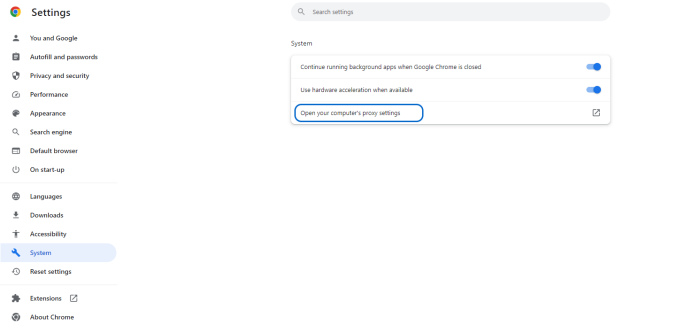
- Consequently, the corresponding proxy settings in your operating system will be displayed, where you can disable the proxy.
On Windows:
- Open the Start menu and go to “Network and Internet” > “Proxy.”
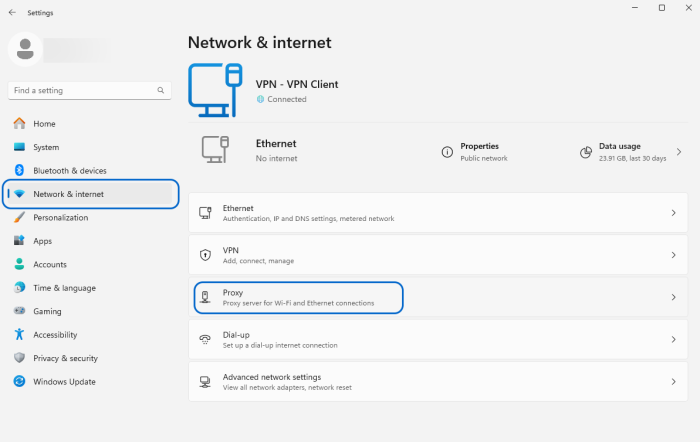
- Disable the desired proxies by turning off the toggle key for Proxy server settings.
- Click the “Save” button.
On macOS:
- Navigate to the “connection settings” page through the Apple menu and select the “Proxies” tab.
- Uncheck all options related to the proxy.
- Press the “OK” button.
11. Delete Temporary Files
Browsers and operating systems store temporary data (such as cookies, browsing history details, and saved websites) in temporary files. If these data expire or become corrupted, they can conflict with DNS records and result in the DNS_PROBE_FINISHED_BAD_CONFIG error. Therefore, the solution to this problem is to delete temporary files from the operating system. Below, you will learn the steps to delete temporary files on different operating systems:
On Windows:
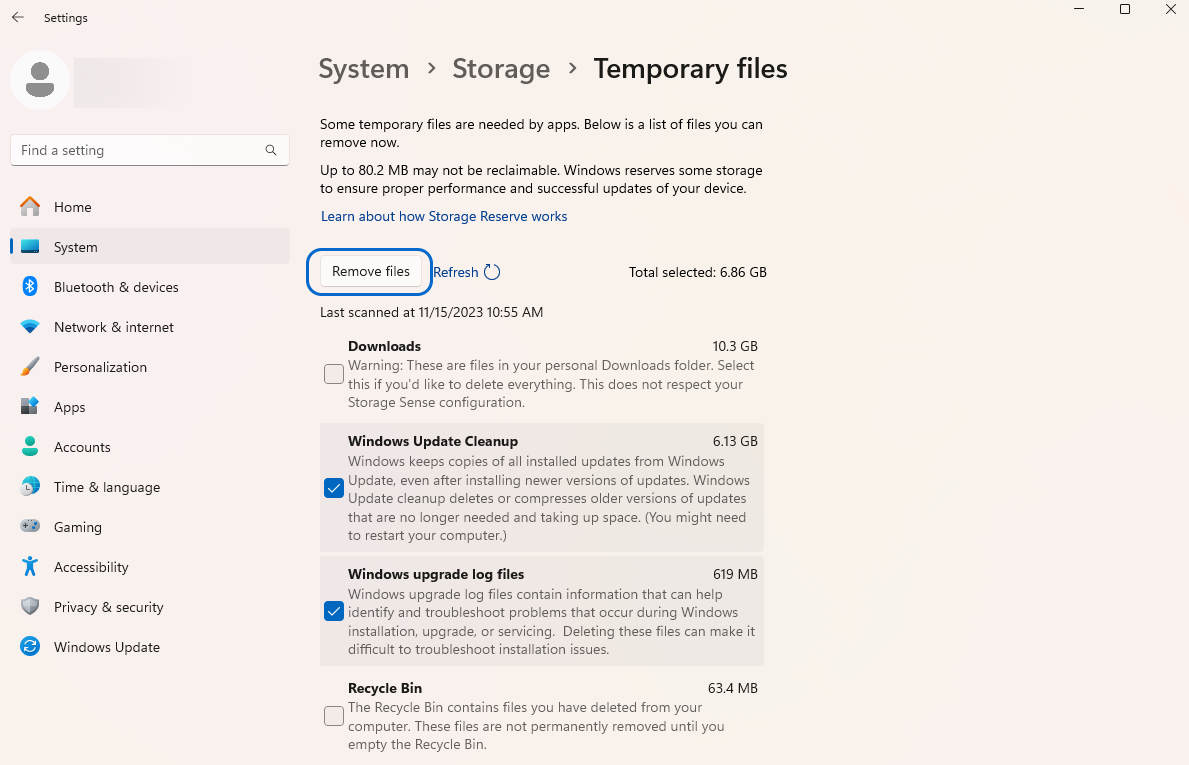
Method 1: Remove temporary files via storage settings
- Go to the Start menu and type “storage” in the search bar.
- Click “Storage settings” in the search results and select “Temporary Files” from the Storage page.
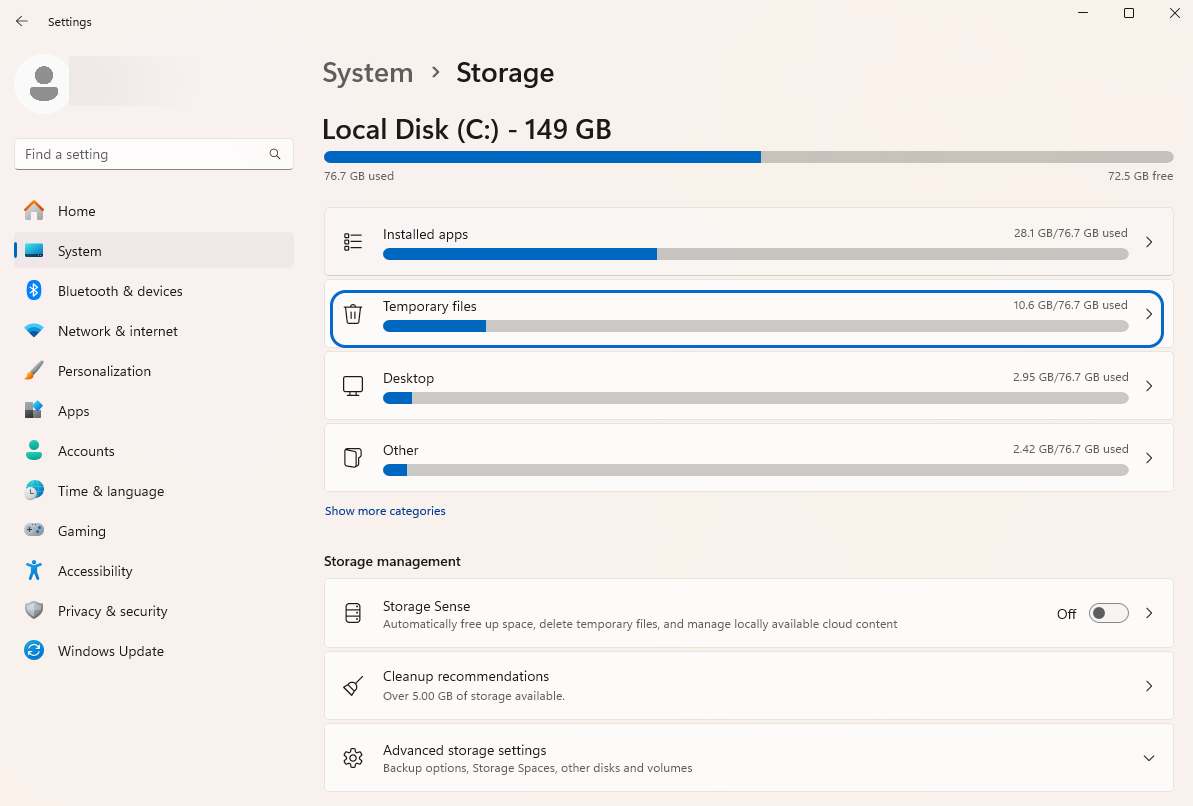
- Choose the type of files you want to delete and click the “Remove files” button.
Method 2: Manually remove temporary files
- Open the Start menu and type “run” in the search bar to launch the Run app.
- In the Run app dialog box, enter “%temp%” and hit OK.
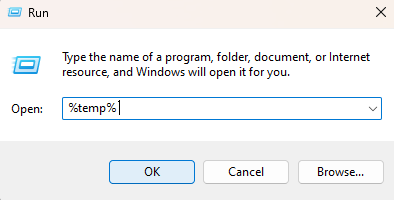
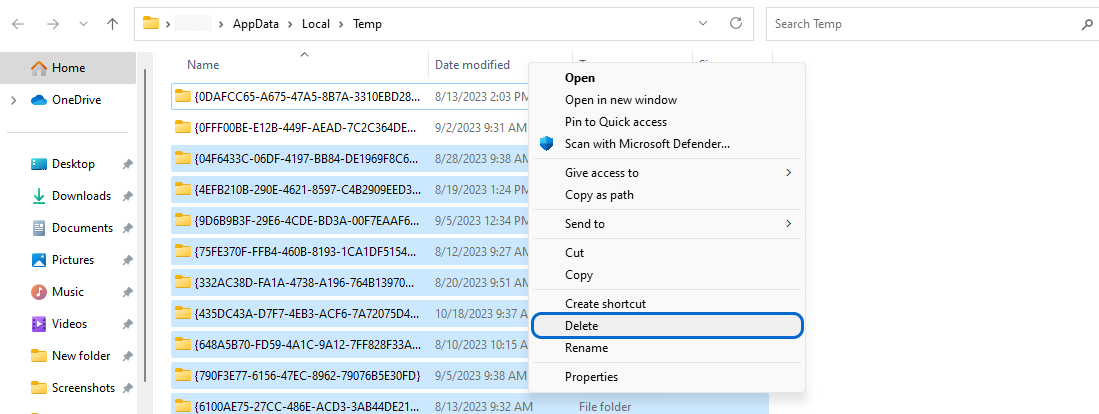
- Windows Explorer will open the temp directory containing temporary files, allowing you to select and delete files and folders. (You can delete files by right-clicking on each file and selecting the “Delete” option from the drop-down menu.)
On macOS:
- Open “Finder” from the Dock menu.
- To access the search bar, press “CMD+Shift+G.”
- In the search bar, type “/Library/Caches” and press Enter.
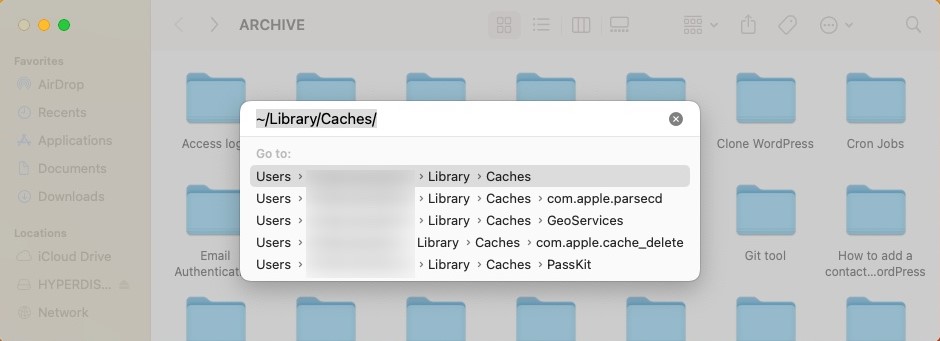
- As a result, all temporary files and caches will be displayed, and you can delete them by sending them to the Trash.
On Linux:
The/tmp and /var/tmp directories in Linux contain temporary files. You can delete temporary files by running the following commands in the terminal:
sudo rm -r /tmp/*This command deletes all temporary files and directories in the /tmp directory.
If you want to locate and delete all regular files (not directories) within the /tmp directory, use the following command:
sudo find /tmp -type f -delete12. Fix Hosts file misconfigurations
The Hosts file maps domain names to IP addresses. Incorrect configurations in the Hosts file, such as inaccurate or malicious entries, can lead to problems with network connectivity and domain resolution. Below, we will guide you on how to troubleshoot the Hosts file on Windows, Linux, and macOS:
On Windows:
- Open Notepad with administrative privileges. (You can do this by right-clicking the Notepad and selecting “Run as administrator.”)
- Open the Hosts file in Windows:
C:\Windows\System32\drivers\etc\hosts- Check the Hosts file for incorrect entries. Each line should follow the format IP_address Hostname. If necessary, fix them.
- Save the file.
- Open the command prompt with administrative privileges.
- Flush the DNS cache:
ipconfig /flushdnsOn macOS:
- Open the Terminal.
- Edit the Hosts file using a text editor like nano or vi:
sudo nano /etc/hosts- Examine the entries in the Hosts file and fix them if necessary.
- Save the file and exit the text editor.
- Clear the DNS cache:
sudo dscacheutil -flushcacheOn Linux:
- Open the Terminal.
- Edit the Hosts file using a text editor with root privileges:
sudo nano /etc/hosts- Check the entries in the Hosts file and fix incorrect entries if necessary.
- Save the file and exit the text editor.
- Clear the DNS cache, if necessary:
sudo systemd-resolve --flush-caches13. Scan the Computer
Scanning your computer for malware helps you identify and remove malware, viruses, and other threats, safeguarding your system. One of the objectives of malware and viruses is to manipulate cached DNS records and redirect users to malicious and fake websites. Therefore, scanning your computer for malware effectively enhances DNS and system security against attackers and cyber threats.
Conclusion
Encountering the “DNS_PROBE_FINISHED_BAD_CONFIG” error can be frustrating and troublesome for many users, but there are various ways to address and resolve it.
This article has provided instructions on diagnosing and fixing the “DNS_PROBE_FINISHED_BAD_CONFIG” error, including changing DNS server settings, clearing the DNS cache, checking network configuration, and addressing browser or security software-related issues. One of these methods should resolve your issue. However, if, after trying all the provided methods, the problem persists and you cannot solve it on your own, consider seeking assistance from your network administrator, ISP, or IT support.
We hope this troubleshooting guide for resolving the “DNS_PROBE_FINISHED_BAD_CONFIG” error proves helpful in resolving your issue. If you have any questions, feel free to share them with us in the comments section.