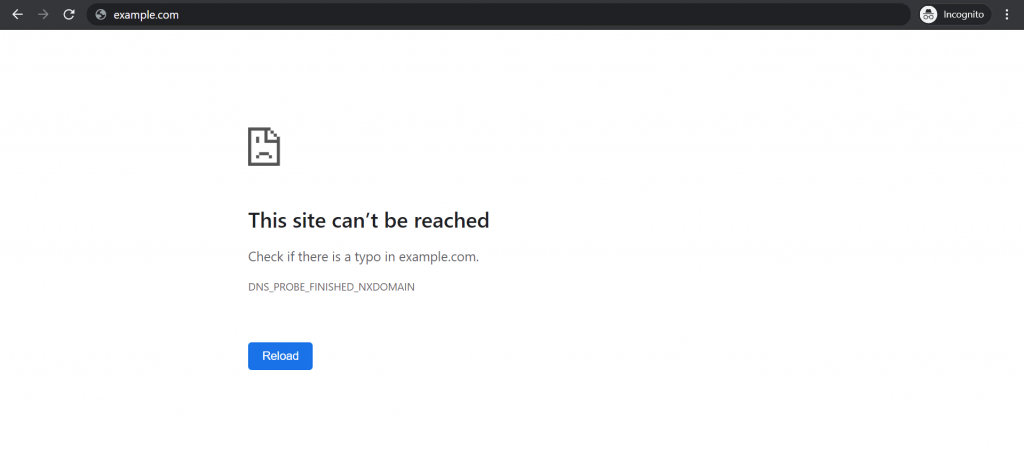
Fix DNS_PROBE_FINISHED_NXDOMAIN in Linux & Windows
You have undoubtedly encountered the “DNS_PROBE_FINISHED_NXDOMAIN” error at least once during web surfing. You know how the continuous occurrence of this error while accessing various websites can be frustrating. The “DNS_PROBE_FINISHED_NXDOMAIN” error is one of the common and familiar errors encountered during web browsing. It occurs when the DNS server encounters a problem resolving the domain name to an IP address. Consequently, this issue prevents access to the desired website and displays this error in your browser.
The occurrence of the “DNS_PROBE_FINISHED_NXDOMAIN” error in Linux and Windows can have various causes, including DNS server issues, incorrect DNS settings, or network configuration problems. In this article, we intend to teach practical methods for troubleshooting and resolving the “DNS_PROBE_FINISHED_NXDOMAIN” error in Linux and Windows so that your web browsing does not become more exhausting. If you’re ready, let’s delve into expert troubleshooting of DNS server and network problems.
What does the “DNS_PROBE_FINISHED_NXDOMAIN” error mean?
The “DNS_PROBE_FINISHED_NXDOMAIN” error is a message web browsers display when the DNS server cannot resolve the domain name to an IP address. To better understand this error, let’s break down its components and analyze it to diagnose the problem more quickly.
DNS (Domain Name System): DNS is a system that translates human-readable domain names into their respective IP addresses to facilitate communication between devices on a network when accessing websites over the Internet.
PROBE: In networking terminology, “probe” refers to a test or inquiry made to gather information about a system or network.
FINISHED: Indicates the termination of the DNS lookup process.
NXDOMAIN: NXDOMAIN stands for “Non-Existent Domain,” indicating that the domain being queried does not exist in the DNS system. The DNS server could not find a record for the domain name.
Therefore, this error indicates that the DNS server failed to obtain a record or any information for the domain you are attempting to access.
Reasons for the DNS_PROBE_FINISHED_NXDOMAIN error occurrence
After purchasing a VPS running Linux or Windows, you may encounter the “DNS_PROBE_FINISHED_NXDOMAIN” error when trying to access various websites. In this section of the article, you will identify common reasons for this error and fix your issues quickly with the solutions we will provide.
Various reasons cause the “DNS_PROBE_FINISHED_NXDOMAIN” error to appear in the web browser. Here, we will mention the underlying reasons that lead to the occurrence of the “DNS_PROBE_FINISHED_NXDOMAIN” error:
- Typo in the domain name and website address
- DNS server issues like DNS misconfiguration
- Domain not registered or has been removed or expired
- network connectivity issues
- VPN or antivirus problems
- DNS cache issues such as outdated or incorrect DNS entries on your device
- Firewall or security settings
Solutions to fix DNS_PROBE_FINISHED_NXDOMAIN error in windows and linux
Now that you know the common causes of the “DNS_PROBE_FINISHED_NXDOMAIN” error, you can troubleshoot and fix your problem faster and more efficiently. There are various troubleshooting tools to fix DNS errors, but this guide will teach you the most practical methods to fix the “DNS_PROBE_FINISHED_NXDOMAIN” error.
1. Restart Networking Services and Reset Network Adapter
Restarting the Networking service is one of the simplest and most basic methods to solve any problem, which often resolves the issue in most cases and has become a routine for solving problems. Although this method is the simplest, it may play a role in solving your problem. Therefore, you can reset the network services in the Windows and Linux systems to solve “DNS_PROBE_FINISHED_NXDOMAIN” errors.
For Linux:
You can use the following command to Restart Networking service in Linux:
- Debian-based Linux:
sudo systemctl restart networking- CentOS or Red-Hat-based Linux:
sudo systemctl restart network- Fedora:
sudo systemctl restart NetworkManager- Arch Linux:
sudo systemctl restart networkRestarting the networking service in Linux causes a network adapter reset, which is another solution to resolve the DNS_PROBE_FINISHED_NXDOMAIN error in Linux and Windows. So, By executing the relevant command to restart the networking service in Linux, you also reset the network adapter.
For Windows:
Follow the steps below to Restart the Networking Service in Windows:
- Press the shortcut keys Win + X and select “Windows Terminal (Admin)” or “Command Prompt (Admin).”
- Run the following commands and then hit Enter:
netsh interface set interface "Local Area Connection" admin=disable
netsh interface set interface "Local Area Connection" admin=enable
Replace “Local Area Connection” with the actual name of your network interface if it’s different.
To reset the network adapter in Windows, you should follow the steps below:
- Launch the Command Prompt by right-clicking on the Windows start button.
- Type “netsh winsock” in the Windows command prompt and hit enter.
- After running the command, restart the Windows system.
2. Check DNS Settings
Incorrect DNS configuration can disrupt DNS functionality, so it’s essential to ensure correct DNS settings. To resolve the DNS issue, check the DNS settings in both Linux and Windows.
For Linux:
Since the /etc/resolv.conf file contains DNS configurations in Linux, you can check the DNS configuration in Linux by running the following command:
cat /etc/resolv.confBy running this command, you can ensure the validity and reachability of the listed DNS servers. If you discover that the DNS servers are not configured correctly, you must change the DNS Server Settings in Linux.
For Windows:
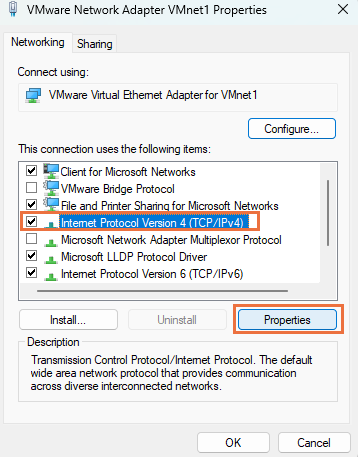
To check the DNS settings and ensure proper configuration and the validity of available DNS servers, follow these steps in Windows:
- Navigate to “Network and Sharing Center” > “Change adapter settings.”
- right-click on your network connection.
- Select “Properties” and then “Internet Protocol Version 4 (TCP/IPv4)” to check your DNS settings.
3. Check Hosts File
Hosts file is a text file that your system uses every time you browse the web to match the domain name to the corresponding IP address to prevent the default DNS mapping and fetch the correct website for display. Therefore, if the Hosts File contains incorrect entries, it may lead to DNS-related issues. In some cases, malware can make changes to the Hosts File, redirecting traffic to incorrect and troublesome addresses, and preventing you from accessing the desired website.
Hence, you should check the contents of the Hosts File in both Linux and Windows to ensure that no incorrect entries exist.
For Linux:
Check the Hosts file In Linux (/etc/hosts file )and fix the DNS issue through the following instructions:
- Launch Terminal.
- Navigate to the /etc directory through the following command:
cd /etc- Open the Hosts File using your preferred text editor:
sudo nano hosts- It’s time to edit the Hosts File, Find the entry for the desired website in the Hosts File, and delete it.
- Save the Hosts File and exit the nano editor.
- Restart the Linux system and check whether you can successfully access your desired website.
For Windows:
The Hosts File is located at C:\Windows\System32\drivers\etc\hosts in Windows. Therefore, to check the Hosts File in Windows, follow these steps:
- Type Notepad in the search bar, then right-click on it and choose Run as administrator to open it with administrative privileges.
- Select the “File” option and click “Open” from the displayed menu.
- In the filter menu, select the” All Files” option.
- In the File name box, enter the following path:
C:\Windows\System32\drivers\etc\
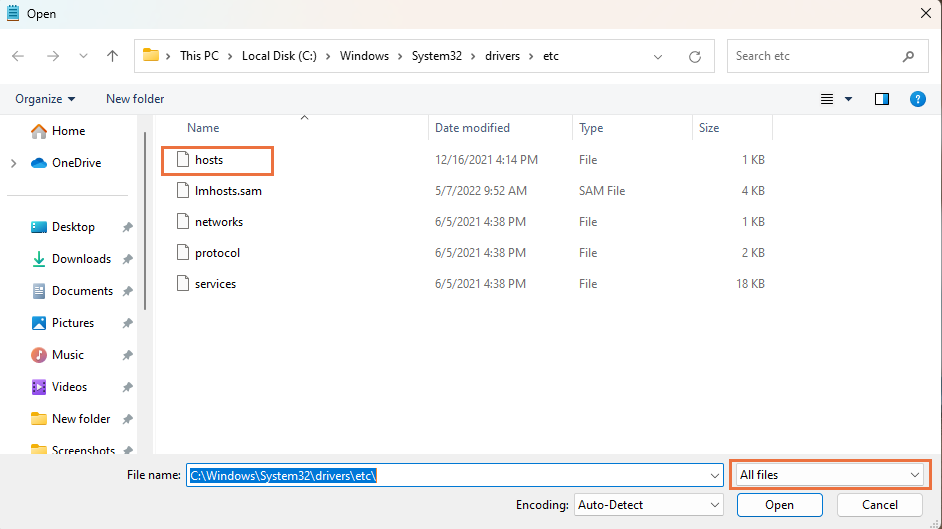
- Open the Hosts File.
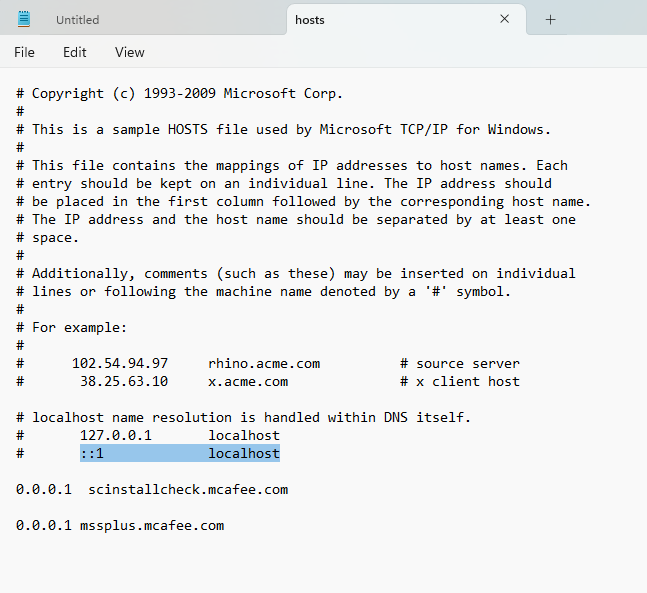
- The content of this file displays a list of blacklisted websites. If your target website’s domain name and IP address are placed below the line ::1 localhost, remove it and save the file.
4. Flush DNS Cache
DNS caches contain information that DNS uses to improve and speed up the process of mapping various domain names to their respective IP addresses. Therefore, the DNS cache stores all the IP addresses of websites you have previously visited, which may become outdated with website information updates. These outdated IP addresses may prevent access to your desired website, therefore, Clearing the DNS cache in Windows and Linux can assist in resolving DNS resolution issues. Clearing the DNS cache ensures that up-to-date website information is stored, fixing the DNS_PROBE_FINISHED_NXDOMAIN error in Windows and Linux.
Although you have previously learned how to clear the DNS cache in Windows and Linux, we will provide a brief tutorial for this purpose in this article. However, we recommend learning this method from the previous article.
For Linux:
If you suspect a DNS cache issue, flush the DNS cache in popular Linux distributions, including Ubuntu, Debian, and CentOS, using the following command:
sudo systemd-resolve --flush-cachesYou can also use the following command to clear the DNS entries:
sudo /etc/init.d/nscd restartFor Windows:
Use the following instructions to flush the DNS cache on Windows:
- Find “Command Prompt” in the list of start menu and launch it with administrative privileges.
Run the following command and then press the Enter:
ipconfig /flushdns- Launch the browser and check again if you are getting the “DNS_PROBE_FINISHED_NXDOMAIN” error when attempting to access the desired website.
5. Release and Renew IP Address
If flushing the DNS cache doesn’t resolve the DNS issue, giving up the lease to your computer’s old IP address and requesting a new one is an effective method to solve network connection issues. You can change the address provided by DHCP with Release and Renew IP Address.
For Linux:
To Release and Renew IP Address in Linux, follow these steps in order:
- Open the Linux terminal by pressing the Ctrl+Alt+T shortcut keys.
- To release the current IP, use the following command:
sudo dhclient -rOutput:
Killed old client process- After making sure that the old client process is terminated, renew the IP address by running the following command:
sudo dhclientThen, test connecting to the desired website to see if your problem is resolved.
For Windows:
Use the following steps to Release and Renew IP Address in Windows:
- Launch command prompt as administrator
- Release the current IP address via the following command:
ipconfig/release- Run the following command to check full IP configs for all the adapters:
ipconfig/allUse the following command to reset the DNS cache:
ipconfig/flushdnsRenew the DNS setting for all adapters through the following command and press Enter:
ipconfig /renewTo reset your previous IP settings and reinstate the Winsock Catalog, run the following command:
netsh int ip set dns
netsh winsock reset
Exit the command prompt and restart your Windows system. Then, open your browser, search for the website URL you want, and check whether your problem is solved.
6. Clear Browser DNS Cache
Browsers, separately from the operating system, cache website data you visit to reduce search time and speed up domain name translation to the IP address. Clearing the browser’s DNS cache is a quick method to resolve DNS errors. In the following, we will provide instructions on how to flush the browser DNS cache in popular browsers like Chrome and Firefox.
Clearing Browser DNS Cache in Chrome
- Open the Chrome browser and enter chrome://net-internals/#dns in the browser’s address bar.
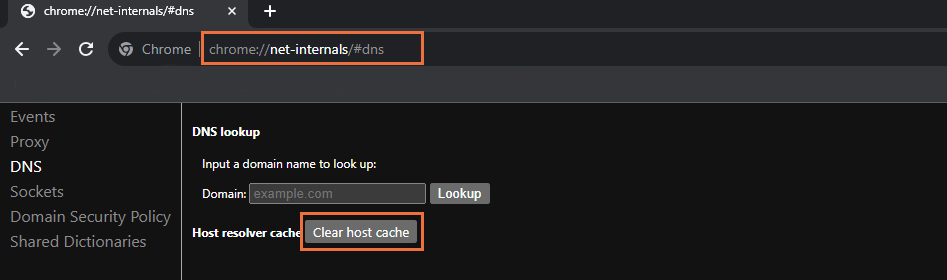
- Hit the “Clear host cache” button.
- To apply your changes, restart the Chrome browser.
Clearing Browser DNS Cache in Firefox
- Launch the Firefox browser, and in the address bar, enter about:networking#dns.
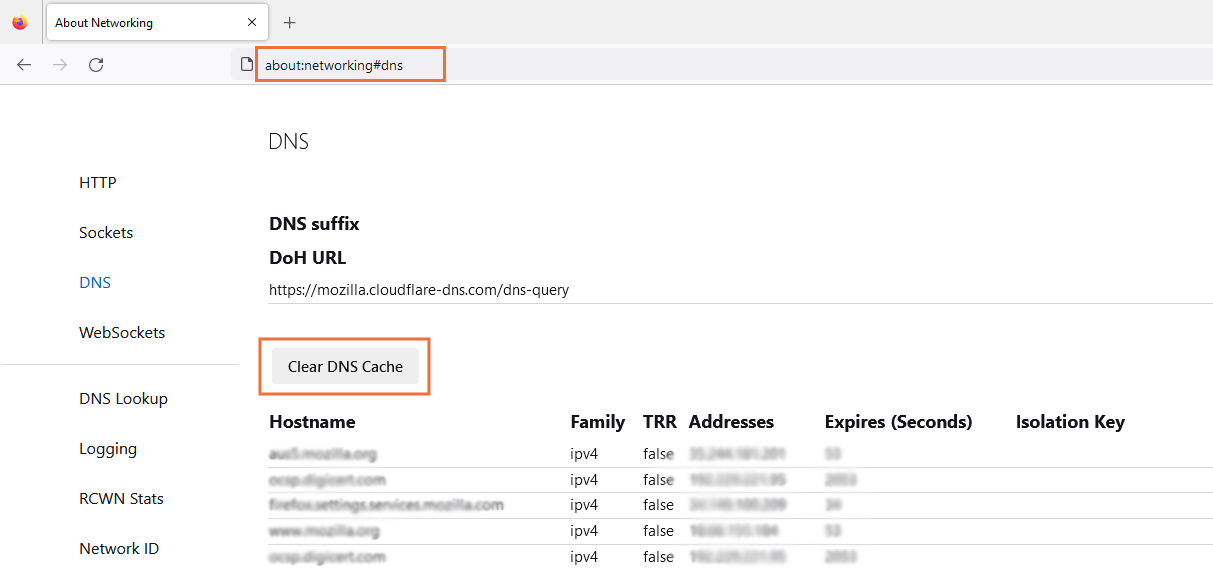
- Click on the “Clear host cache” button.
- You must restart the Firefox browser for the changes to take effect.
7. Reset Chrome Flags
Chrome Flags are a hidden and experimental feature in the browser that allows users to enable or disable settings and features that are not typically accessible. These features are usually provided for reasons such as performance testing, experimenting with new features, finding and fixing issues, or improving efficiency in the browser. If Chrome Flags have incorrect settings, it can block access to a specific website. Therefore, resetting Chrome Flags can be helpful in resolving the DNS_PROBE_FINISHED_NXDOMAIN error. Follow the steps below for this purpose:
- Open the Chrome browser and go to the “chrome://flags” address to review Chrome flags and their status.
- Click the “Reset all” button, or you can individually review the status of each flag and modify them if necessary.
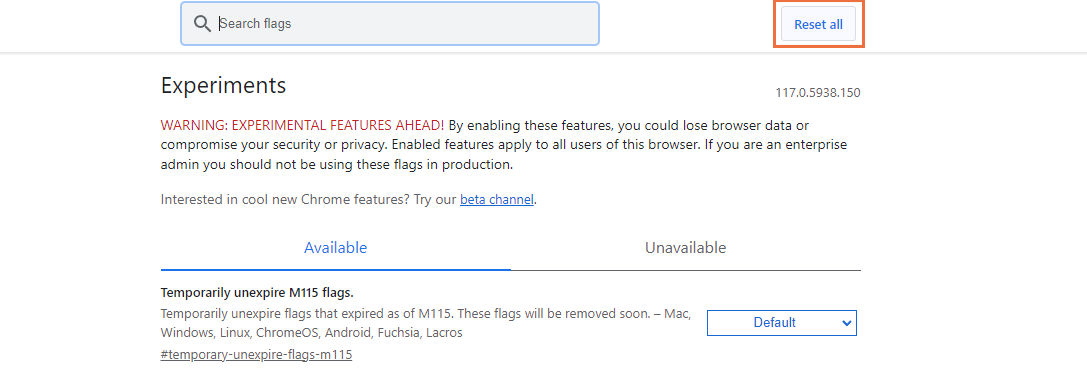
- Restart the Chrome browser to apply your changes.
8. Disable Firewall
Firewalls block access to malicious websites to enhance system security. Incorrect firewall configuration can prevent access to specific websites and result in displaying the DNS_PROBE_FINISHED_NXDOMAIN error. Therefore, you should review the firewall settings and temporarily disable the firewall if needed.
For Linux:
Disabling the firewall can vary based on the Linux distribution and the firewall tool in use (e.g., iptables, UFW, firewalld). Here are a few common methods to temporarily disable the firewall in popular Linux distributions:
Disabling iptables in Linux (for older distributions)
If you are using iptables on your Linux system, temporarily stop the iptables service to disable the firewall. To do this, run the following command as root or with sudo:
sudo systemctl stop iptablesDisabling UFW in Linux (for Debian/Ubuntu-based distributions)
If the UFW firewall is enabled on your Linux system, disable it by running the following command:
sudo ufw disableDisabling firewalld in Linux (for CentOS/Fedora-based distributions)
If you use firewalld, you must temporarily stop the firewalld service to disable it. For this purpose, use the following command:
sudo systemctl stop firewalldFor Windows:
We provided a comprehensive guide to disable the Windows firewall temporarily, but here we will briefly mention the steps. The steps to disable the firewall in Windows are as follows:
Navigate to Start menu > Windows security > Firewall & network protection > Select the active network profile > Turn the Microsoft Defender Firewall off.
After disabling the firewall, restart your system and check access to your desired website. If the error disappeared after disabling the firewall, the issue was with the firewall. However, if you still encounter the DNS error, the problem may not be with the firewall. In that case, re-enable the firewall, as disabling the firewall makes your system vulnerable to security threats and risks.
9. Disable VPN and Antivirus
Using antivirus and VPN is essential for security and data protection. Using both Simultaneously puts your system at a lower risk and helps preserve your data and privacy. However, they can block access to certain websites, leading to DNS errors. Temporarily disabling your antivirus and VPN allows you to check if the DNS-related issues are caused by them or for other reasons. You can roll back the changes if not needed.
So, shut down the VPN and try to connect to your desired website. Additionally, if you are using an antivirus, temporarily pause or quit it and check the access to your desired website.
10. Use Another DNS Server
If none of the solutions resolve the DNS error, you can use reliable and fast DNS servers such as OpenDNS or Google DNS instead of your Internet service provider’s DNS servers to solve the problem.
For Linux:
Changing DNS servers to Google DNS or OpenDNS in Linux requires modifying the DNS configuration file or network settings. The following steps will guide you in changing the DNS servers:
- Open /etc/resolv.conf file using a text editor in the terminal:
sudo nano /etc/resolv.conf- Add the OpenDNS servers to the file:
nameserver 208.67.222.222
nameserver 208.67.220.220- Alternatively, you can Add the Google DNS servers to the file by running the following command:
nameserver 8.8.8.8
nameserver 8.8.4.4- Save and close the file.
For Windows:
To change the DNS server address in Windows, follow these steps:
- Navigate to Control Panel > Network and Sharing Center.
- Select “Change adapter settings” from the left pane menu.

- Right-click on the current connection and choose the “Properties” option.
- Select “Internet Protocol Version 4 (TCP/IPv4)” or “Internet Protocol Version 6 (TCP/IPv6)” and click the “Properties” button.
Check the “Use the following DNS server addresses” option and enter the following numbers:
For Google DNS:
Preferred DNS server:8.8.8.8
Alternate DNS server: 8.8.4.4
For Open DNS:
Preferred DNS server: 2001:4860:4860::8888
Alternate DNS server: 2001:4860:4860::8844
When you’re finished, click OK to save your modifications.
Conclusion
In general, the DNS_PROBE_FINISHED_NXDOMAIN error is nothing to be overly concerned about and can be resolved with one of the methods provided in this article. In addition to the methods presented in this article, properly checking the domain name or domain registration, restarting the router, rebooting the internet connection, temporarily turning off your CDN, checking the network connection, and restarting the DNS Client Service are common and effective methods that play a role in resolving the DNS_PROBE_FINISHED_NXDOMAIN error. If the problem persists after trying all the methods, it is advisable to contact your internet service provider or network administrator for assistance.
If you have tried any other effective method to resolve the DNS_PROBE_FINISHED_NXDOMAIN error, please suggest it in the comments section.
Related Article : What is Debian OS